Chapter 2. Securing Your Network
2.1. Workstation Security
Securing a Linux environment begins with the workstation. Whether
locking down a personal machine or securing an enterprise system, sound
security policy begins with the individual computer. A computer network
is only as secure as its weakest node.
2.1.1. Evaluating Workstation Security
When evaluating the security of a Red Hat Enterprise Linux workstation, consider the following:
- BIOS and Boot Loader Security — Can an unauthorized user physically access the machine and boot into single user or rescue mode without a password?
- Password Security — How secure are the user account passwords on the machine?
- Administrative Controls — Who has an account on the system and how much administrative control do they have?
- Available Network Services — What services are listening for requests from the network and should they be running at all?
- Personal Firewalls — What type of firewall, if any, is necessary?
- Security Enhanced Communication Tools — Which tools should be used to communicate between workstations and which should be avoided?
2.1.2. BIOS and Boot Loader Security
Password protection for the BIOS (or BIOS equivalent) and the boot
loader can prevent unauthorized users who have physical access to
systems from booting using removable media or obtaining root privileges
through single user mode. The security measures you should take to
protect against such attacks depends both on the sensitivity of the
information on the workstation and the location of the machine.
For example, if a machine is used in a trade show and contains no
sensitive information, then it may not be critical to prevent such
attacks. However, if an employee's laptop with private, unencrypted SSH
keys for the corporate network is left unattended at that same trade
show, it could lead to a major security breach with ramifications for
the entire company.
If the workstation is located in a place where only authorized or
trusted people have access, however, then securing the BIOS or the boot
loader may not be necessary.
2.1.2.1. BIOS Passwords
The two primary reasons for password protecting the BIOS of a computer are[11]:
- Preventing Changes to BIOS Settings — If an intruder has access to the BIOS, they can set it to boot from a diskette or CD-ROM. This makes it possible for them to enter rescue mode or single user mode, which in turn allows them to start arbitrary processes on the system or copy sensitive data.
- Preventing System Booting — Some BIOSes allow password protection of the boot process. When activated, an attacker is forced to enter a password before the BIOS launches the boot loader.
Because the methods for setting a BIOS password vary between
computer manufacturers, consult the computer's manual for specific
instructions.
If you forget the BIOS password, it can either be reset with jumpers
on the motherboard or by disconnecting the CMOS battery. For this
reason, it is good practice to lock the computer case if possible.
However, consult the manual for the computer or motherboard before
attempting to disconnect the CMOS battery.
2.1.2.1.1. Securing Non-x86 Platforms
Other architectures use different programs to perform low-level
tasks roughly equivalent to those of the BIOS on x86 systems. For
instance, Intel® Itanium™ computers use the Extensible Firmware Interface (EFI) shell.
For instructions on password protecting BIOS-like programs on other
architectures, refer to the manufacturer's instructions.
2.1.2.2. Boot Loader Passwords
The primary reasons for password protecting a Linux boot loader are as follows:
- Preventing Access to Single User Mode — If attackers can boot the system into single user mode, they are logged in automatically as root without being prompted for the root password.
- Preventing Access to the GRUB Console — If the machine uses GRUB as its boot loader, an attacker can use the GRUB editor interface to change its configuration or to gather information using the
catcommand. - Preventing Access to Insecure Operating Systems — If it is a dual-boot system, an attacker can select an operating system at boot time (for example, DOS), which ignores access controls and file permissions.
Red Hat Enterprise Linux 6 ships with the GRUB boot loader on the
x86 platform. For a detailed look at GRUB, refer to the Red Hat
Installation Guide.
2.1.2.2.1. Password Protecting GRUB
You can configure GRUB to address the first two issues listed in Section 2.1.2.2, “Boot Loader Passwords”
by adding a password directive to its configuration file. To do this,
first choose a strong password, open a shell, log in as root, and then
type the following command:
/sbin/grub-md5-crypt
When prompted, type the GRUB password and press Enter. This returns an MD5 hash of the password.
Next, edit the GRUB configuration file
/boot/grub/grub.conf. Open the file and below the timeout line in the main section of the document, add the following line:
password --md5 <password-hash>
The next time the system boots, the GRUB menu prevents access to the editor or command interface without first pressing p followed by the GRUB password.
Unfortunately, this solution does not prevent an attacker from
booting into an insecure operating system in a dual-boot environment.
For this, a different part of the
/boot/grub/grub.conf file must be edited.
Look for the
title line of the operating system that you want to secure, and add a line with the lock directive immediately beneath it.
For a DOS system, the stanza should begin similar to the following:
title DOS lockWarning
A
password line must be present in the main section of the /boot/grub/grub.conf file for this method to work properly. Otherwise, an attacker can access the GRUB editor interface and remove the lock line.
To create a different password for a particular kernel or operating system, add a
lock line to the stanza, followed by a password line.
Each stanza protected with a unique password should begin with lines similar to the following example:
title DOS lock password --md5 <password-hash>2.1.3. Password Security
Passwords are the primary method that Red Hat Enterprise Linux uses
to verify a user's identity. This is why password security is so
important for protection of the user, the workstation, and the network.
For security purposes, the installation program configures the system to use Secure Hash Algorithm 512 (SHA512) and shadow passwords. It is highly recommended that you do not alter these settings.
If shadow passwords are deselected during installation, all passwords are stored as a one-way hash in the world-readable
/etc/passwd
file, which makes the system vulnerable to offline password cracking
attacks. If an intruder can gain access to the machine as a regular
user, he can copy the /etc/passwd file to
his own machine and run any number of password cracking programs against
it. If there is an insecure password in the file, it is only a matter
of time before the password cracker discovers it.
Shadow passwords eliminate this type of attack by storing the password hashes in the file
/etc/shadow, which is readable only by the root user.
This forces a potential attacker to attempt password cracking
remotely by logging into a network service on the machine, such as SSH
or FTP. This sort of brute-force attack is much slower and leaves an
obvious trail as hundreds of failed login attempts are written to system
files. Of course, if the cracker starts an attack in the middle of the
night on a system with weak passwords, the cracker may have gained
access before dawn and edited the log files to cover his tracks.
In addition to format and storage considerations is the issue of
content. The single most important thing a user can do to protect his
account against a password cracking attack is create a strong password.
2.1.3.1. Creating Strong Passwords
When creating a secure password, it is a good idea to follow these guidelines:
- Do Not Use Only Words or Numbers — Never use only numbers or words in a password.Some insecure examples include the following:
- 8675309
- juan
- hackme
- Do Not Use Recognizable Words — Words such as proper names, dictionary words, or even terms from television shows or novels should be avoided, even if they are bookended with numbers.Some insecure examples include the following:
- john1
- DS-9
- mentat123
- Do Not Use Words in Foreign Languages — Password cracking programs often check against word lists that encompass dictionaries of many languages. Relying on foreign languages for secure passwords is not secure.Some insecure examples include the following:
- cheguevara
- bienvenido1
- 1dumbKopf
- Do Not Use Hacker Terminology — If you think you are elite because you use hacker terminology — also called l337 (LEET) speak — in your password, think again. Many word lists include LEET speak.Some insecure examples include the following:
- H4X0R
- 1337
- Do Not Use Personal Information — Avoid using any personal information in your passwords. If the attacker knows your identity, the task of deducing your password becomes easier. The following is a list of the types of information to avoid when creating a password:Some insecure examples include the following:
- Your name
- The names of pets
- The names of family members
- Any birth dates
- Your phone number or zip code
- Do Not Invert Recognizable Words — Good password checkers always reverse common words, so inverting a bad password does not make it any more secure.Some insecure examples include the following:
- R0X4H
- nauj
- 9-DS
- Do Not Write Down Your Password — Never store a password on paper. It is much safer to memorize it.
- Do Not Use the Same Password For All Machines — It is important to make separate passwords for each machine. This way if one system is compromised, all of your machines are not immediately at risk.
The following guidelines will help you to create a strong password:
- Make the Password at Least Eight Characters Long — The longer the password, the better. If using MD5 passwords, it should be 15 characters or longer. With DES passwords, use the maximum length (eight characters).
- Mix Upper and Lower Case Letters — Red Hat Enterprise Linux is case sensitive, so mix cases to enhance the strength of the password.
- Mix Letters and Numbers — Adding numbers to passwords, especially when added to the middle (not just at the beginning or the end), can enhance password strength.
- Include Non-Alphanumeric Characters — Special characters such as &, $, and > can greatly improve the strength of a password (this is not possible if using DES passwords).
- Pick a Password You Can Remember — The best password in the world does little good if you cannot remember it; use acronyms or other mnemonic devices to aid in memorizing passwords.
With all these rules, it may seem difficult to create a password
that meets all of the criteria for good passwords while avoiding the
traits of a bad one. Fortunately, there are some steps you can take to
generate an easily-remembered, secure password.
2.1.3.1.1. Secure Password Creation Methodology
There are many methods that people use to create secure passwords.
One of the more popular methods involves acronyms. For example:
- Think of an easily-remembered phrase, such as:"over the river and through the woods, to grandmother's house we go."
- Next, turn it into an acronym (including the punctuation).
otrattw,tghwg. - Add complexity by substituting numbers and symbols for letters in the acronym. For example, substitute
7fortand the at symbol (@) fora:o7r@77w,7ghwg. - Add more complexity by capitalizing at least one letter, such as
H.o7r@77w,7gHwg. - Finally, do not use the example password above for any systems, ever.
While creating secure passwords is imperative, managing them
properly is also important, especially for system administrators within
larger organizations. The following section details good practices for
creating and managing user passwords within an organization.
2.1.3.2. Creating User Passwords Within an Organization
If an organization has a large number of users, the system
administrators have two basic options available to force the use of good
passwords. They can create passwords for the user, or they can let
users create their own passwords, while verifying the passwords are of
acceptable quality.
Creating the passwords for the users ensures that the passwords are
good, but it becomes a daunting task as the organization grows. It also
increases the risk of users writing their passwords down.
For these reasons, most system administrators prefer to have the
users create their own passwords, but actively verify that the passwords
are good and, in some cases, force users to change their passwords
periodically through password aging.
2.1.3.2.1. Forcing Strong Passwords
To protect the network from intrusion it is a good idea for system
administrators to verify that the passwords used within an organization
are strong ones. When users are asked to create or change passwords,
they can use the command line application
passwd, which is Pluggable Authentication Modules (PAM) aware and therefore checks to see if the password is too short or otherwise easy to crack. This check is performed using the pam_cracklib.so PAM module. Since PAM is customizable, it is possible to add more password integrity checkers, such as pam_passwdqc (available from http://www.openwall.com/passwdqc/) or to write a new module. For a list of available PAM modules, refer to http://www.kernel.org/pub/linux/libs/pam/modules.html. For more information about PAM, refer to Managing Single Sign-On and Smart Cards.
The password check that is performed at the time of their creation
does not discover bad passwords as effectively as running a password
cracking program against the passwords.
Many password cracking programs are available that run under Red
Hat Enterprise Linux, although none ship with the operating system.
Below is a brief list of some of the more popular password cracking
programs:
- John The Ripper — A fast and flexible password cracking program. It allows the use of multiple word lists and is capable of brute-force password cracking. It is available online at http://www.openwall.com/john/.
- Crack — Perhaps the most well known password cracking software, Crack is also very fast, though not as easy to use as John The Ripper. It can be found online at http://www.crypticide.com/alecm/security/crack/c50-faq.html.
- Slurpie — Slurpie is similar to John The Ripper and Crack, but it is designed to run on multiple computers simultaneously, creating a distributed password cracking attack. It can be found along with a number of other distributed attack security evaluation tools online at http://www.ussrback.com/distributed.htm.
Warning
Always get authorization in writing before attempting to crack passwords within an organization.
2.1.3.2.2. Passphrases
Passphrases and passwords are the cornerstone to security in most
of today's systems. Unfortunately, techniques such as biometrics and
two-factor authentication have not yet become mainstream in many
systems. If passwords are going to be used to secure a system, then the
use of passphrases should be considered. Passphrases are longer than
passwords and provide better protection than a password even when
implemented with non-standard characters such as numbers and symbols.
2.1.3.2.3. Password Aging
Password aging is another technique used by system administrators
to defend against bad passwords within an organization. Password aging
means that after a specified period (usually 90 days), the user is
prompted to create a new password. The theory behind this is that if a
user is forced to change his password periodically, a cracked password
is only useful to an intruder for a limited amount of time. The downside
to password aging, however, is that users are more likely to write
their passwords down.
There are two primary programs used to specify password aging under Red Hat Enterprise Linux: the
chage command or the graphical User Manager (system-config-users) application.
The
-M option of the chage
command specifies the maximum number of days the password is valid. For
example, to set a user's password to expire in 90 days, use the
following command:
chage -M 90 <username>
In the above command, replace
<username> with the name of the user. To disable password expiration, it is traditional to use a value of 99999 after the -M option (this equates to a little over 273 years).
You can also use the
chage command in
interactive mode to modify multiple password aging and account details.
Use the following command to enter interactive mode:
chage <username>
The following is a sample interactive session using this command:
[root@myServer ~]# chage davido
Changing the aging information for davido
Enter the new value, or press ENTER for the default
Minimum Password Age [0]: 10
Maximum Password Age [99999]: 90
Last Password Change (YYYY-MM-DD) [2006-08-18]:
Password Expiration Warning [7]:
Password Inactive [-1]:
Account Expiration Date (YYYY-MM-DD) [1969-12-31]:
[root@myServer ~]#
Refer to the man page for chage for more information on the available options.
You can also use the graphical User Manager application to create password aging policies, as follows. Note: you need Administrator privileges to perform this procedure.
- Click the menu on the Panel, point to and then click to display the User Manager. Alternatively, type the command
system-config-usersat a shell prompt. - Click the Users tab, and select the required user in the list of users.
- Click on the toolbar to display the User Properties dialog box (or choose on the menu).
- Click the Password Info tab, and select the check box for Enable password expiration.
- Enter the required value in the Days before change required field, and click .
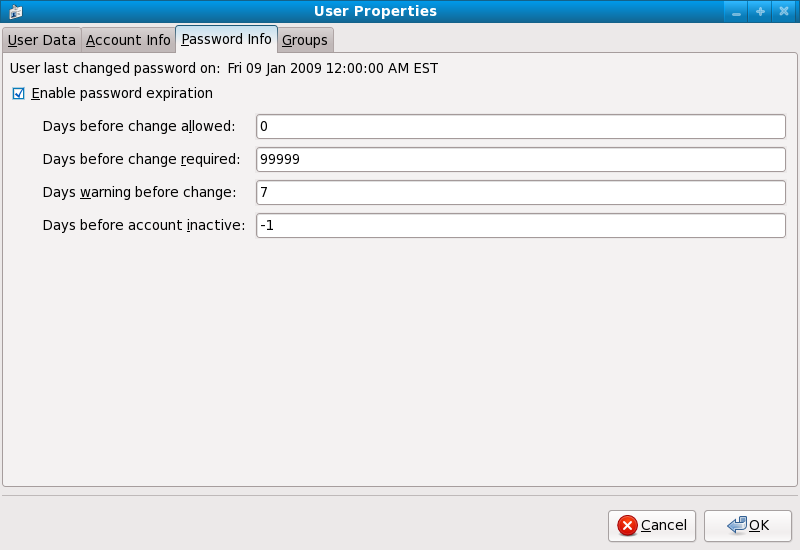
Password Info pane illustration.
Figure 2.1. Specifying password aging options
2.1.4. Administrative Controls
When administering a home machine, the user must perform some tasks
as the root user or by acquiring effective root privileges via a setuid program, such as
sudo or su. A setuid program is one that operates with the user ID (UID) of the program's owner rather than the user operating the program. Such programs are denoted by an s in the owner section of a long format listing, as in the following example:
-rwsr-xr-x 1 root root 47324 May 1 08:09 /bin/suNote
The
s may be upper case or lower case. If it appears as upper case, it means that the underlying permission bit has not been set.
For the system administrators of an organization, however, choices
must be made as to how much administrative access users within the
organization should have to their machine. Through a PAM module called
pam_console.so,
some activities normally reserved only for the root user, such as
rebooting and mounting removable media are allowed for the first user
that logs in at the physical console (refer to Managing Single Sign-On and Smart Cards for more information about the pam_console.so
module.) However, other important system administration tasks, such as
altering network settings, configuring a new mouse, or mounting network
devices, are not possible without administrative privileges. As a
result, system administrators must decide how much access the users on
their network should receive.
2.1.4.1. Allowing Root Access
If the users within an organization are trusted and
computer-literate, then allowing them root access may not be an issue.
Allowing root access by users means that minor activities, like adding
devices or configuring network interfaces, can be handled by the
individual users, leaving system administrators free to deal with
network security and other important issues.
On the other hand, giving root access to individual users can lead to the following issues:
- Machine Misconfiguration — Users with root access can misconfigure their machines and require assistance to resolve issues. Even worse, they might open up security holes without knowing it.
- Running Insecure Services — Users with root access might run insecure servers on their machine, such as FTP or Telnet, potentially putting usernames and passwords at risk. These services transmit this information over the network in plain text.
- Running Email Attachments As Root — Although rare, email viruses that affect Linux do exist. The only time they are a threat, however, is when they are run by the root user.
2.1.4.2. Disallowing Root Access
If an administrator is uncomfortable allowing users to log in as
root for these or other reasons, the root password should be kept
secret, and access to runlevel one or single user mode should be
disallowed through boot loader password protection (refer to Section 2.1.2.2, “Boot Loader Passwords” for more information on this topic.)
Table 2.1, “Methods of Disabling the Root Account” describes ways that an administrator can further ensure that root logins are disallowed:
Table 2.1. Methods of Disabling the Root Account
| Method | Description | Effects | Does Not Affect | |||||||||||||||
|---|---|---|---|---|---|---|---|---|---|---|---|---|---|---|---|---|---|---|
| Changing the root shell. |
Edit the /etc/passwd file and change the shell from /bin/bash to /sbin/nologin.
|
|
| |||||||||||||||
| Disabling root access via any console device (tty). |
An empty /etc/securetty file prevents root login on any devices attached to the computer.
|
|
| |||||||||||||||
| Disabling root SSH logins. |
Edit the /etc/ssh/sshd_config file and set the PermitRootLogin parameter to no.
|
|
| |||||||||||||||
| Use PAM to limit root access to services. |
Edit the file for the target service in the /etc/pam.d/ directory. Make sure the pam_listfile.so is required for authentication.[a]
|
|
| |||||||||||||||
[a] Refer to Section 2.1.4.2.4, “Disabling Root Using PAM” for details. | ||||||||||||||||||
2.1.4.2.1. Disabling the Root Shell
To prevent users from logging in directly as root, the system administrator can set the root account's shell to
/sbin/nologin in the /etc/passwd file. This prevents access to the root account through commands that require a shell, such as the su and the ssh commands.
Important
Programs that do not require access to the shell, such as email clients or the
sudo command, can still access the root account.
2.1.4.2.2. Disabling Root Logins
To further limit access to the root account, administrators can disable root logins at the console by editing the
/etc/securetty
file. This file lists all devices the root user is allowed to log into.
If the file does not exist at all, the root user can log in through any
communication device on the system, whether via the console or a raw
network interface. This is dangerous, because a user can log in to his
machine as root via Telnet, which transmits the password in plain text
over the network. By default, Red Hat Enterprise Linux's /etc/securetty
file only allows the root user to log in at the console physically
attached to the machine. To prevent root from logging in, remove the
contents of this file by typing the following command:
echo > /etc/securettyWarning
A blank
/etc/securetty file does not
prevent the root user from logging in remotely using the OpenSSH suite
of tools because the console is not opened until after authentication.
2.1.4.2.3. Disabling Root SSH Logins
Root logins via the SSH protocol are disabled by default in Red Hat
Enterprise Linux 6; however, if this option has been enabled, it can be
disabled again by editing the SSH daemon's configuration file (
/etc/ssh/sshd_config). Change the line that reads:
PermitRootLogin yes
to read as follows:
PermitRootLogin no
For these changes to take effect, the SSH daemon must be restarted. This can be done via the following command:
kill -HUP `cat /var/run/sshd.pid`2.1.4.2.4. Disabling Root Using PAM
PAM, through the
/lib/security/pam_listfile.so
module, allows great flexibility in denying specific accounts. The
administrator can use this module to reference a list of users who are
not allowed to log in. Below is an example of how the module is used for
the vsftpd FTP server in the /etc/pam.d/vsftpd PAM configuration file (the \ character at the end of the first line in the following example is not necessary if the directive is on one line):
auth required /lib/security/pam_listfile.so item=user \
sense=deny file=/etc/vsftpd.ftpusers onerr=succeed
This instructs PAM to consult the
/etc/vsftpd.ftpusers
file and deny access to the service for any listed user. The
administrator can change the name of this file, and can keep separate
lists for each service or use one central list to deny access to
multiple services.
If the administrator wants to deny access to multiple services, a
similar line can be added to the PAM configuration files, such as
/etc/pam.d/pop and /etc/pam.d/imap for mail clients, or /etc/pam.d/ssh for SSH clients.
For more information about PAM, refer to Managing Single Sign-On and Smart Cards.
2.1.4.3. Limiting Root Access
Rather than completely denying access to the root user, the
administrator may want to allow access only via setuid programs, such as
su or sudo.
2.1.4.3.1. The su Command
When a user executes the
su command, they are prompted for the root password and, after authentication, is given a root shell prompt.
Once logged in via the
su command, the user is the root user and has absolute administrative access to the system[13]. In addition, once a user has become root, it is possible for them to use the su command to change to any other user on the system without being prompted for a password.
Because this program is so powerful, administrators within an organization may wish to limit who has access to the command.
One of the simplest ways to do this is to add users to the special administrative group called wheel. To do this, type the following command as root:
usermod -G wheel <username>
In the previous command, replace
<username> with the username you want to add to the wheel group.
You can also use the User Manager to modify group memberships, as follows. Note: you need Administrator privileges to perform this procedure.
- Click the menu on the Panel, point to and then click to display the User Manager. Alternatively, type the command
system-config-usersat a shell prompt. - Click the Users tab, and select the required user in the list of users.
- Click on the toolbar to display the User Properties dialog box (or choose on the menu).
- Click the Groups tab, select the check box for the wheel group, and then click . Refer to Figure 2.2, “Adding users to the "wheel" group.”.
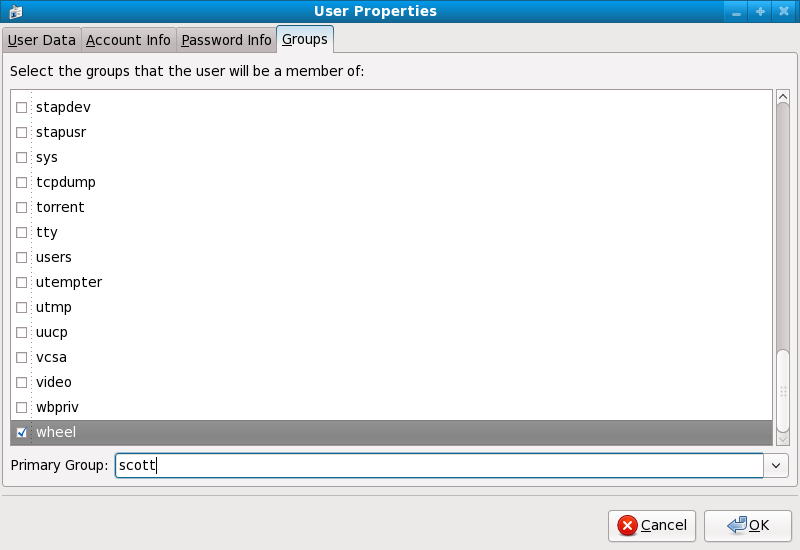
Groups pane illustration
Figure 2.2. Adding users to the "wheel" group.
Open the PAM configuration file for
su (/etc/pam.d/su) in a text editor and remove the comment # from the following line:
auth required /lib/security/$ISA/pam_wheel.so use_uid
This change means that only members of the administrative group
wheel can use this program.
Note
The root user is part of the
wheel group by default.
2.1.4.3.2. The sudo Command
The
sudo command offers another
approach to giving users administrative access. When trusted users
precede an administrative command with sudo, they are prompted for their own
password. Then, when they have been authenticated and assuming that the
command is permitted, the administrative command is executed as if they
were the root user.
The basic format of the
sudo command is as follows:
sudo <command>
In the above example,
<command> would be replaced by a command normally reserved for the root user, such as mount.
Important
Users of the
sudo command should take
extra care to log out before walking away from their machines since
sudoers can use the command again without being asked for a password
within a five minute period. This setting can be altered via the
configuration file, /etc/sudoers.
The
sudo command allows for a high degree of flexibility. For instance, only users listed in the /etc/sudoers configuration file are allowed to use the sudo command and the command is executed in the user's shell, not a root shell. This means the root shell can be completely disabled, as shown in Section 2.1.4.2.1, “Disabling the Root Shell”.
The
sudo command also provides a comprehensive audit trail. Each successful authentication is logged to the file /var/log/messages and the command issued along with the issuer's user name is logged to the file /var/log/secure.
Another advantage of the
sudo command is that an administrator can allow different users access to specific commands based on their needs.
Administrators wanting to edit the
sudo configuration file, /etc/sudoers, should use the visudo command.
To give someone full administrative privileges, type
visudo and add a line similar to the following in the user privilege specification section:
juan ALL=(ALL) ALL
This example states that the user,
juan, can use sudo from any host and execute any command.
The example below illustrates the granularity possible when configuring
sudo:
%users localhost=/sbin/shutdown -h now
This example states that any user can issue the command
/sbin/shutdown -h now as long as it is issued from the console.
The man page for
sudoers has a detailed listing of options for this file.
2.1.5. Available Network Services
While user access to administrative controls is an important issue
for system administrators within an organization, monitoring which
network services are active is of paramount importance to anyone who
administers and operates a Linux system.
Many services under Red Hat Enterprise Linux 6 behave as network
servers. If a network service is running on a machine, then a server
application (called a daemon), is listening
for connections on one or more network ports. Each of these servers
should be treated as a potential avenue of attack.
2.1.5.1. Risks To Services
Network services can pose many risks for Linux systems. Below is a list of some of the primary issues:
- Denial of Service Attacks (DoS) — By flooding a service with requests, a denial of service attack can render a system unusable as it tries to log and answer each request.
- Distributed Denial of Service Attack (DDoS) — A type of DoS attack which uses multiple compromised machines (often numbering in the thousands or more) to direct a co-ordinated attack on a service, flooding it with requests and making it unusable.
- Script Vulnerability Attacks — If a server is using scripts to execute server-side actions, as Web servers commonly do, a cracker can attack improperly written scripts. These script vulnerability attacks can lead to a buffer overflow condition or allow the attacker to alter files on the system.
- Buffer Overflow Attacks — Services that connect to ports numbered 0 through 1023 must run as an administrative user. If the application has an exploitable buffer overflow, an attacker could gain access to the system as the user running the daemon. Because exploitable buffer overflows exist, crackers use automated tools to identify systems with vulnerabilities, and once they have gained access, they use automated rootkits to maintain their access to the system.
Note
The threat of buffer overflow vulnerabilities is mitigated in Red Hat Enterprise Linux by ExecShield,
an executable memory segmentation and protection technology supported
by x86-compatible uni- and multi-processor kernels. ExecShield reduces
the risk of buffer overflow by separating virtual memory into executable
and non-executable segments. Any program code that tries to execute
outside of the executable segment (such as malicious code injected from a
buffer overflow exploit) triggers a segmentation fault and terminates.
Execshield also includes support for No eXecute (NX) technology on AMD64 platforms and eXecute Disable (XD) technology on Itanium and Intel®
64 systems. These technologies work in conjunction with ExecShield to
prevent malicious code from running in the executable portion of virtual
memory with a granularity of 4KB of executable code, lowering the risk
of attack from stealthy buffer overflow exploits.
Important
To limit exposure to attacks over the network, all services that are unused should be turned off.
2.1.5.2. Identifying and Configuring Services
To enhance security, most network services installed with Red Hat
Enterprise Linux are turned off by default. There are, however, some
notable exceptions:
cupsd— The default print server for Red Hat Enterprise Linux.lpd— An alternative print server.xinetd— A super server that controls connections to a range of subordinate servers, such asgssftpandtelnet.sendmail— The Sendmail Mail Transport Agent (MTA) is enabled by default, but only listens for connections from the localhost.sshd— The OpenSSH server, which is a secure replacement for Telnet.
When determining whether to leave these services running, it is best
to use common sense and err on the side of caution. For example, if a
printer is not available, do not leave
cupsd running. The same is true for portmap. If you do not mount NFSv3 volumes or use NIS (the ypbind service), then portmap should be disabled.

Services Configuration Tool illustration
Figure 2.3. Services Configuration Tool
If unsure of the purpose for a particular service, the Services Configuration Tool has a description field, illustrated in Figure 2.3, “Services Configuration Tool”, that provides additional information.
Checking which network services are available to start at boot time
is only part of the story. You should also check which ports are open
and listening. Refer to Section 2.2.8, “Verifying Which Ports Are Listening” for more information.
2.1.5.3. Insecure Services
Potentially, any network service is insecure. This is why turning
off unused services is so important. Exploits for services are routinely
revealed and patched, making it very important to regularly update
packages associated with any network service. Refer to Section 1.5, “Security Updates” for more information.
Some network protocols are inherently more insecure than others. These include any services that:
- Transmit Usernames and Passwords Over a Network Unencrypted — Many older protocols, such as Telnet and FTP, do not encrypt the authentication session and should be avoided whenever possible.
- Transmit Sensitive Data Over a Network Unencrypted — Many protocols transmit data over the network unencrypted. These protocols include Telnet, FTP, HTTP, and SMTP. Many network file systems, such as NFS and SMB, also transmit information over the network unencrypted. It is the user's responsibility when using these protocols to limit what type of data is transmitted.Remote memory dump services, like
netdump, transmit the contents of memory over the network unencrypted. Memory dumps can contain passwords or, even worse, database entries and other sensitive information.Other services likefingerandrwhodreveal information about users of the system.
Examples of inherently insecure services include
rlogin, rsh, telnet, and vsftpd.
All remote login and shell programs (
rlogin, rsh, and telnet) should be avoided in favor of SSH. Refer to Section 2.1.7, “Security Enhanced Communication Tools” for more information about sshd.
FTP is not as inherently dangerous to the security of the system as
remote shells, but FTP servers must be carefully configured and
monitored to avoid problems. Refer to Section 2.2.6, “Securing FTP” for more information about securing FTP servers.
Services that should be carefully implemented and behind a firewall include:
fingerauthd(this was calledidentdin previous Red Hat Enterprise Linux releases.)netdumpnetdump-servernfsrwhodsendmailsmb(Samba)yppasswddypservypxfrd
More information on securing network services is available in Section 2.2, “Server Security”.
The next section discusses tools available to set up a simple firewall.
2.1.6. Personal Firewalls
After the necessary network services are configured, it is important to implement a firewall.
Important
You should configure the necessary services and implement a firewall before connecting to the Internet or any other network that you do not trust.
Firewalls prevent network packets from accessing the system's network
interface. If a request is made to a port that is blocked by a
firewall, the request is ignored. If a service is listening on one of
these blocked ports, it does not receive the packets and is effectively
disabled. For this reason, care should be taken when configuring a
firewall to block access to ports not in use, while not blocking access
to ports used by configured services.
For most users, the best tool for configuring a simple firewall is
the graphical firewall configuration tool which ships with Red Hat
Enterprise Linux: the Firewall Configuration Tool (
system-config-firewall). This tool creates broad iptables rules for a general-purpose firewall using a control panel interface.
Refer to Section 2.5.2, “Basic Firewall Configuration” for more information about using this application and its available options.
For advanced users and server administrators, manually configuring a firewall with
iptables is probably a better option. Refer to Section 2.5, “Firewalls” for more information. Refer to Section 2.6, “IPTables” for a comprehensive guide to the iptables command.
2.1.7. Security Enhanced Communication Tools
As the size and popularity of the Internet has grown, so has the
threat of communication interception. Over the years, tools have been
developed to encrypt communications as they are transferred over the
network.
Red Hat Enterprise Linux 6 ships with two basic tools that use
high-level, public-key-cryptography-based encryption algorithms to
protect information as it travels over the network.
- OpenSSH — A free implementation of the SSH protocol for encrypting network communication.
- Gnu Privacy Guard (GPG) — A free implementation of the PGP (Pretty Good Privacy) encryption application for encrypting data.
OpenSSH is a safer way to access a remote machine and replaces older, unencrypted services like
telnet and rsh. OpenSSH includes a network service called sshd and three command line client applications:
ssh— A secure remote console access client.scp— A secure remote copy command.sftp— A secure pseudo-ftp client that allows interactive file transfer sessions.
Refer to Section 3.6, “Secure Shell” for more information regarding OpenSSH.
Important
Although the
sshd service is inherently secure, the service must be kept up-to-date to prevent security threats. Refer to Section 1.5, “Security Updates” for more information.
GPG is one way to ensure private email communication. It can be used
both to email sensitive data over public networks and to protect
sensitive data on hard drives.
2.2. Server Security
When a system is used as a server on a public network, it becomes a
target for attacks. Hardening the system and locking down services is
therefore of paramount importance for the system administrator.
Before delving into specific issues, review the following general tips for enhancing server security:
- Keep all services current, to protect against the latest threats.
- Use secure protocols whenever possible.
- Serve only one type of network service per machine whenever possible.
- Monitor all servers carefully for suspicious activity.
2.2.1. Securing Services With TCP Wrappers and xinetd
TCP Wrappers provide access control to a
variety of services. Most modern network services, such as SSH, Telnet,
and FTP, make use of TCP Wrappers, which stand guard between an incoming
request and the requested service.
The benefits offered by TCP Wrappers are enhanced when used in conjunction with
xinetd, a super server that provides additional access, logging, binding, redirection, and resource utilization control.
Note
It is a good idea to use iptables firewall rules in conjunction with TCP Wrappers and
xinetd to create redundancy within service access controls. Refer to Section 2.5, “Firewalls” for more information about implementing firewalls with iptables commands.
The following subsections assume a basic knowledge of each topic and focus on specific security options.
2.2.1.1. Enhancing Security With TCP Wrappers
TCP Wrappers are capable of much more than denying access to
services. This section illustrates how they can be used to send
connection banners, warn of attacks from particular hosts, and enhance
logging functionality. Refer to the
hosts_options man page for information about the TCP Wrapper functionality and control language. Refer to the xinetd.conf man page available online at http://linux.die.net/man/5/xinetd.conf for available flags, which act as options you can apply to a service.
2.2.1.1.1. TCP Wrappers and Connection Banners
Displaying a suitable banner when users connect to a service is a
good way to let potential attackers know that the system administrator
is being vigilant. You can also control what information about the
system is presented to users. To implement a TCP Wrappers banner for a
service, use the
banner option.
This example implements a banner for
vsftpd.
To begin, create a banner file. It can be anywhere on the system, but
it must have same name as the daemon. For this example, the file is
called /etc/banners/vsftpd and contains the following line:
220-Hello, %c
220-All activity on ftp.example.com is logged.
220-Inappropriate use will result in your access privileges being removed.
The
%c token supplies a variety of
client information, such as the username and hostname, or the username
and IP address to make the connection even more intimidating.
For this banner to be displayed to incoming connections, add the following line to the
/etc/hosts.allow file:
vsftpd : ALL : banners /etc/banners/ 2.2.1.1.2. TCP Wrappers and Attack Warnings
If a particular host or network has been detected attacking the
server, TCP Wrappers can be used to warn the administrator of subsequent
attacks from that host or network using the
spawn directive.
In this example, assume that a cracker from the 206.182.68.0/24
network has been detected attempting to attack the server. Place the
following line in the
/etc/hosts.deny file to deny any connection attempts from that network, and to log the attempts to a special file:
ALL : 206.182.68.0 : spawn /bin/echo `date` %c %d >> /var/log/intruder_alert
The
%d token supplies the name of the service that the attacker was trying to access.
To allow the connection and log it, place the
spawn directive in the /etc/hosts.allow file.
Note
Because the
spawn directive executes
any shell command, it is a good idea to create a special script to
notify the administrator or execute a chain of commands in the event
that a particular client attempts to connect to the server.
2.2.1.1.3. TCP Wrappers and Enhanced Logging
If certain types of connections are of more concern than others, the log level can be elevated for that service using the
severity option.
For this example, assume that anyone attempting to connect to port
23 (the Telnet port) on an FTP server is a cracker. To denote this,
place an
emerg flag in the log files instead of the default flag, info, and deny the connection.
To do this, place the following line in
/etc/hosts.deny:
in.telnetd : ALL : severity emerg
This uses the default
authpriv logging facility, but elevates the priority from the default value of info to emerg, which posts log messages directly to the console.
2.2.1.2. Enhancing Security With xinetd
This section focuses on using
xinetd to set a trap service and using it to control resource levels available to any given xinetd service. Setting resource limits for services can help thwart Denial of Service (DoS) attacks. Refer to the man pages for xinetd and xinetd.conf for a list of available options.
2.2.1.2.1. Setting a Trap
One important feature of
xinetd is its ability to add hosts to a global no_access list. Hosts on this list are denied subsequent connections to services managed by xinetd for a specified period or until xinetd is restarted. You can do this using the SENSOR attribute. This is an easy way to block hosts attempting to scan the ports on the server.
The first step in setting up a
SENSOR is to choose a service you do not plan on using. For this example, Telnet is used.
Edit the file
/etc/xinetd.d/telnet and change the flags line to read:
flags = SENSOR
Add the following line:
deny_time = 30
This denies any further connection attempts to that port by that host for 30 minutes. Other acceptable values for the
deny_time attribute are FOREVER, which keeps the ban in effect until xinetd is restarted, and NEVER, which allows the connection and logs it.
Finally, the last line should read:
disable = no
This enables the trap itself.
While using
SENSOR is a good way to detect and stop connections from undesirable hosts, it has two drawbacks:
- It does not work against stealth scans.
- An attacker who knows that a
SENSORis running can mount a Denial of Service attack against particular hosts by forging their IP addresses and connecting to the forbidden port.
2.2.1.2.2. Controlling Server Resources
Another important feature of
xinetd is its ability to set resource limits for services under its control.
It does this using the following directives:
cps = <number_of_connections> <wait_period>— Limits the rate of incoming connections. This directive takes two arguments:<number_of_connections>— The number of connections per second to handle. If the rate of incoming connections is higher than this, the service is temporarily disabled. The default value is fifty (50).<wait_period>— The number of seconds to wait before re-enabling the service after it has been disabled. The default interval is ten (10) seconds.
instances = <number_of_connections>— Specifies the total number of connections allowed to a service. This directive accepts either an integer value orUNLIMITED.per_source = <number_of_connections>— Specifies the number of connections allowed to a service by each host. This directive accepts either an integer value orUNLIMITED.rlimit_as = <number[K|M]>— Specifies the amount of memory address space the service can occupy in kilobytes or megabytes. This directive accepts either an integer value orUNLIMITED.rlimit_cpu = <number_of_seconds>— Specifies the amount of time in seconds that a service may occupy the CPU. This directive accepts either an integer value orUNLIMITED.
Using these directives can help prevent any single
xinetd service from overwhelming the system, resulting in a denial of service.
2.2.2. Securing Portmap
The
portmap service is a dynamic port
assignment daemon for RPC services such as NIS and NFS. It has weak
authentication mechanisms and has the ability to assign a wide range of
ports for the services it controls. For these reasons, it is difficult
to secure.
Note
Securing
portmap only affects NFSv2 and
NFSv3 implementations, since NFSv4 no longer requires it. If you plan
to implement an NFSv2 or NFSv3 server, then portmap is required, and the following section applies.
If running RPC services, follow these basic rules.
2.2.2.1. Protect portmap With TCP Wrappers
It is important to use TCP Wrappers to limit which networks or hosts have access to the
portmap service since it has no built-in form of authentication.
Further, use only IP
addresses when limiting access to the service. Avoid using hostnames, as
they can be forged by DNS poisoning and other methods.
2.2.2.2. Protect portmap With iptables
To further restrict access to the
portmap service, it is a good idea to add iptables rules to the server and restrict access to specific networks.
Below are two example iptables commands. The first allows TCP connections to the port 111 (used by the
portmap
service) from the 192.168.0.0/24 network. The second allows TCP
connections to the same port from the localhost. This is necessary for
the sgi_fam service used by Nautilus. All other packets are dropped.
iptables -A INPUT -p tcp ! -s 192.168.0.0/24 --dport 111 -j DROP
iptables -A INPUT -p tcp -s 127.0.0.1  --dport 111 -j ACCEPT
To similarly limit UDP traffic, use the following command.
iptables -A INPUT -p udp ! -s 192.168.0.0/24 --dport 111 -j DROP
Note
Refer to Section 2.5, “Firewalls” for more information about implementing firewalls with iptables commands.
2.2.3. Securing NIS
The Network Information Service (NIS) is an RPC service, called
ypserv, which is used in conjunction with portmap
and other related services to distribute maps of usernames, passwords,
and other sensitive information to any computer claiming to be within
its domain.
An NIS server is comprised of several applications. They include the following:
/usr/sbin/rpc.yppasswdd— Also called theyppasswddservice, this daemon allows users to change their NIS passwords./usr/sbin/rpc.ypxfrd— Also called theypxfrdservice, this daemon is responsible for NIS map transfers over the network./usr/sbin/yppush— This application propagates changed NIS databases to multiple NIS servers./usr/sbin/ypserv— This is the NIS server daemon.
NIS is somewhat insecure by today's standards. It has no host
authentication mechanisms and transmits all of its information over the
network unencrypted, including password hashes. As a result, extreme
care must be taken when setting up a network that uses NIS. This is
further complicated by the fact that the default configuration of NIS is
inherently insecure.
It is recommended that anyone planning to implement an NIS server first secure the
portmap service as outlined in Section 2.2.2, “Securing Portmap”, then address the following issues, such as network planning.
2.2.3.1. Carefully Plan the Network
Because NIS transmits sensitive information unencrypted over the
network, it is important the service be run behind a firewall and on a
segmented and secure network. Whenever NIS information is transmitted
over an insecure network, it risks being intercepted. Careful network
design can help prevent severe security breaches.
2.2.3.2. Use a Password-like NIS Domain Name and Hostname
Any machine within an NIS domain can use commands to extract
information from the server without authentication, as long as the user
knows the NIS server's DNS hostname and NIS domain name.
For instance, if someone either connects a laptop computer into the
network or breaks into the network from outside (and manages to spoof an
internal IP address), the following command reveals the
/etc/passwd map:
ypcat -d<NIS_domain>-h<DNS_hostname>passwd
If this attacker is a root user, they can obtain the
/etc/shadow file by typing the following command:
ypcat -d<NIS_domain>-h<DNS_hostname>shadow
Note
If Kerberos is used, the
/etc/shadow file is not stored within an NIS map.
To make access to NIS maps harder for an attacker, create a random string for the DNS hostname, such as
o7hfawtgmhwg.domain.com. Similarly, create a different randomized NIS domain name. This makes it much more difficult for an attacker to access the NIS server.
2.2.3.3. Edit the /var/yp/securenets File
If the
/var/yp/securenets file is
blank or does not exist (as is the case after a default installation),
NIS listens to all networks. One of the first things to do is to put
netmask/network pairs in the file so that ypserv only responds to requests from the appropriate network.
Below is a sample entry from a
/var/yp/securenets file:
255.255.255.0 192.168.0.0
Warning
Never start an NIS server for the first time without creating the
/var/yp/securenets file.
This technique does not provide protection from an IP spoofing
attack, but it does at least place limits on what networks the NIS
server services.
2.2.3.4. Assign Static Ports and Use iptables Rules
All of the servers related to NIS can be assigned specific ports except for
rpc.yppasswdd — the daemon that allows users to change their login passwords. Assigning ports to the other two NIS server daemons, rpc.ypxfrd and ypserv, allows for the creation of firewall rules to further protect the NIS server daemons from intruders.
To do this, add the following lines to
/etc/sysconfig/network:
YPSERV_ARGS="-p 834" YPXFRD_ARGS="-p 835"
The following iptables rules can then be used to enforce which network the server listens to for these ports:
iptables -A INPUT -p ALL ! -s 192.168.0.0/24  --dport 834 -j DROP
iptables -A INPUT -p ALL ! -s 192.168.0.0/24  --dport 835 -j DROP
This means that the server only allows connections to ports 834 and
835 if the requests come from the 192.168.0.0/24 network, regardless of
the protocol.
Note
Refer to Section 2.5, “Firewalls” for more information about implementing firewalls with iptables commands.
2.2.3.5. Use Kerberos Authentication
One of the issues to consider when NIS is used for authentication is
that whenever a user logs into a machine, a password hash from the
/etc/shadow
map is sent over the network. If an intruder gains access to an NIS
domain and sniffs network traffic, they can collect usernames and
password hashes. With enough time, a password cracking program can guess
weak passwords, and an attacker can gain access to a valid account on
the network.
Since Kerberos uses secret-key cryptography, no password hashes are
ever sent over the network, making the system far more secure. Refer to Managing Single Sign-On and Smart Cards for more information about Kerberos.
2.2.4. Securing NFS
Important
The version of NFS included in Red Hat Enterprise Linux 6, NFSv4, no longer requires the
portmap service as outlined in Section 2.2.2, “Securing Portmap”.
NFS traffic now utilizes TCP in all versions, rather than UDP, and
requires it when using NFSv4. NFSv4 now includes Kerberos user and group
authentication, as part of the RPCSEC_GSS kernel module. Information on portmap is still included, since Red Hat Enterprise Linux 6 supports NFSv2 and NFSv3, both of which utilize portmap.
2.2.4.1. Carefully Plan the Network
Now that NFSv4 has the ability to pass all information encrypted
using Kerberos over a network, it is important that the service be
configured correctly if it is behind a firewall or on a segmented
network. NFSv2 and NFSv3 still pass data insecurely, and this should be
taken into consideration. Careful network design in all of these regards
can help prevent security breaches.
2.2.4.2. Beware of Syntax Errors
The NFS server determines which file systems to export and which hosts to export these directories to by consulting the
/etc/exports file. Be careful not to add extraneous spaces when editing this file.
For instance, the following line in the
/etc/exports file shares the directory /tmp/nfs/ to the host bob.example.com with read/write permissions.
/tmp/nfs/ bob.example.com(rw)
The following line in the
/etc/exports file, on the other hand, shares the same directory to the host bob.example.com with read-only permissions and shares it to the world with read/write permissions due to a single space character after the hostname.
/tmp/nfs/ bob.example.com (rw)
It is good practice to check any configured NFS shares by using the
showmount command to verify what is being shared:
showmount -e <hostname>2.2.4.3. Do Not Use the no_root_squash Option
By default, NFS shares change the root user to the
nfsnobody user, an unprivileged user account. This changes the owner of all root-created files to nfsnobody, which prevents uploading of programs with the setuid bit set.
If
no_root_squash is used, remote root
users are able to change any file on the shared file system and leave
applications infected by trojans for other users to inadvertently
execute.
2.2.4.4. NFS Firewall Configuration
The ports used for NFS are assigned dynamically by rpcbind, which
can cause problems when creating firewall rules. To simplify this
process, use the /etc/sysconfig/nfs file to specify which ports are to be used:
MOUNTD_PORT— TCP and UDP port for mountd (rpc.mountd)STATD_PORT— TCP and UDP port for status (rpc.statd)LOCKD_TCPPORT— TCP port for nlockmgr (rpc.lockd)LOCKD_UDPPORT— UDP port nlockmgr (rpc.lockd)
Port numbers specified must not be used by any other service.
Configure your firewall to allow the port numbers specified, as well as
TCP and UDP port 2049 (NFS).
Run the
rpcinfo -p command on the NFS server to see which ports and RPC programs are being used.
2.2.5. Securing the Apache HTTP Server
The Apache HTTP Server is one of the most stable and secure services
that ships with Red Hat Enterprise Linux. A large number of options and
techniques are available to secure the Apache HTTP Server — too numerous
to delve into deeply here. The following section briefly explains good
practices when running the Apache HTTP Server.
Always verify that any scripts running on the system work as intended before
putting them into production. Also, ensure that only the root user has
write permissions to any directory containing scripts or CGIs. To do
this, run the following commands as the root user:
chown root
<directory_name>chmod 755
<directory_name>
System administrators should be careful when using the following configuration options (configured in
/etc/httpd/conf/httpd.conf):
FollowSymLinks- This directive is enabled by default, so be sure to use caution when creating symbolic links to the document root of the Web server. For instance, it is a bad idea to provide a symbolic link to
/. Indexes- This directive is enabled by default, but may not be desirable. To prevent visitors from browsing files on the server, remove this directive.
UserDir- The
UserDirdirective is disabled by default because it can confirm the presence of a user account on the system. To enable user directory browsing on the server, use the following directives:UserDir enabled UserDir disabled root
These directives activate user directory browsing for all user directories other than/root/. To add users to the list of disabled accounts, add a space-delimited list of users on theUserDir disabledline.
Important
Do not remove the
IncludesNoExec directive. By default, the Server-Side Includes (SSI)
module cannot execute commands. It is recommended that you do not
change this setting unless absolutely necessary, as it could,
potentially, enable an attacker to execute commands on the system.
2.2.6. Securing FTP
The File Transfer Protocol (FTP)
is an older TCP protocol designed to transfer files over a network.
Because all transactions with the server, including user authentication,
are unencrypted, it is considered an insecure protocol and should be
carefully configured.
Red Hat Enterprise Linux provides three FTP servers.
gssftpd— A Kerberos-awarexinetd-based FTP daemon that does not transmit authentication information over the network.- Red Hat Content Accelerator (
tux) — A kernel-space Web server with FTP capabilities. vsftpd— A standalone, security oriented implementation of the FTP service.
The following security guidelines are for setting up the
vsftpd FTP service.
2.2.6.1. FTP Greeting Banner
Before submitting a username and password, all users are presented
with a greeting banner. By default, this banner includes version
information useful to crackers trying to identify weaknesses in a
system.
To change the greeting banner for
vsftpd, add the following directive to the /etc/vsftpd/vsftpd.conf file:
ftpd_banner=<insert_greeting_here>
Replace
<insert_greeting_here> in the above directive with the text of the greeting message.
For mutli-line banners, it is best to use a banner file. To simplify
management of multiple banners, place all banners in a new directory
called
/etc/banners/. The banner file for FTP connections in this example is /etc/banners/ftp.msg. Below is an example of what such a file may look like:
######### # Hello, all activity on ftp.example.com is logged. #########
Note
It is not necessary to begin each line of the file with
220 as specified in Section 2.2.1.1.1, “TCP Wrappers and Connection Banners”.
To reference this greeting banner file for
vsftpd, add the following directive to the /etc/vsftpd/vsftpd.conf file:
banner_file=/etc/banners/ftp.msg
It also is possible to send additional banners to incoming connections using TCP Wrappers as described in Section 2.2.1.1.1, “TCP Wrappers and Connection Banners”.
2.2.6.2. Anonymous Access
The presence of the
/var/ftp/ directory activates the anonymous account.
The easiest way to create this directory is to install the
vsftpd
package. This package establishes a directory tree for anonymous users
and configures the permissions on directories to read-only for anonymous
users.
By default the anonymous user cannot write to any directories.
Warning
If enabling anonymous access to an FTP server, be aware of where sensitive data is stored.
2.2.6.2.1. Anonymous Upload
To allow anonymous users to upload files, it is recommended that a write-only directory be created within
/var/ftp/pub/.
To do this, type the following command:
mkdir /var/ftp/pub/upload
Next, change the permissions so that anonymous users cannot view the contents of the directory:
chmod 730 /var/ftp/pub/upload
A long format listing of the directory should look like this:
drwx-wx--- 2 root ftp 4096 Feb 13 20:05 upload
Warning
Administrators who allow anonymous users to read and write in
directories often find that their servers become a repository of stolen
software.
Additionally, under
vsftpd, add the following line to the /etc/vsftpd/vsftpd.conf file:
anon_upload_enable=YES
2.2.6.3. User Accounts
Because FTP transmits unencrypted usernames and passwords over
insecure networks for authentication, it is a good idea to deny system
users access to the server from their user accounts.
To disable all user accounts in
vsftpd, add the following directive to /etc/vsftpd/vsftpd.conf:
local_enable=NO
2.2.6.3.1. Restricting User Accounts
To disable FTP access for specific accounts or specific groups of accounts, such as the root user and those with
sudo privileges, the easiest way is to use a PAM list file as described in Section 2.1.4.2.4, “Disabling Root Using PAM”. The PAM configuration file for vsftpd is /etc/pam.d/vsftpd.
It is also possible to disable user accounts within each service directly.
To disable specific user accounts in
vsftpd, add the username to /etc/vsftpd/ftpusers
2.2.6.4. Use TCP Wrappers To Control Access
Use TCP Wrappers to control access to either FTP daemon as outlined in Section 2.2.1.1, “Enhancing Security With TCP Wrappers”.
2.2.7. Securing Sendmail
Sendmail is a Mail Transfer Agent (MTA) that uses the Simple Mail
Transfer Protocol (SMTP) to deliver electronic messages between other
MTAs and to email clients or delivery agents. Although many MTAs are
capable of encrypting traffic between one another, most do not, so
sending email over any public networks is considered an inherently
insecure form of communication.
It is recommended that anyone planning to implement a Sendmail server address the following issues.
2.2.7.1. Limiting a Denial of Service Attack
Because of the nature of email, a determined attacker can flood the
server with mail fairly easily and cause a denial of service. By setting
limits to the following directives in
/etc/mail/sendmail.mc, the effectiveness of such attacks is limited.
confCONNECTION_RATE_THROTTLE— The number of connections the server can receive per second. By default, Sendmail does not limit the number of connections. If a limit is set and reached, further connections are delayed.confMAX_DAEMON_CHILDREN— The maximum number of child processes that can be spawned by the server. By default, Sendmail does not assign a limit to the number of child processes. If a limit is set and reached, further connections are delayed.confMIN_FREE_BLOCKS— The minimum number of free blocks which must be available for the server to accept mail. The default is 100 blocks.confMAX_HEADERS_LENGTH— The maximum acceptable size (in bytes) for a message header.confMAX_MESSAGE_SIZE— The maximum acceptable size (in bytes) for a single message.
2.2.7.2. NFS and Sendmail
Never put the mail spool directory,
/var/spool/mail/, on an NFS shared volume.
Because NFSv2 and NFSv3 do not maintain control over user and group
IDs, two or more users can have the same UID, and receive and read each
other's mail.
Note
With NFSv4 using Kerberos, this is not the case, since the
SECRPC_GSS kernel module does not utilize UID-based authentication. However, it is still considered good practice not to put the mail spool directory on NFS shared volumes.
2.2.7.3. Mail-only Users
To help prevent local user exploits on the Sendmail server, it is
best for mail users to only access the Sendmail server using an email
program. Shell accounts on the mail server should not be allowed and all
user shells in the
/etc/passwd file should be set to /sbin/nologin (with the possible exception of the root user).
2.2.8. Verifying Which Ports Are Listening
After configuring network services, it is important to pay attention
to which ports are actually listening on the system's network
interfaces. Any open ports can be evidence of an intrusion.
There are two basic approaches for listing the ports that are
listening on the network. The less reliable approach is to query the
network stack using commands such as
netstat -an or lsof -i.
This method is less reliable since these programs do not connect to the
machine from the network, but rather check to see what is running on
the system. For this reason, these applications are frequent targets for
replacement by attackers. Crackers attempt to cover their tracks if
they open unauthorized network ports by replacing netstat and lsof with their own, modified versions.
A more reliable way to check which ports are listening on the network is to use a port scanner such as
nmap.
The following command issued from the console determines which ports are listening for TCP connections from the network:
nmap -sT -O localhost
The output of this command appears as follows:
Starting Nmap 4.68 ( http://nmap.org ) at 2009-03-06 12:08 EST
Interesting ports on localhost.localdomain (127.0.0.1):
Not shown: 1711 closed ports
PORT      STATE SERVICE
22/tcp    open  ssh
25/tcp    open  smtp
111/tcp   open  rpcbind
113/tcp   open  auth
631/tcp   open  ipp
834/tcp   open  unknown
2601/tcp  open  zebra
32774/tcp open  sometimes-rpc11
Device type: general purpose
Running: Linux 2.6.X
OS details: Linux 2.6.17 - 2.6.24
Uptime: 4.122 days (since Mon Mar  2 09:12:31 2009)
Network Distance: 0 hops
OS detection performed. Please report any incorrect results at http://nmap.org/submit/ .
Nmap done: 1 IP address (1 host up) scanned in 1.420 seconds
This output shows the system is running
portmap due to the presence of the sunrpc
service. However, there is also a mystery service on port 834. To check
if the port is associated with the official list of known services,
type:
cat /etc/services | grep 834
This command returns no output for port 834. Due to the format of the
command, output for other ports (1834, 2834, and 3834) will be shown.
This indicates that while the port 834 is in the reserved range (meaning
0 through 1023) and requires root access to open, it is not associated
with a known service.
Next, check for information about the port using
netstat or lsof. To check for port 834 using netstat, use the following command:
netstat -anp | grep 834
The command returns the following output:
tcp 0 0 0.0.0.0:834 0.0.0.0:* LISTEN 653/ypbind
The presence of the open port in
netstat
is reassuring because a cracker opening a port surreptitiously on a
hacked system is not likely to allow it to be revealed through this
command. Also, the [p] option reveals the process ID (PID) of the service that opened the port. In this case, the open port belongs to ypbind (NIS), which is an RPC service handled in conjunction with the portmap service.
The
lsof command reveals similar information to netstat since it is also capable of linking open ports to services:
lsof -i | grep 834
The relevant portion of the output from this command follows:
ypbind      653        0    7u  IPv4       1319                 TCP *:834 (LISTEN)
ypbind      655        0    7u  IPv4       1319                 TCP *:834 (LISTEN)
ypbind      656        0    7u  IPv4       1319                 TCP *:834 (LISTEN)
ypbind      657        0    7u  IPv4       1319                 TCP *:834 (LISTEN)
These tools reveal a great deal about the status of the services
running on a machine. These tools are flexible and can provide a wealth
of information about network services and configuration. Refer to the
man pages for
lsof, netstat, nmap, and services for more information.
2.3. TCP Wrappers and xinetd
Controlling access to network services is one of the most important
security tasks facing a server administrator. Red Hat Enterprise Linux
provides several tools for this purpose. For example, an
iptables-based firewall filters out unwelcome network packets within the kernel's network stack. For network services that utilize it, TCP Wrappers add an additional layer of protection by defining which hosts are or are not allowed to connect to "wrapped" network services. One such wrapped network service is the xinetd super server.
This service is called a super server because it controls connections
to a subset of network services and further refines access control.
Figure 2.4, “Access Control to Network Services” is a basic illustration of how these tools work together to protect network services.
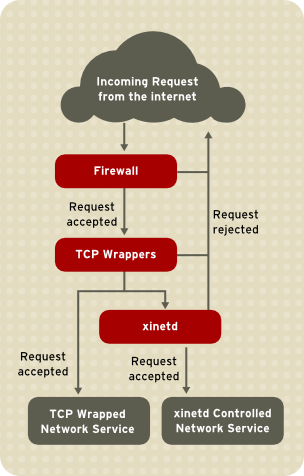
Exhibit A: Access Control to Network Services Flowchart
Figure 2.4. Access Control to Network Services
This chapter focuses on the role of TCP Wrappers and
xinetd
in controlling access to network services and reviews how these tools
can be used to enhance both logging and utilization management. Refer to
Section 2.6, “IPTables” for information about using firewalls with iptables.
2.3.1. TCP Wrappers
The TCP Wrappers packages (
tcp_wrappers and tcp_wrappers-libs)
are installed by default and provide host-based access control to
network services. The most important component within the package is the
/lib/libwrap.a or /lib64/libwrap.a library. In general terms, a TCP-wrapped service is one that has been compiled against the libwrap.a library.
When a connection attempt is made to a TCP-wrapped service, the service first references the host's access files (
/etc/hosts.allow and /etc/hosts.deny) to determine whether or not the client is allowed to connect. In most cases, it then uses the syslog daemon (syslogd) to write the name of the requesting client and the requested service to /var/log/secure or /var/log/messages.
If a client is allowed to connect, TCP Wrappers release control of
the connection to the requested service and take no further part in the
communication between the client and the server.
In addition to access control and logging, TCP Wrappers can execute
commands to interact with the client before denying or releasing control
of the connection to the requested network service.
Because TCP Wrappers are a valuable addition to any server
administrator's arsenal of security tools, most network services within
Red Hat Enterprise Linux are linked to the
libwrap.a library. Some such applications include /usr/sbin/sshd, /usr/sbin/sendmail, and /usr/sbin/xinetd.
Note
To determine if a network service binary is linked to
libwrap.a, type the following command as the root user:
ldd <binary-name> | grep libwrap
Replace
<binary-name> with the name of the network service binary.
If the command returns straight to the prompt with no output, then the network service is not linked to
libwrap.a.
The following example indicates that
/usr/sbin/sshd is linked to libwrap.a:
[root@myServer ~]# ldd /usr/sbin/sshd | grep libwrap
        libwrap.so.0 => /lib/libwrap.so.0 (0x00655000)
[root@myServer ~]#
2.3.1.1. Advantages of TCP Wrappers
TCP Wrappers provide the following advantages over other network service control techniques:
- Transparency to both the client and the wrapped network service — Both the connecting client and the wrapped network service are unaware that TCP Wrappers are in use. Legitimate users are logged and connected to the requested service while connections from banned clients fail.
- Centralized management of multiple protocols — TCP Wrappers operate separately from the network services they protect, allowing many server applications to share a common set of access control configuration files, making for simpler management.
2.3.2. TCP Wrappers Configuration Files
To determine if a client is allowed to connect to a service, TCP
Wrappers reference the following two files, which are commonly referred
to as hosts access files:
/etc/hosts.allow/etc/hosts.deny
When a TCP-wrapped service receives a client request, it performs the following steps:
- It references
/etc/hosts.allow— The TCP-wrapped service sequentially parses the/etc/hosts.allowfile and applies the first rule specified for that service. If it finds a matching rule, it allows the connection. If not, it moves on to the next step. - It references
/etc/hosts.deny— The TCP-wrapped service sequentially parses the/etc/hosts.denyfile. If it finds a matching rule, it denies the connection. If not, it grants access to the service.
The following are important points to consider when using TCP Wrappers to protect network services:
- Because access rules in
hosts.alloware applied first, they take precedence over rules specified inhosts.deny. Therefore, if access to a service is allowed inhosts.allow, a rule denying access to that same service inhosts.denyis ignored. - The rules in each file are read from the top down and the first matching rule for a given service is the only one applied. The order of the rules is extremely important.
- If no rules for the service are found in either file, or if neither file exists, access to the service is granted.
- TCP-wrapped services do not cache the rules from the hosts access files, so any changes to
hosts.alloworhosts.denytake effect immediately, without restarting network services.
Warning
If the last line of a hosts access file is not a newline character (created by pressing the Enter key), the last rule in the file fails and an error is logged to either
/var/log/messages or /var/log/secure.
This is also the case for a rule that spans multiple lines without
using the backslash character. The following example illustrates the
relevant portion of a log message for a rule failure due to either of
these circumstances:
warning: /etc/hosts.allow, line 20: missing newline or line too long
2.3.2.1. Formatting Access Rules
The format for both
/etc/hosts.allow and /etc/hosts.deny is identical. Each rule must be on its own line. Blank lines or lines that start with a hash (#) are ignored.
Each rule uses the following basic format to control access to network services:
<daemon list>:<client list>[:<option>:<option>: ...]
<daemon list>— A comma-separated list of process names (not service names) or theALLwildcard. The daemon list also accepts operators (refer to Section 2.3.2.1.4, “Operators”) to allow greater flexibility.<client list>— A comma-separated list of hostnames, host IP addresses, special patterns, or wildcards which identify the hosts affected by the rule. The client list also accepts operators listed in Section 2.3.2.1.4, “Operators” to allow greater flexibility.<option>— An optional action or colon-separated list of actions performed when the rule is triggered. Option fields support expansions, launch shell commands, allow or deny access, and alter logging behavior.
Note
More information on some of the terms above can be found elsewhere in this guide:
The following is a basic sample hosts access rule:
vsftpd : .example.com
This rule instructs TCP Wrappers to watch for connections to the FTP daemon (
vsftpd) from any host in the example.com domain. If this rule appears in hosts.allow, the connection is accepted. If this rule appears in hosts.deny, the connection is rejected.
The next sample hosts access rule is more complex and uses two option fields:
sshd : .example.com \ : spawn /bin/echo `/bin/date` access denied>>/var/log/sshd.log \ : deny
Note that each option field is preceded by the backslash (\). Use of
the backslash prevents failure of the rule due to length.
This sample rule states that if a connection to the SSH daemon (
sshd) is attempted from a host in the example.com domain, execute the echo command to append the attempt to a special log file, and deny the connection. Because the optional deny directive is used, this line denies access even if it appears in the hosts.allow file. Refer to Section 2.3.2.2, “Option Fields” for a more detailed look at available options.
2.3.2.1.1. Wildcards
Wildcards allow TCP Wrappers to more easily match groups of daemons
or hosts. They are used most frequently in the client list field of
access rules.
The following wildcards are available:
ALL— Matches everything. It can be used for both the daemon list and the client list.LOCAL— Matches any host that does not contain a period (.), such as localhost.KNOWN— Matches any host where the hostname and host address are known or where the user is known.UNKNOWN— Matches any host where the hostname or host address are unknown or where the user is unknown.PARANOID— Matches any host where the hostname does not match the host address.
Important
The
KNOWN, UNKNOWN, and PARANOID
wildcards should be used with care, because they rely on a functioning
DNS server for correct operation. Any disruption to name resolution may
prevent legitimate users from gaining access to a service.
2.3.2.1.2. Patterns
Patterns can be used in the client field of access rules to more precisely specify groups of client hosts.
The following is a list of common patterns for entries in the client field:
- Hostname beginning with a period (.) — Placing a period at the beginning of a hostname matches all hosts sharing the listed components of the name. The following example applies to any host within the
example.comdomain:ALL : .example.com
- IP address ending with a period (.) — Placing a period at the end of an IP address matches all hosts sharing the initial numeric groups of an IP address. The following example applies to any host within the
192.168.x.xnetwork:ALL : 192.168.
- IP address/netmask pair — Netmask expressions can also be used as a pattern to control access to a particular group of IP addresses. The following example applies to any host with an address range of
192.168.0.0through192.168.1.255:ALL : 192.168.0.0/255.255.254.0
Important
When working in the IPv4 address space, the address/prefix length (prefixlen) pair declarations (CIDR notation) are not supported. Only IPv6 rules can use this format. - [IPv6 address]/prefixlen pair — [net]/prefixlen pairs can also be used as a pattern to control access to a particular group of IPv6 addresses. The following example would apply to any host with an address range of
3ffe:505:2:1::through3ffe:505:2:1:ffff:ffff:ffff:ffff:ALL : [3ffe:505:2:1::]/64
- The asterisk (*) — Asterisks can be used to match entire groups of hostnames or IP addresses, as long as they are not mixed in a client list containing other types of patterns. The following example would apply to any host within the
example.comdomain:ALL : *.example.com
- The slash (/) — If a client list begins with a slash, it is treated as a file name. This is useful if rules specifying large numbers of hosts are necessary. The following example refers TCP Wrappers to the
/etc/telnet.hostsfile for all Telnet connections:in.telnetd : /etc/telnet.hosts
Other, less used patterns are also accepted by TCP Wrappers. Refer to the
hosts_access man 5 page for more information.
Warning
Be very careful when using hostnames and domain names. Attackers
can use a variety of tricks to circumvent accurate name resolution. In
addition, disruption to DNS service prevents even authorized users from
using network services. It is, therefore, best to use IP addresses
whenever possible.
2.3.2.1.3. Portmap and TCP Wrappers
Portmap's implementation of TCP Wrappers does not support host look-ups, which means portmap can not use hostnames to identify hosts. Consequently, access control rules for portmap in hosts.allow or hosts.deny must use IP addresses, or the keyword ALL, for specifying hosts.
Changes to
portmap access control rules may not take effect immediately. You may need to restart the portmap service.
Widely used services, such as NIS and NFS, depend on
portmap to operate, so be aware of these limitations.
2.3.2.1.4. Operators
At present, access control rules accept one operator,
EXCEPT. It can be used in both the daemon list and the client list of a rule.
The
EXCEPT operator allows specific exceptions to broader matches within the same rule.
In the following example from a
hosts.allow file, all example.com hosts are allowed to connect to all services except cracker.example.com:
ALL: .example.com EXCEPT cracker.example.com
In another example from a
hosts.allow file, clients from the 192.168.0.x network can use all services except for FTP:
ALL EXCEPT vsftpd: 192.168.0.
Note
Organizationally, it is often easier to avoid using
EXCEPT
operators. This allows other administrators to quickly scan the
appropriate files to see what hosts are allowed or denied access to
services, without having to sort through EXCEPT operators.
2.3.2.2. Option Fields
In addition to basic rules that allow and deny access, the Red Hat
Enterprise Linux implementation of TCP Wrappers supports extensions to
the access control language through option fields.
By using option fields in hosts access rules, administrators can
accomplish a variety of tasks such as altering log behavior,
consolidating access control, and launching shell commands.
2.3.2.2.1. Logging
Option fields let administrators easily change the log facility and priority level for a rule by using the
severity directive.
In the following example, connections to the SSH daemon from any host in the
example.com domain are logged to the default authpriv syslog facility (because no facility value is specified) with a priority of emerg:
sshd : .example.com : severity emerg
It is also possible to specify a facility using the
severity option. The following example logs any SSH connection attempts by hosts from the example.com domain to the local0 facility with a priority of alert:
sshd : .example.com : severity local0.alert
Note
In practice, this example does not work until the syslog daemon (
syslogd) is configured to log to the local0 facility. Refer to the syslog.conf man page for information about configuring custom log facilities.
2.3.2.2.2. Access Control
Option fields also allow administrators to explicitly allow or deny hosts in a single rule by adding the
allow or deny directive as the final option.
For example, the following two rules allow SSH connections from
client-1.example.com, but deny connections from client-2.example.com:
sshd : client-1.example.com : allow
sshd : client-2.example.com : deny
By allowing access control on a per-rule basis, the option field
allows administrators to consolidate all access rules into a single
file: either
hosts.allow or hosts.deny. Some administrators consider this an easier way of organizing access rules.
2.3.2.2.3. Shell Commands
Option fields allow access rules to launch shell commands through the following two directives:
spawn— Launches a shell command as a child process. This directive can perform tasks like using/usr/sbin/safe_fingerto get more information about the requesting client or create special log files using theechocommand.In the following example, clients attempting to access Telnet services from theexample.comdomain are quietly logged to a special file:in.telnetd : .example.com \ : spawn /bin/echo `/bin/date` from %h>>/var/log/telnet.log \ : allow
twist— Replaces the requested service with the specified command. This directive is often used to set up traps for intruders (also called "honey pots"). It can also be used to send messages to connecting clients. Thetwistdirective must occur at the end of the rule line.In the following example, clients attempting to access FTP services from theexample.comdomain are sent a message using theechocommand:vsftpd : .example.com \ : twist /bin/echo "421 This domain has been black-listed. Access denied!"
For more information about shell command options, refer to the
hosts_options man page.
2.3.2.2.4. Expansions
Expansions, when used in conjunction with the
spawn and twist directives, provide information about the client, server, and processes involved.
The following is a list of supported expansions:
%a— Returns the client's IP address.%A— Returns the server's IP address.%c— Returns a variety of client information, such as the username and hostname, or the username and IP address.%d— Returns the daemon process name.%h— Returns the client's hostname (or IP address, if the hostname is unavailable).%H— Returns the server's hostname (or IP address, if the hostname is unavailable).%n— Returns the client's hostname. If unavailable,unknownis printed. If the client's hostname and host address do not match,paranoidis printed.%N— Returns the server's hostname. If unavailable,unknownis printed. If the server's hostname and host address do not match,paranoidis printed.%p— Returns the daemon's process ID.%s—Returns various types of server information, such as the daemon process and the host or IP address of the server.%u— Returns the client's username. If unavailable,unknownis printed.
The following sample rule uses an expansion in conjunction with the
spawn command to identify the client host in a customized log file.
When connections to the SSH daemon (
sshd) are attempted from a host in the example.com domain, execute the echo command to log the attempt, including the client hostname (by using the %h expansion), to a special file:
sshd : .example.com  \
	: spawn /bin/echo `/bin/date` access denied to %h>>/var/log/sshd.log \
	: deny
Similarly, expansions can be used to personalize messages back to
the client. In the following example, clients attempting to access FTP
services from the
example.com domain are informed that they have been banned from the server:
vsftpd : .example.com \
: twist /bin/echo "421 %h has been banned from this server!"
For a full explanation of available expansions, as well as
additional access control options, refer to section 5 of the man pages
for
hosts_access (man 5 hosts_access) and the man page for hosts_options.
Refer to Section 2.3.5, “Additional Resources” for more information about TCP Wrappers.
2.3.3. xinetd
The
xinetd daemon is a TCP-wrapped super service
which controls access to a subset of popular network services,
including FTP, IMAP, and Telnet. It also provides service-specific
configuration options for access control, enhanced logging, binding,
redirection, and resource utilization control.
When a client attempts to connect to a network service controlled by
xinetd, the super service receives the request and checks for any TCP Wrappers access control rules.
If access is allowed,
xinetd verifies
that the connection is allowed under its own access rules for that
service. It also checks that the service is able to have more resources
assigned to it and that it is not in breach of any defined rules.
If all these conditions are met (that is, access is allowed to the
service; the service has not reached its resource limit; and the service
is not in breach of any defined rule),
xinetd
then starts an instance of the requested service and passes control of
the connection to it. After the connection has been established, xinetd takes no further part in the communication between the client and the server.
2.3.4. xinetd Configuration Files
The configuration files for
xinetd are as follows:
/etc/xinetd.conf— The globalxinetdconfiguration file./etc/xinetd.d/— The directory containing all service-specific files.
2.3.4.1. The /etc/xinetd.conf File
The
/etc/xinetd.conf file contains general configuration settings which affect every service under xinetd's control. It is read when the xinetd service is first started, so for configuration changes to take effect, you need to restart the xinetd service. The following is a sample /etc/xinetd.conf file:
defaults
{
	 instances               = 60
	 log_type                = SYSLOG	authpriv
	 log_on_success          = HOST PID
	 log_on_failure          = HOST
	 cps                     = 25 30
}
includedir /etc/xinetd.d
These lines control the following aspects of
xinetd:
instances— Specifies the maximum number of simultaneous requests thatxinetdcan process.log_type— Configuresxinetdto use theauthprivlog facility, which writes log entries to the/var/log/securefile. Adding a directive such asFILE /var/log/xinetdlogwould create a custom log file calledxinetdlogin the/var/log/directory.log_on_success— Configuresxinetdto log successful connection attempts. By default, the remote host's IP address and the process ID of the server processing the request are recorded.log_on_failure— Configuresxinetdto log failed connection attempts or if the connection was denied.cps— Configuresxinetdto allow no more than 25 connections per second to any given service. If this limit is exceeded, the service is retired for 30 seconds.includedir/etc/xinetd.d/— Includes options declared in the service-specific configuration files located in the/etc/xinetd.d/directory. Refer to Section 2.3.4.2, “The /etc/xinetd.d/ Directory” for more information.
Note
Often, both the
log_on_success and log_on_failure settings in /etc/xinetd.conf
are further modified in the service-specific configuration files. More
information may therefore appear in a given service's log file than the /etc/xinetd.conf file may indicate. Refer to Section 2.3.4.3.1, “Logging Options” for further information.
2.3.4.2. The /etc/xinetd.d/ Directory
The
/etc/xinetd.d/ directory contains the configuration files for each service managed by xinetd and the names of the files are correlated to the service. As with xinetd.conf, this directory is read only when the xinetd service is started. For any changes to take effect, the administrator must restart the xinetd service.
The format of files in the
/etc/xinetd.d/ directory use the same conventions as /etc/xinetd.conf.
The primary reason the configuration for each service is stored in a
separate file is to make customization easier and less likely to affect
other services.
To gain an understanding of how these files are structured, consider the
/etc/xinetd.d/krb5-telnet file:
service telnet
{
	 flags           = REUSE
	 socket_type     = stream
	 wait            = no
	 user            = root
	 server          = /usr/kerberos/sbin/telnetd
	 log_on_failure  += USERID
	 disable         = yes
}
These lines control various aspects of the
telnet service:
service— Specifies the service name, usually one of those listed in the/etc/servicesfile.flags— Sets any of a number of attributes for the connection.REUSEinstructsxinetdto reuse the socket for a Telnet connection.Note
TheREUSEflag is deprecated. All services now implicitly use theREUSEflag.socket_type— Sets the network socket type tostream.wait— Specifies whether the service is single-threaded (yes) or multi-threaded (no).user— Specifies which user ID the process runs under.server— Specifies which binary executable to launch.log_on_failure— Specifies logging parameters forlog_on_failurein addition to those already defined inxinetd.conf.disable— Specifies whether the service is disabled (yes) or enabled (no).
Refer to the
xinetd.conf man page for more information about these options and their usage.
2.3.4.3. Altering xinetd Configuration Files
A range of directives is available for services protected by
xinetd. This section highlights some of the more commonly used options.
2.3.4.3.1. Logging Options
The following logging options are available for both
/etc/xinetd.conf and the service-specific configuration files within the /etc/xinetd.d/ directory.
The following is a list of some of the more commonly used logging options:
ATTEMPT— Logs the fact that a failed attempt was made (log_on_failure).DURATION— Logs the length of time the service is used by a remote system (log_on_success).EXIT— Logs the exit status or termination signal of the service (log_on_success).HOST— Logs the remote host's IP address (log_on_failureandlog_on_success).PID— Logs the process ID of the server receiving the request (log_on_success).USERID— Logs the remote user using the method defined in RFC 1413 for all multi-threaded stream services (log_on_failureandlog_on_success).
For a complete list of logging options, refer to the
xinetd.conf man page.
2.3.4.3.2. Access Control Options
Users of
xinetd services can choose to use the TCP Wrappers hosts access rules, provide access control via the xinetd configuration files, or a mixture of both. Refer to Section 2.3.2, “TCP Wrappers Configuration Files” for more information about TCP Wrappers hosts access control files.
This section discusses using
xinetd to control access to services.
Note
Unlike TCP Wrappers, changes to access control only take effect if the
xinetd administrator restarts the xinetd service.
Also, unlike TCP Wrappers, access control through
xinetd only affects services controlled by xinetd.
The
xinetd hosts access control
differs from the method used by TCP Wrappers. While TCP Wrappers places
all of the access configuration within two files, /etc/hosts.allow and /etc/hosts.deny, xinetd's access control is found in each service's configuration file in the /etc/xinetd.d/ directory.
The following hosts access options are supported by
xinetd:
only_from— Allows only the specified hosts to use the service.no_access— Blocks listed hosts from using the service.access_times— Specifies the time range when a particular service may be used. The time range must be stated in 24-hour format notation, HH:MM-HH:MM.
The
only_from and no_access options can use a list of IP addresses or host names, or can specify an entire network. Like TCP Wrappers, combining xinetd
access control with the enhanced logging configuration can increase
security by blocking requests from banned hosts while verbosely
recording each connection attempt.
For example, the following
/etc/xinetd.d/telnet
file can be used to block Telnet access from a particular network group
and restrict the overall time range that even allowed users can log in:
service telnet
{
	 disable         = no
	 flags           = REUSE
	 socket_type     = stream
	 wait            = no
	 user            = root
	 server          = /usr/kerberos/sbin/telnetd
	 log_on_failure  += USERID
	 no_access       = 172.16.45.0/24
	 log_on_success  += PID HOST EXIT
	 access_times    = 09:45-16:15
}
In this example, when a client system from the
172.16.45.0/24 network, such as 172.16.45.2, tries to access the Telnet service, it receives the following message:
Connection closed by foreign host.
In addition, their login attempts are logged in
/var/log/messages as follows:
Sep  7 14:58:33 localhost xinetd[5285]: FAIL: telnet address from=172.16.45.107
Sep  7 14:58:33 localhost xinetd[5283]: START: telnet pid=5285 from=172.16.45.107
Sep  7 14:58:33 localhost xinetd[5283]: EXIT: telnet status=0 pid=5285 duration=0(sec)
When using TCP Wrappers in conjunction with
xinetd access controls, it is important to understand the relationship between the two access control mechanisms.
The following is the sequence of events followed by
xinetd when a client requests a connection:
- The
xinetddaemon accesses the TCP Wrappers hosts access rules using alibwrap.alibrary call. If a deny rule matches the client, the connection is dropped. If an allow rule matches the client, the connection is passed toxinetd. - The
xinetddaemon checks its own access control rules both for thexinetdservice and the requested service. If a deny rule matches the client, the connection is dropped. Otherwise,xinetdstarts an instance of the requested service and passes control of the connection to that service.
Important
Care should be taken when using TCP Wrappers access controls in conjunction with
xinetd access controls. Misconfiguration can cause undesirable effects.
2.3.4.3.3. Binding and Redirection Options
The service configuration files for
xinetd
support binding the service to an IP address and redirecting incoming
requests for that service to another IP address, hostname, or port.
Binding is controlled with the
bind
option in the service-specific configuration files and links the service
to one IP address on the system. When this is configured, the bind
option only allows requests to the correct IP address to access the
service. You can use this method to bind different services to different
network interfaces based on requirements.
This is particularly useful for systems with multiple network
adapters or with multiple IP addresses. On such a system, insecure
services (for example, Telnet), can be configured to listen only on the
interface connected to a private network and not to the interface
connected to the Internet.
The
redirect option accepts an IP
address or hostname followed by a port number. It configures the service
to redirect any requests for this service to the specified host and
port number. This feature can be used to point to another port number on
the same system, redirect the request to a different IP address on the
same machine, shift the request to a totally different system and port
number, or any combination of these options. A user connecting to a
certain service on a system may therefore be rerouted to another system
without disruption.
The
xinetd daemon is able to
accomplish this redirection by spawning a process that stays alive for
the duration of the connection between the requesting client machine and
the host actually providing the service, transferring data between the
two systems.
The advantages of the
bind and redirect
options are most clearly evident when they are used together. By
binding a service to a particular IP address on a system and then
redirecting requests for this service to a second machine that only the
first machine can see, an internal system can be used to provide
services for a totally different network. Alternatively, these options
can be used to limit the exposure of a particular service on a
multi-homed machine to a known IP address, as well as redirect any
requests for that service to another machine especially configured for
that purpose.
For example, consider a system that is used as a firewall with this setting for its Telnet service:
service telnet
{
	 socket_type		= stream
	 wait			= no
	 server			= /usr/kerberos/sbin/telnetd
	 log_on_success		+= DURATION USERID
	 log_on_failure		+= USERID
	 bind                    = 123.123.123.123
	 redirect                = 10.0.1.13 23
}
The
bind and redirect options in this file ensure that the Telnet service on the machine is bound to the external IP address (123.123.123.123), the one facing the Internet. In addition, any requests for Telnet service sent to 123.123.123.123 are redirected via a second network adapter to an internal IP address (10.0.1.13)
that only the firewall and internal systems can access. The firewall
then sends the communication between the two systems, and the connecting
system thinks it is connected to 123.123.123.123 when it is actually connected to a different machine.
This feature is particularly useful for users with broadband
connections and only one fixed IP address. When using Network Address
Translation (NAT), the systems behind the gateway machine, which are
using internal-only IP addresses, are not available from outside the
gateway system. However, when certain services controlled by
xinetd are configured with the bind and redirect
options, the gateway machine can act as a proxy between outside systems
and a particular internal machine configured to provide the service. In
addition, the various xinetd access control and logging options are also available for additional protection.
2.3.4.3.4. Resource Management Options
The
xinetd daemon can add a basic
level of protection from Denial of Service (DoS) attacks. The following
is a list of directives which can aid in limiting the effectiveness of
such attacks:
per_source— Defines the maximum number of instances for a service per source IP address. It accepts only integers as an argument and can be used in bothxinetd.confand in the service-specific configuration files in thexinetd.d/directory.cps— Defines the maximum number of connections per second. This directive takes two integer arguments separated by white space. The first argument is the maximum number of connections allowed to the service per second. The second argument is the number of seconds thatxinetdmust wait before re-enabling the service. It accepts only integers as arguments and can be used in either thexinetd.conffile or the service-specific configuration files in thexinetd.d/directory.max_load— Defines the CPU usage or load average threshold for a service. It accepts a floating point number argument.The load average is a rough measure of how many processes are active at a given time. See theuptime,who, andprocinfocommands for more information about load average.
There are more resource management options available for
xinetd. Refer to the xinetd.conf man page for more information.
2.3.5. Additional Resources
More information about TCP Wrappers and
xinetd is available from system documentation and on the Internet.
2.3.5.1. Installed TCP Wrappers Documentation
The documentation on your system is a good place to start looking for additional configuration options for TCP Wrappers,
xinetd, and access control.
/usr/share/doc/tcp_wrappers-— This directory contains a<version>/READMEfile that discusses how TCP Wrappers work and the various hostname and host address spoofing risks that exist./usr/share/doc/xinetd-— This directory contains a<version>/READMEfile that discusses aspects of access control and asample.conffile with various ideas for modifying service-specific configuration files in the/etc/xinetd.d/directory.- TCP Wrappers and
xinetd-related man pages — A number of man pages exist for the various applications and configuration files involved with TCP Wrappers andxinetd. The following are some of the more important man pages:- Server Applications
man xinetd— The man page forxinetd.
- Configuration Files
man 5 hosts_access— The man page for the TCP Wrappers hosts access control files.man hosts_options— The man page for the TCP Wrappers options fields.man xinetd.conf— The man page listingxinetdconfiguration options.
2.3.5.2. Useful TCP Wrappers Websites
- http://www.docstoc.com/docs/2133633/An-Unofficial-Xinetd-Tutorial — A thorough tutorial that discusses many different ways to optimize default
xinetdconfiguration files to meet specific security goals.
2.3.5.3. Related Books
- Hacking Linux Exposed by Brian Hatch, James Lee, and George Kurtz; Osbourne/McGraw-Hill — An excellent security resource with information about TCP Wrappers and
xinetd.
2.4. Virtual Private Networks (VPNs)
Organizations with several satellite offices often connect to each
other with dedicated lines for efficiency and protection of sensitive
data in transit. For example, many businesses use frame relay or Asynchronous Transfer Mode (ATM)
lines as an end-to-end networking solution to link one office with
others. This can be an expensive proposition, especially for small to
medium sized businesses (SMBs) that want to expand without paying the high costs associated with enterprise-level, dedicated digital circuits.
To address this need, Virtual Private Networks (VPNs) were developed. Following the same functional principles as dedicated circuits, VPNs allow for secured digital communication between two parties (or networks), creating a Wide Area Network (WAN) from existing Local Area Networks (LANs). Where it differs from frame relay or ATM is in its transport medium. VPNs
transmit over IP using datagrams as the transport layer, making it a
secure conduit through the Internet to an intended destination. Most
free software VPN implementations incorporate open standard encryption methods to further mask data in transit.
Some organizations employ hardware VPN solutions to augment security, while others use software or protocol-based implementations. Several vendors provide hardware VPN solutions, such as Cisco, Nortel, IBM, and Checkpoint. There is a free software-based VPN solution for Linux called FreeS/Wan that utilizes a standardized Internet Protocol Security (IPsec) implementation. These VPN
solutions, irrespective of whether they are hardware or software based,
act as specialized routers that exist between the IP connection from
one office to another.
2.4.1. How Does a VPN Work?
When a packet is transmitted from a client, it sends it through the VPN router or gateway, which adds an Authentication Header (AH) for routing and authentication. The data is then encrypted and, finally, enclosed with an Encapsulating Security Payload (ESP). This latter constitutes the decryption and handling instructions.
The receiving VPN router strips the
header information, decrypts the data, and routes it to its intended
destination (either a workstation or other node on a network). Using a
network-to-network connection, the receiving node on the local network
receives the packets already decrypted and ready for processing. The
encryption/decryption process in a network-to-network VPN connection is transparent to a local node.
With such a heightened level of security, an attacker must not only
intercept a packet, but decrypt the packet as well. Intruders who employ
a man-in-the-middle attack between a server and client must also have
access to at least one of the private keys for authenticating sessions.
Because they employ several layers of authentication and encryption, VPNs are a secure and effective means of connecting multiple remote nodes to act as a unified intranet.
2.4.2. Openswan
2.4.2.1. Overview
Overview
Openswan is an open source, kernel-level IPsec implementation available in Red Hat Enterprise Linux. It employs key establishment protocols IKE (Internet Key Exchange) v1 and v2, implemented as user-level daemons. Manual key establishment is also possible viaip xfrm commands, however this is not recommended.
Cryptographic Support
Openswan has an in-built cryptographic library, however it also supports a NSS (Network Security Services) library, which is fully supported, and required for FIPS security compliance. More information on the FIPS (Federal Information Processing Standard) can be found in Section 7.2, “Federal Information Processing Standard (FIPS)”.Installation
Run theyum install openswan command to install Openswan.
2.4.2.2. Configuration
Locations
This section lists and explains important directories and files used for configuring Openswan./etc/ipsec.d- main directory. Stores Openswan related files./etc/ipsec.conf- master configuration file. Further*.confconfiguration files can be created in/etc/ipsec.dfor individual configurations./etc/ipsec.secrets- master secrets file. Further*.secretsfiles can be created in/etc/ipsec.dfor individual configurations./etc/ipsec.d/cert*.db- Certificate database files. The old default NSS database file iscert8.db. From Red Hat Enterprise Linux 6 onwards, NSS sqlite databases are used in thecert9.dbfile./etc/ipsec.d/key*.db- Key database files. The old default NSS database file iskey3.db. From Red Hat Enterprise Linux 6 onwards, NSS sqlite databases are used in thekey4.dbfile./etc/ipsec.d/cacerts- Location for Certificate Authority (CA) certificates./etc/ipsec.d/certs- Location for user certificates. Not needed when using NSS./etc/ipsec.d/policies- Groups policies. Policies can be defined as block, clear, clear-or-private, private, private-or-clear./etc/ipsec.d/nsspassword- NSS password file. This file does not exist by default, and is required if the NSS database in use is created with a password.
Configuration Parameters
This section lists some of the configuration options available, mostly written to/etc/ipsec.conf.
protostack- defines which protocol stack is used. The default option in Red Hat Enterprise Linux 6 is netkey. Other valid values are auto, klips and mast.nat_traversal- defines if NAT workaround for connections is accepted. Default is no.dumpdir- defines the location for core dump files.nhelpers- When using NSS, defines the number of threads used for cryptographic operations. When not using NSS, defines the number of processes used for cryptographic operations.virtual_private- subnets allowed for the client connection. Ranges that may exist behind a NAT router through which a client connects.plutorestartoncrash- set to yes by default.plutostderr- path for pluto error log. Points to syslog location by default.connaddrfamily- can be set to either ipv4 or ipv6.
Further details about Openswan configuration can be found in the
ipsec.conf(5) manual page.
2.4.2.3. Commands
This section explains and gives examples of some of the commands used for Openswan.
Note
As shown in the following example, using
service ipsec start/stop
is the recommended method of changing the state of the ipsec service.
This is also the recommended technique for starting and stopping all
other services in Red Hat Enterprise Linux 6.
- Starting and Stopping Openswan:
ipsec setup start/stopservice ipsec start/stop
- Adding/deleting a connection:
ipsec auto --add/delete <connection name>
- Connection establishment/breaking:
ipsec auto --up/down <connection-name>
- Generating RSA keys:
ipsec newhostkey --configdir /etc/ipsec.d --password password --output /etc/ipsec.d/<name-of-file>
- Checking ipsec policies in Kernel:
ip xfrm policyip xfrm state
- Creating self-signed certificate:
certutil -S -k rsa -n <ca-cert-nickname> -s "CN=ca-cert-common-name" -w 12 -t "C,C,C" -x -d /etc/ipsec.d
- Creating user certificate signed by the previous CA:
certutil -S -k rsa -c
<ca-cert-nickname> -n <user-cert-nickname> -s
"CN=user-cert-common-name" -w 12 -t "u,u,u" -d /etc/ipsec.d
2.4.2.4. Openswan Resources
- The Openswan-doc package: HTML, examples, README.*
- README.nss
2.5. Firewalls
Information security is commonly thought of as a process and not a
product. However, standard security implementations usually employ some
form of dedicated mechanism to control access privileges and restrict
network resources to users who are authorized, identifiable, and
traceable. Red Hat Enterprise Linux includes several tools to assist
administrators and security engineers with network-level access control
issues.
Firewalls are one of the core components of a network security
implementation. Several vendors market firewall solutions catering to
all levels of the marketplace: from home users protecting one PC to data
center solutions safeguarding vital enterprise information. Firewalls
can be stand-alone hardware solutions, such as firewall appliances by
Cisco, Nokia, and Sonicwall. Vendors such as Checkpoint, McAfee, and
Symantec have also developed proprietary software firewall solutions for
home and business markets.
Apart from the differences between hardware and software firewalls,
there are also differences in the way firewalls function that separate
one solution from another. Table 2.2, “Firewall Types” details three common types of firewalls and how they function:
Table 2.2. Firewall Types
| Method | Description | Advantages | Disadvantages | ||||||
|---|---|---|---|---|---|---|---|---|---|
| NAT | Network Address Translation (NAT) places private IP subnetworks behind one or a small pool of public IP addresses, masquerading all requests to one source rather than several. The Linux kernel has built-in NAT functionality through the Netfilter kernel subsystem. |
|
| ||||||
| Packet Filter | A packet filtering firewall reads each data packet that passes through a LAN. It can read and process packets by header information and filters the packet based on sets of programmable rules implemented by the firewall administrator. The Linux kernel has built-in packet filtering functionality through the Netfilter kernel subsystem. |
|
| ||||||
| Proxy | Proxy firewalls filter all requests of a certain protocol or type from LAN clients to a proxy machine, which then makes those requests to the Internet on behalf of the local client. A proxy machine acts as a buffer between malicious remote users and the internal network client machines. |
|
|
2.5.1. Netfilter and IPTables
The Linux kernel features a powerful networking subsystem called Netfilter.
The Netfilter subsystem provides stateful or stateless packet filtering
as well as NAT and IP masquerading services. Netfilter also has the
ability to mangle IP header information for advanced routing and connection state management. Netfilter is controlled using the
iptables tool.
2.5.1.1. IPTables Overview
The power and flexibility of Netfilter is implemented using the
iptables administration tool, a command line tool similar in syntax to its predecessor, ipchains, which Netfilter/iptables replaced in the Linux kernel 2.4 and above.
iptables uses the Netfilter subsystem to enhance network connection, inspection, and processing. iptables
features advanced logging, pre- and post-routing actions, network
address translation, and port forwarding, all in one command line
interface.
This section provides an overview of
iptables. For more detailed information, refer to Section 2.6, “IPTables”.
2.5.2. Basic Firewall Configuration
Just as a firewall in a building attempts to prevent a fire from
spreading, a computer firewall attempts to prevent malicious software
from spreading to your computer. It also helps to prevent unauthorized
users from accessing your computer.
In a default Red Hat Enterprise Linux installation, a firewall exists
between your computer or network and any untrusted networks, for
example the Internet. It determines which services on your computer
remote users can access. A properly configured firewall can greatly
increase the security of your system. It is recommended that you
configure a firewall for any Red Hat Enterprise Linux system with an
Internet connection.
2.5.2.1. Firewall Configuration Tool
During the Firewall Configuration
screen of the Red Hat Enterprise Linux installation, you were given the
option to enable a basic firewall as well as to allow specific devices,
incoming services, and ports.
After installation, you can change this preference by using the Firewall Configuration Tool.
To start this application, use the following command:
[root@myServer ~] # system-config-firewall

Security Level Configuration
Figure 2.5. Firewall Configuration Tool
Note
The Firewall Configuration Tool only configures a basic firewall. If the system needs more complex rules, refer to Section 2.6, “IPTables” for details on configuring specific
iptables rules.
2.5.2.2. Enabling and Disabling the Firewall
Select one of the following options for the firewall:
- Disabled — Disabling the firewall provides complete access to your system and does no security checking. This should only be selected if you are running on a trusted network (not the Internet) or need to configure a custom firewall using the iptables command line tool.
Warning
Firewall configurations and any customized firewall rules are stored in the/etc/sysconfig/iptablesfile. If you choose Disabled and click , these configurations and firewall rules will be lost. - Enabled — This option configures the system to reject incoming connections that are not in response to outbound requests, such as DNS replies or DHCP requests. If access to services running on this machine is needed, you can choose to allow specific services through the firewall.If you are connecting your system to the Internet, but do not plan to run a server, this is the safest choice.
2.5.2.3. Trusted Services
Enabling options in the Trusted services list allows the specified service to pass through the firewall.
- WWW (HTTP)
- The HTTP protocol is used by Apache (and by other Web servers) to serve web pages. If you plan on making your Web server publicly available, select this check box. This option is not required for viewing pages locally or for developing web pages. This service requires that the
httpdpackage be installed.Enabling WWW (HTTP) will not open a port for HTTPS, the SSL version of HTTP. If this service is required, select the Secure WWW (HTTPS) check box. - FTP
- The FTP protocol is used to transfer files between machines on a network. If you plan on making your FTP server publicly available, select this check box. This service requires that the
vsftpdpackage be installed. - SSH
- Secure Shell (SSH) is a suite of tools for logging into and executing commands on a remote machine. To allow remote access to the machine via ssh, select this check box. This service requires that the
openssh-serverpackage be installed. - Telnet
- Telnet is a protocol for logging into remote machines. Telnet communications are unencrypted and provide no security from network snooping. Allowing incoming Telnet access is not recommended. To allow remote access to the machine via telnet, select this check box. This service requires that the
telnet-serverpackage be installed. - Mail (SMTP)
- SMTP is a protocol that allows remote hosts to connect directly to your machine to deliver mail. You do not need to enable this service if you collect your mail from your ISP's server using POP3 or IMAP, or if you use a tool such as
fetchmail. To allow delivery of mail to your machine, select this check box. Note that an improperly configured SMTP server can allow remote machines to use your server to send spam. - NFS4
- The Network File System (NFS) is a file sharing protocol commonly used on *NIX systems. Version 4 of this protocol is more secure than its predecessors. If you want to share files or directories on your system with other network users, select this check box.
- Samba
- Samba is an implementation of Microsoft's proprietary SMB networking protocol. If you need to share files, directories, or locally-connected printers with Microsoft Windows machines, select this check box.
2.5.2.4. Other Ports
The Firewall Configuration Tool includes an Other ports section for specifying custom IP ports as being trusted by
iptables. For example, to allow IRC and Internet printing protocol (IPP) to pass through the firewall, add the following to the Other ports section:
194:tcp,631:tcp
2.5.2.5. Saving the Settings
Click to save the changes and enable or disable the firewall. If Enable firewall was selected, the options selected are translated to
iptables commands and written to the /etc/sysconfig/iptables file. The iptables service is also started so that the firewall is activated immediately after saving the selected options. If Disable firewall was selected, the /etc/sysconfig/iptables file is removed and the iptables service is stopped immediately.
The selected options are also written to the
/etc/sysconfig/system-config-firewall file so that the settings can be restored the next time the application is started. Do not edit this file by hand.
Even though the firewall is activated immediately, the
iptables service is not configured to start automatically at boot time. Refer to Section 2.5.2.6, “Activating the IPTables Service” for more information.
2.5.2.6. Activating the IPTables Service
The firewall rules are only active if the
iptables service is running. To manually start the service, use the following command:
[root@myServer ~] # service iptables restart
To ensure that
iptables starts when the system is booted, use the following command:
[root@myServer ~] # chkconfig --level 345 iptables on
2.5.3. Using IPTables
The first step in using
iptables is to start the iptables service. Use the following command to start the iptables service:
[root@myServer ~] # service iptables start
Note
The
ip6tables service can be turned off if you intend to use the iptables service only. If you deactivate the ip6tables service, remember to deactivate the IPv6 network also. Never leave a network device active without the matching firewall.
To force
iptables to start by default when the system is booted, use the following command:
[root@myServer ~] # chkconfig --level 345 iptables on
This forces
iptables to start whenever the system is booted into runlevel 3, 4, or 5.
2.5.3.1. IPTables Command Syntax
The following sample
iptables command illustrates the basic command syntax:
[root@myServer ~ ] # iptables -A<chain>-j<target>
The
-A option specifies that the rule be appended to <chain>. Each chain is comprised of one or more rules, and is therefore also known as a ruleset.
The three built-in chains are INPUT, OUTPUT, and FORWARD. These
chains are permanent and cannot be deleted. The chain specifies the
point at which a packet is manipulated.
The
-j <target>
option specifies the target of the rule; i.e., what to do if the packet
matches the rule. Examples of built-in targets are ACCEPT, DROP, and
REJECT.
Refer to the
iptables man page for more information on the available chains, options, and targets.
2.5.3.2. Basic Firewall Policies
Establishing basic firewall policies creates a foundation for building more detailed, user-defined rules.
Each
iptables chain is comprised of a
default policy, and zero or more rules which work in concert with the
default policy to define the overall ruleset for the firewall.
The default policy for a chain can be either DROP or ACCEPT.
Security-minded administrators typically implement a default policy of
DROP, and only allow specific packets on a case-by-case basis. For
example, the following policies block all incoming and outgoing packets
on a network gateway:
[root@myServer ~ ] # iptables -P INPUT DROP
[root@myServer ~ ] # iptables -P OUTPUT DROP
It is also recommended that any forwarded packets
— network traffic that is to be routed from the firewall to its
destination node — be denied as well, to restrict internal clients from
inadvertent exposure to the Internet. To do this, use the following
rule:
[root@myServer ~ ] # iptables -P FORWARD DROP
When you have established the default policies for each chain, you
can create and save further rules for your particular network and
security requirements.
The following sections describe how to save iptables rules and
outline some of the rules you might implement in the course of building
your iptables firewall.
2.5.3.3. Saving and Restoring IPTables Rules
Changes to
iptables are transitory; if the system is rebooted or if the iptables service is restarted, the rules are automatically flushed and reset. To save the rules so that they are loaded when the iptables service is started, use the following command:
[root@myServer ~ ] # service iptables save
The rules are stored in the file
/etc/sysconfig/iptables and are applied whenever the service is started or the machine is rebooted.
2.5.4. Common IPTables Filtering
Preventing remote attackers from accessing a LAN is one of the most
important aspects of network security. The integrity of a LAN should be
protected from malicious remote users through the use of stringent
firewall rules.
However, with a default policy set to block all incoming, outgoing,
and forwarded packets, it is impossible for the firewall/gateway and
internal LAN users to communicate with each other or with external
resources.
To allow users to perform network-related functions and to use
networking applications, administrators must open certain ports for
communication.
For example, to allow access to port 80 on the firewall, append the following rule:
[root@myServer ~ ] # iptables -A INPUT -p tcp -m tcp --dport 80 -j ACCEPT
This allows users to browse websites that communicate using the
standard port 80. To allow access to secure websites (for example,
https://www.example.com/), you also need to provide access to port 443,
as follows:
[root@myServer ~ ] # iptables -A INPUT -p tcp -m tcp --dport 443 -j ACCEPT
Important
When creating an
iptables ruleset, order is important.
If a rule specifies that any packets from the 192.168.100.0/24
subnet be dropped, and this is followed by a rule that allows packets
from 192.168.100.13 (which is within the dropped subnet), then the
second rule is ignored.
The rule to allow packets from 192.168.100.13 must precede the rule that drops the remainder of the subnet.
To insert a rule in a specific location in an existing chain, use the
-I option. For example:
[root@myServer ~ ] # iptables -I INPUT 1 -i lo -p all -j ACCEPT
This rule is inserted as the first rule in the INPUT chain to allow local loopback device traffic.
There may be times when you require remote access to the LAN. Secure
services, for example SSH, can be used for encrypted remote connection
to LAN services.
Administrators with PPP-based resources (such as modem banks or bulk
ISP accounts), dial-up access can be used to securely circumvent
firewall barriers. Because they are direct connections, modem
connections are typically behind a firewall/gateway.
For remote users with broadband connections, however, special cases can be made. You can configure
iptables to accept connections from remote SSH clients. For example, the following rules allow remote SSH access:
[root@myServer ~ ] # iptables -A INPUT -p tcp --dport 22 -j ACCEPT
[root@myServer ~ ] # iptables -A OUTPUT -p tcp --sport 22 -j ACCEPT
These rules allow incoming and outbound access for an individual
system, such as a single PC directly connected to the Internet or a
firewall/gateway. However, they do not allow nodes behind the
firewall/gateway to access these services. To allow LAN access to these
services, you can use Network Address Translation (NAT) with
iptables filtering rules.
2.5.5. FORWARD and NAT Rules
Most ISPs provide only a limited number of publicly routable IP addresses to the organizations they serve.
Administrators must, therefore, find alternative ways to share access
to Internet services without giving public IP addresses to every node
on the LAN. Using private IP addresses is the most common way of
allowing all nodes on a LAN to properly access internal and external
network services.
Edge routers (such as firewalls) can receive incoming transmissions
from the Internet and route the packets to the intended LAN node. At the
same time, firewalls/gateways can also route outgoing requests from a
LAN node to the remote Internet service.
This forwarding of network traffic can become dangerous at times,
especially with the availability of modern cracking tools that can spoof
internal IP addresses and make the remote attacker's machine act as a node on your LAN.
To prevent this,
iptables provides routing and forwarding policies that can be implemented to prevent abnormal usage of network resources.
The
FORWARD chain allows an
administrator to control where packets can be routed within a LAN. For
example, to allow forwarding for the entire LAN (assuming the
firewall/gateway is assigned an internal IP address on eth1), use the
following rules:
[root@myServer ~ ] # iptables -A FORWARD -i eth1 -j ACCEPT
[root@myServer ~ ] # iptables -A FORWARD -o eth1 -j ACCEPT
This rule gives systems behind the firewall/gateway access to the
internal network. The gateway routes packets from one LAN node to its
intended destination node, passing all packets through its
eth1 device.
Note
By default, the IPv4 policy in Red Hat Enterprise Linux kernels
disables support for IP forwarding. This prevents machines that run Red
Hat Enterprise Linux from functioning as dedicated edge routers. To
enable IP forwarding, use the following command:
[root@myServer ~ ] # sysctl -w net.ipv4.ip_forward=1
This configuration change is only valid for the current session; it
does not persist beyond a reboot or network service restart. To
permanently set IP forwarding, edit the
/etc/sysctl.conf file as follows:
Locate the following line:
net.ipv4.ip_forward = 0
Edit it to read as follows:
net.ipv4.ip_forward = 1
Use the following command to enable the change to the
sysctl.conf file:
[root@myServer ~ ] # sysctl -p /etc/sysctl.conf
2.5.5.1. Postrouting and IP Masquerading
Accepting forwarded packets via the firewall's internal IP device
allows LAN nodes to communicate with each other; however they still
cannot communicate externally to the Internet.
To allow LAN nodes with private IP addresses to communicate with external public networks, configure the firewall for IP masquerading, which masks requests from LAN nodes with the IP address of the firewall's external device (in this case, eth0):
[root@myServer ~ ] # iptables -t nat -A POSTROUTING -o eth0 -j MASQUERADE
This rule uses the NAT packet matching table (
-t nat) and specifies the built-in POSTROUTING chain for NAT (-A POSTROUTING) on the firewall's external networking device (-o eth0).
POSTROUTING allows packets to be altered as they are leaving the firewall's external device.
The
-j MASQUERADE target is specified to mask the private IP address of a node with the external IP address of the firewall/gateway.
2.5.5.2. Prerouting
If you have a server on your internal network that you want make available externally, you can use the
-j DNAT
target of the PREROUTING chain in NAT to specify a destination IP
address and port where incoming packets requesting a connection to your
internal service can be forwarded.
For example, if you want to forward incoming HTTP requests to your
dedicated Apache HTTP Server at 172.31.0.23, use the following command:
[root@myServer ~ ] # iptables -t nat -A PREROUTING -i eth0 -p tcp --dport 80 -j DNAT --to 172.31.0.23:80
This rule specifies that the nat
table use the built-in PREROUTING chain to forward incoming HTTP
requests exclusively to the listed destination IP address of
172.31.0.23.
Note
If you have a default policy of DROP in your FORWARD chain, you
must append a rule to forward all incoming HTTP requests so that
destination NAT routing is possible. To do this, use the following
command:
[root@myServer ~ ] # iptables -A FORWARD -i eth0 -p tcp --dport 80 -d 172.31.0.23 -j ACCEPT
This rule forwards all incoming HTTP requests from the firewall to
the intended destination; the Apache HTTP Server behind the firewall.
2.5.5.3. DMZs and IPTables
You can create
iptables rules to route traffic to certain machines, such as a dedicated HTTP or FTP server, in a demilitarized zone (DMZ). A DMZ is a special local subnetwork dedicated to providing services on a public carrier, such as the Internet.
For example, to set a rule for routing incoming HTTP requests to a
dedicated HTTP server at 10.0.4.2 (outside of the 192.168.1.0/24 range
of the LAN), NAT uses the
PREROUTING table to forward the packets to the appropriate destination:
[root@myServer ~ ] # iptables -t nat -A PREROUTING -i eth0 -p tcp --dport 80 -j DNAT --to-destination 10.0.4.2:80
With this command, all HTTP connections to port 80 from outside of
the LAN are routed to the HTTP server on a network separate from the
rest of the internal network. This form of network segmentation can
prove safer than allowing HTTP connections to a machine on the network.
If the HTTP server is configured to accept secure connections, then port 443 must be forwarded as well.
2.5.6. Malicious Software and Spoofed IP Addresses
More elaborate rules can be created that control access to specific
subnets, or even specific nodes, within a LAN. You can also restrict
certain dubious applications or programs such as trojans, worms, and
other client/server viruses from contacting their server.
For example, some trojans scan networks for services on ports from 31337 to 31340 (called the elite ports in cracking terminology).
Since there are no legitimate services that communicate via these
non-standard ports, blocking them can effectively diminish the chances
that potentially infected nodes on your network independently
communicate with their remote master servers.
The following rules drop all TCP traffic that attempts to use port 31337:
[root@myServer ~ ] # iptables -A OUTPUT -o eth0 -p tcp --dport 31337 --sport 31337 -j DROP
[root@myServer ~ ] # iptables -A FORWARD -o eth0 -p tcp --dport 31337 --sport 31337 -j DROP
You can also block outside connections that attempt to spoof private IP address ranges to infiltrate your LAN.
For example, if your LAN uses the 192.168.1.0/24 range, you can
design a rule that instructs the Internet-facing network device (for
example, eth0) to drop any packets to that device with an address in
your LAN IP range.
Because it is recommended to reject forwarded packets as a default
policy, any other spoofed IP address to the external-facing device
(eth0) is rejected automatically.
[root@myServer ~ ] # iptables -A FORWARD -s 192.168.1.0/24 -i eth0 -j DROP
Note
There is a distinction between the
DROP and REJECT targets when dealing with appended rules.
The
REJECT target denies access and returns a connection refused error to users who attempt to connect to the service. The DROP target, as the name implies, drops the packet without any warning.
Administrators can use their own discretion when using these
targets. However, to avoid user confusion and attempts to continue
connecting, the
REJECT target is recommended.
2.5.7. IPTables and Connection Tracking
You can inspect and restrict connections to services based on their connection state. A module within
iptables uses a method called connection tracking to store information about incoming connections. You can allow or deny access based on the following connection states:
NEW— A packet requesting a new connection, such as an HTTP request.ESTABLISHED— A packet that is part of an existing connection.RELATED— A packet that is requesting a new connection but is part of an existing connection. For example, FTP uses port 21 to establish a connection, but data is transferred on a different port (typically port 20).INVALID— A packet that is not part of any connections in the connection tracking table.
You can use the stateful functionality of
iptables
connection tracking with any network protocol, even if the protocol
itself is stateless (such as UDP). The following example shows a rule
that uses connection tracking to forward only the packets that are
associated with an established connection:
[root@myServer ~ ] # iptables -A FORWARD -m state --state ESTABLISHED,RELATED -j ACCEPT
2.5.8. IPv6
The introduction of the next-generation Internet Protocol, called
IPv6, expands beyond the 32-bit address limit of IPv4 (or IP). IPv6
supports 128-bit addresses, and carrier networks that are IPv6 aware are
therefore able to address a larger number of routable addresses than
IPv4.
Red Hat Enterprise Linux supports IPv6 firewall rules using the Netfilter 6 subsystem and the
ip6tables command. In Red Hat Enterprise Linux 6, both IPv4 and IPv6 services are enabled by default.
The
ip6tables command syntax is identical to iptables
in every aspect except that it supports 128-bit addresses. For example,
use the following command to enable SSH connections on an IPv6-aware
network server:
[root@myServer ~ ] # ip6tables -A INPUT -i eth0 -p tcp -s 3ffe:ffff:100::1/128 --dport 22 -j ACCEPT
For more information about IPv6 networking, refer to the IPv6 Information Page at http://www.ipv6.org/.
2.5.9. Additional Resources
There are several aspects to firewalls and the Linux Netfilter
subsystem that could not be covered in this chapter. For more
information, refer to the following resources.
2.5.9.1. Installed Firewall Documentation
- Refer to Section 2.6, “IPTables” for more detailed information on the
iptablescommand, including definitions for many command options. - The
iptablesman page contains a brief summary of the various options.
2.5.9.2. Useful Firewall Websites
- http://www.netfilter.org/ — The official homepage of the Netfilter and
iptablesproject. - http://www.tldp.org/ — The Linux Documentation Project contains several useful guides relating to firewall creation and administration.
- http://www.iana.org/assignments/port-numbers — The official list of registered and common service ports as assigned by the Internet Assigned Numbers Authority.
2.5.9.3. Related Documentation
- Red Hat Linux Firewalls, by Bill McCarty; Red Hat Press — a comprehensive reference to building network and server firewalls using open source packet filtering technology such as Netfilter and
iptables. It includes topics that cover analyzing firewall logs, developing firewall rules, and customizing your firewall using various graphical tools. - Linux Firewalls, by Robert Ziegler; New Riders Press — contains a wealth of information on building firewalls using both 2.2 kernel
ipchainsas well as Netfilter andiptables. Additional security topics such as remote access issues and intrusion detection systems are also covered.
2.6. IPTables
Included with Red Hat Enterprise Linux are advanced tools for network packet filtering
— the process of controlling network packets as they enter, move
through, and exit the network stack within the kernel. Kernel versions
prior to 2.4 relied on
ipchains for packet
filtering and used lists of rules applied to packets at each step of the
filtering process. The 2.4 kernel introduced iptables (also called netfilter), which is similar to ipchains but greatly expands the scope and control available for filtering network packets.
This chapter focuses on packet filtering basics, explains various options available with
iptables commands, and explains how filtering rules can be preserved between system reboots.
Refer to Section 2.6.6, “Additional Resources” for instructions on how to construct
iptables rules and setting up a firewall based on these rules.
Important
The default firewall mechanism in the 2.4 and later kernels is
iptables, but iptables cannot be used if ipchains is already running. If ipchains is present at boot time, the kernel issues an error and fails to start iptables.
The functionality of
ipchains is not affected by these errors.
2.6.1. Packet Filtering
The Linux kernel uses the Netfilter
facility to filter packets, allowing some of them to be received by or
pass through the system while stopping others. This facility is built in
to the Linux kernel, and has three built-in tables or rules lists, as follows:
filter— The default table for handling network packets.nat— Used to alter packets that create a new connection and used for Network Address Translation (NAT).mangle— Used for specific types of packet alteration.
Each table has a group of built-in chains, which correspond to the actions performed on the packet by
netfilter.
The built-in chains for the
filter table are as follows:
- INPUT — Applies to network packets that are targeted for the host.
- OUTPUT — Applies to locally-generated network packets.
- FORWARD — Applies to network packets routed through the host.
The built-in chains for the
nat table are as follows:
- PREROUTING — Alters network packets when they arrive.
- OUTPUT — Alters locally-generated network packets before they are sent out.
- POSTROUTING — Alters network packets before they are sent out.
The built-in chains for the
mangle table are as follows:
- INPUT — Alters network packets targeted for the host.
- OUTPUT — Alters locally-generated network packets before they are sent out.
- FORWARD — Alters network packets routed through the host.
- PREROUTING — Alters incoming network packets before they are routed.
- POSTROUTING — Alters network packets before they are sent out.
Every network packet received by or sent from a Linux system is
subject to at least one table. However, a packet may be subjected to
multiple rules within each table before emerging at the end of the
chain. The structure and purpose of these rules may vary, but they
usually seek to identify a packet coming from or going to a particular
IP address, or set of addresses, when using a particular protocol and
network service. The following image outlines how the flow of packets is
examined by the iptables subsystem:

Note
By default, firewall rules are saved in the
/etc/sysconfig/iptables or /etc/sysconfig/ip6tables files.
The
iptables service starts before any
DNS-related services when a Linux system is booted. This means that
firewall rules can only reference numeric IP addresses (for example,
192.168.0.1). Domain names (for example, host.example.com) in such rules
produce errors.
Regardless of their destination, when packets match a particular rule in one of the tables, a target or action is applied to them. If the rule specifies an
ACCEPT
target for a matching packet, the packet skips the rest of the rule
checks and is allowed to continue to its destination. If a rule
specifies a DROP target, that packet is
refused access to the system and nothing is sent back to the host that
sent the packet. If a rule specifies a QUEUE target, the packet is passed to user-space. If a rule specifies the optional REJECT target, the packet is dropped, but an error packet is sent to the packet's originator.
Every chain has a default policy to
ACCEPT, DROP, REJECT, or QUEUE. If none of the rules in the chain apply to the packet, then the packet is dealt with in accordance with the default policy.
The
iptables command configures these tables, as well as sets up new tables if necessary.
2.6.2. Command Options for IPTables
Rules for filtering packets are created using the
iptables command. The following aspects of the packet are most often used as criteria:
- Packet Type — Specifies the type of packets the command filters.
- Packet Source/Destination — Specifies which packets the command filters based on the source or destination of the packet.
- Target — Specifies what action is taken on packets matching the above criteria.
Refer to Section 2.6.2.4, “IPTables Match Options” and Section 2.6.2.5, “Target Options” for more information about specific options that address these aspects of a packet.
The options used with specific
iptables
rules must be grouped logically, based on the purpose and conditions of
the overall rule, for the rule to be valid. The remainder of this
section explains commonly-used options for the iptables command.
2.6.2.1. Structure of IPTables Command Options
Many
iptables commands have the following structure:
iptables [-t <table-name>] <command> <chain-name> \ <parameter-1> <option-1> \ <parameter-n> <option-n><table-name> — Specifies which table the rule applies to. If omitted, the filter table is used.
<command> — Specifies the action to perform, such as appending or deleting a rule.
<chain-name> — Specifies the chain to edit, create, or delete.
<parameter>-<option> pairs — Parameters and associated options that specify how to process a packet that matches the rule.
The length and complexity of an
iptables command can change significantly, based on its purpose.
For example, a command to remove a rule from a chain can be very short:
iptables -D <chain-name> <line-number>
In contrast, a command that adds a rule which filters packets from a
particular subnet using a variety of specific parameters and options
can be rather long. When constructing
iptables
commands, it is important to remember that some parameters and options
require further parameters and options to construct a valid rule. This
can produce a cascading effect, with the further parameters requiring
yet more parameters. Until every parameter and option that requires
another set of options is satisfied, the rule is not valid.
Type
iptables -h to view a comprehensive list of iptables command structures.
2.6.2.2. Command Options
Command options instruct
iptables to perform a specific action. Only one command option is allowed per iptables command. With the exception of the help command, all commands are written in upper-case characters.
The
iptables commands are as follows:
-A— Appends the rule to the end of the specified chain. Unlike the-Ioption described below, it does not take an integer argument. It always appends the rule to the end of the specified chain.-D <integer> | <rule>— Deletes a rule in a particular chain by number (such as5for the fifth rule in a chain), or by rule specification. The rule specification must exactly match an existing rule.-E— Renames a user-defined chain. A user-defined chain is any chain other than the default, pre-existing chains. (Refer to the-Noption, below, for information on creating user-defined chains.) This is a cosmetic change and does not affect the structure of the table.Note
If you attempt to rename one of the default chains, the system reports aMatch not founderror. You cannot rename the default chains.-F— Flushes the selected chain, which effectively deletes every rule in the chain. If no chain is specified, this command flushes every rule from every chain.-h— Provides a list of command structures, as well as a quick summary of command parameters and options.-I [<integer>]— Inserts the rule in the specified chain at a point specified by a user-defined integer argument. If no argument is specified, the rule is inserted at the top of the chain.Important
As noted above, the order of rules in a chain determines which rules apply to which packets. This is important to remember when adding rules using either the-Aor-Ioption.This is especially important when adding rules using the-Iwith an integer argument. If you specify an existing number when adding a rule to a chain,iptablesadds the new rule before (or above) the existing rule.-L— Lists all of the rules in the chain specified after the command. To list all rules in all chains in the defaultfiltertable, do not specify a chain or table. Otherwise, the following syntax should be used to list the rules in a specific chain in a particular table:iptables -L<chain-name>-t<table-name>Additional options for the-Lcommand option, which provide rule numbers and allow more verbose rule descriptions, are described in Section 2.6.2.6, “Listing Options”.-N— Creates a new chain with a user-specified name. The chain name must be unique, otherwise an error message is displayed.-P— Sets the default policy for the specified chain, so that when packets traverse an entire chain without matching a rule, they are sent to the specified target, such as ACCEPT or DROP.-R— Replaces a rule in the specified chain. The rule's number must be specified after the chain's name. The first rule in a chain corresponds to rule number one.-X— Deletes a user-specified chain. You cannot delete a built-in chain.-Z— Sets the byte and packet counters in all chains for a table to zero.
2.6.2.3. IPTables Parameter Options
Certain
iptables commands, including
those used to add, append, delete, insert, or replace rules within a
particular chain, require various parameters to construct a packet
filtering rule.
-c— Resets the counters for a particular rule. This parameter accepts thePKTSandBYTESoptions to specify which counter to reset.-d— Sets the destination hostname, IP address, or network of a packet that matches the rule. When matching a network, the following IP address/netmask formats are supported:N.N.N.N/M.M.M.MN.N.N.Nis the IP address range andM.M.M.Mis the netmask.N.N.N.N/MN.N.N.Nis the IP address range andMis the bitmask.
-f— Applies this rule only to fragmented packets.You can use the exclamation point character (!) option before this parameter to specify that only unfragmented packets are matched.Note
Distinguishing between fragmented and unfragmented packets is desirable, despite fragmented packets being a standard part of the IP protocol.Originally designed to allow IP packets to travel over networks with differing frame sizes, these days fragmentation is more commonly used to generate DoS attacks using mal-formed packets. It's also worth noting that IPv6 disallows fragmentation entirely.-i— Sets the incoming network interface, such aseth0orppp0. Withiptables, this optional parameter may only be used with the INPUT and FORWARD chains when used with thefiltertable and the PREROUTING chain with thenatandmangletables.This parameter also supports the following special options:- Exclamation point character (
!) — Reverses the directive, meaning any specified interfaces are excluded from this rule. - Plus character (
+) — A wildcard character used to match all interfaces that match the specified string. For example, the parameter-i eth+would apply this rule to any Ethernet interfaces but exclude any other interfaces, such asppp0.
If the-iparameter is used but no interface is specified, then every interface is affected by the rule.-j— Jumps to the specified target when a packet matches a particular rule.The standard targets areACCEPT,DROP,QUEUE, andRETURN.Extended options are also available through modules loaded by default with the Red Hat Enterprise LinuxiptablesRPM package. Valid targets in these modules includeLOG,MARK, andREJECT, among others. Refer to theiptablesman page for more information about these and other targets.This option can also be used to direct a packet matching a particular rule to a user-defined chain outside of the current chain so that other rules can be applied to the packet.If no target is specified, the packet moves past the rule with no action taken. The counter for this rule, however, increases by one.-o— Sets the outgoing network interface for a rule. This option is only valid for the OUTPUT and FORWARD chains in thefiltertable, and the POSTROUTING chain in thenatandmangletables. This parameter accepts the same options as the incoming network interface parameter (-i).-p <protocol>— Sets the IP protocol affected by the rule. This can be eithericmp,tcp,udp, orall, or it can be a numeric value, representing one of these or a different protocol. You can also use any protocols listed in the/etc/protocolsfile.The "all" protocol means the rule applies to every supported protocol. If no protocol is listed with this rule, it defaults to "all".-s— Sets the source for a particular packet using the same syntax as the destination (-d) parameter.
2.6.2.4. IPTables Match Options
Different network protocols provide specialized matching options
which can be configured to match a particular packet using that
protocol. However, the protocol must first be specified in the
iptables command. For example, -p <protocol-name>
enables options for the specified protocol. Note that you can also use
the protocol ID, instead of the protocol name. Refer to the following
examples, each of which have the same effect:
iptables -A INPUT -p icmp --icmp-type any -j ACCEPT iptables -A INPUT -p 5813 --icmp-type any -j ACCEPT
Service definitions are provided in the
/etc/services file. For readability, it is recommended that you use the service names rather than the port numbers.
Warning
Secure the
/etc/services file to
prevent unauthorized editing. If this file is editable, crackers can use
it to enable ports on your machine you have otherwise closed. To secure
this file, type the following commands as root:
[root@myServer ~]# chown root.root /etc/services
[root@myServer ~]# chmod 0644 /etc/services
[root@myServer ~]# chattr +i /etc/services
This prevents the file from being renamed, deleted or having links made to it.
2.6.2.4.1. TCP Protocol
These match options are available for the TCP protocol (
-p tcp):
--dport— Sets the destination port for the packet.To configure this option, use a network service name (such as www or smtp); a port number; or a range of port numbers.To specify a range of port numbers, separate the two numbers with a colon (:). For example:-p tcp --dport 3000:3200. The largest acceptable valid range is0:65535.Use an exclamation point character (!) before the--dportoption to match all packets that do not use that network service or port.To browse the names and aliases of network services and the port numbers they use, view the/etc/servicesfile.The--destination-portmatch option is synonymous with--dport.--sport— Sets the source port of the packet using the same options as--dport. The--source-portmatch option is synonymous with--sport.--syn— Applies to all TCP packets designed to initiate communication, commonly called SYN packets. Any packets that carry a data payload are not touched.Use an exclamation point character (!) before the--synoption to match all non-SYN packets.--tcp-flags <tested flag list> <set flag list>— Allows TCP packets that have specific bits (flags) set, to match a rule.The--tcp-flagsmatch option accepts two parameters. The first parameter is the mask; a comma-separated list of flags to be examined in the packet. The second parameter is a comma-separated list of flags that must be set for the rule to match.The possible flags are:ACKFINPSHRSTSYNURGALLNONE
For example, aniptablesrule that contains the following specification only matches TCP packets that have the SYN flag set and the ACK and FIN flags not set:--tcp-flags ACK,FIN,SYN SYNUse the exclamation point character (!) before the--tcp-flagsto reverse the effect of the match option.--tcp-option— Attempts to match with TCP-specific options that can be set within a particular packet. This match option can also be reversed with the exclamation point character (!).
2.6.2.4.2. UDP Protocol
These match options are available for the UDP protocol (
-p udp):
--dport— Specifies the destination port of the UDP packet, using the service name, port number, or range of port numbers. The--destination-portmatch option is synonymous with--dport.--sport— Specifies the source port of the UDP packet, using the service name, port number, or range of port numbers. The--source-portmatch option is synonymous with--sport.
For the
--dport and --sport options, to specify a range of port numbers, separate the two numbers with a colon (:). For example: -p tcp --dport 3000:3200. The largest acceptable valid range is 0:65535.
2.6.2.4.3. ICMP Protocol
The following match options are available for the Internet Control Message Protocol (ICMP) (
-p icmp):
--icmp-type— Sets the name or number of the ICMP type to match with the rule. A list of valid ICMP names can be retrieved by typing theiptables -p icmp -hcommand.
2.6.2.4.4. Additional Match Option Modules
Additional match options are available through modules loaded by the
iptables command.
To use a match option module, load the module by name using the
-m <module-name>, where <module-name> is the name of the module.
Many modules are available by default. You can also create modules to provide additional functionality.
The following is a partial list of the most commonly used modules:
limitmodule — Places limits on how many packets are matched to a particular rule.When used in conjunction with theLOGtarget, thelimitmodule can prevent a flood of matching packets from filling up the system log with repetitive messages or using up system resources.Refer to Section 2.6.2.5, “Target Options” for more information about theLOGtarget.Thelimitmodule enables the following options:--limit— Sets the maximum number of matches for a particular time period, specified as a<value>/<period>--limit 5/hourallows five rule matches per hour.Periods can be specified in seconds, minutes, hours, or days.If a number and time modifier are not used, the default value of3/houris assumed.--limit-burst— Sets a limit on the number of packets able to match a rule at one time.This option is specified as an integer and should be used in conjunction with the--limitoption.If no value is specified, the default value of five (5) is assumed.
statemodule — Enables state matching.Thestatemodule enables the following options:--state— match a packet with the following connection states:ESTABLISHED— The matching packet is associated with other packets in an established connection. You need to accept this state if you want to maintain a connection between a client and a server.INVALID— The matching packet cannot be tied to a known connection.NEW— The matching packet is either creating a new connection or is part of a two-way connection not previously seen. You need to accept this state if you want to allow new connections to a service.RELATED— The matching packet is starting a new connection related in some way to an existing connection. An example of this is FTP, which uses one connection for control traffic (port 21), and a separate connection for data transfer (port 20).
These connection states can be used in combination with one another by separating them with commas, such as-m state --state INVALID,NEW.
macmodule — Enables hardware MAC address matching.Themacmodule enables the following option:--mac-source— Matches a MAC address of the network interface card that sent the packet. To exclude a MAC address from a rule, place an exclamation point character (!) before the--mac-sourcematch option.
Refer to the
iptables man page for more match options available through modules.
2.6.2.5. Target Options
When a packet has matched a particular rule, the rule can direct the
packet to a number of different targets which determine the appropriate
action. Each chain has a default target, which is used if none of the
rules on that chain match a packet or if none of the rules which match
the packet specify a target.
The following are the standard targets:
<user-defined-chain>ACCEPT— Allows the packet through to its destination or to another chain.DROP— Drops the packet without responding to the requester. The system that sent the packet is not notified of the failure.QUEUE— The packet is queued for handling by a user-space application.RETURN— Stops checking the packet against rules in the current chain. If the packet with aRETURNtarget matches a rule in a chain called from another chain, the packet is returned to the first chain to resume rule checking where it left off. If theRETURNrule is used on a built-in chain and the packet cannot move up to its previous chain, the default target for the current chain is used.
In addition, extensions are available which allow other targets to
be specified. These extensions are called target modules or match option
modules and most only apply to specific tables and situations. Refer to
Section 2.6.2.4.4, “Additional Match Option Modules” for more information about match option modules.
Many extended target modules exist, most of which only apply to
specific tables or situations. Some of the most popular target modules
included by default in Red Hat Enterprise Linux are:
LOG— Logs all packets that match this rule. Because the packets are logged by the kernel, the/etc/syslog.conffile determines where these log entries are written. By default, they are placed in the/var/log/messagesfile.Additional options can be used after theLOGtarget to specify the way in which logging occurs:--log-level— Sets the priority level of a logging event. Refer to thesyslog.confman page for a list of priority levels.--log-ip-options— Logs any options set in the header of an IP packet.--log-prefix— Places a string of up to 29 characters before the log line when it is written. This is useful for writing syslog filters for use in conjunction with packet logging.Note
Due to an issue with this option, you should add a trailing space to thelog-prefixvalue.--log-tcp-options— Logs any options set in the header of a TCP packet.--log-tcp-sequence— Writes the TCP sequence number for the packet in the log.
REJECT— Sends an error packet back to the remote system and drops the packet.TheREJECTtarget accepts--reject-with(where<type><type>is the rejection type) allowing more detailed information to be returned with the error packet. The messageport-unreachableis the default error type given if no other option is used. Refer to theiptablesman page for a full list of<type>
Other target extensions, including several that are useful for IP masquerading using the
nat table, or with packet alteration using the mangle table, can be found in the iptables man page.
2.6.2.6. Listing Options
The default list command,
iptables -L [<chain-name>], provides a very basic overview of the default filter table's current chains. Additional options provide more information:
-v— Displays verbose output, such as the number of packets and bytes each chain has processed, the number of packets and bytes each rule has matched, and which interfaces apply to a particular rule.-x— Expands numbers into their exact values. On a busy system, the number of packets and bytes processed by a particular chain or rule may be abbreviated toKilobytes,Megabytes(Megabytes) orGigabytes. This option forces the full number to be displayed.-n— Displays IP addresses and port numbers in numeric format, rather than the default hostname and network service format.--line-numbers— Lists rules in each chain next to their numeric order in the chain. This option is useful when attempting to delete the specific rule in a chain or to locate where to insert a rule within a chain.-t <table-name>— Specifies a table name. If omitted, defaults to the filter table.
2.6.3. Saving IPTables Rules
Rules created with the
iptables command are stored in memory. If the system is restarted before saving the iptables
rule set, all rules are lost. For netfilter rules to persist through a
system reboot, they need to be saved. To save netfilter rules, type the
following command as root:
/sbin/service iptables save
This executes the
iptables init script, which runs the /sbin/iptables-save program and writes the current iptables configuration to /etc/sysconfig/iptables. The existing /etc/sysconfig/iptables file is saved as /etc/sysconfig/iptables.save.
The next time the system boots, the
iptables init script reapplies the rules saved in /etc/sysconfig/iptables by using the /sbin/iptables-restore command.
While it is always a good idea to test a new
iptables rule before committing it to the /etc/sysconfig/iptables file, it is possible to copy iptables rules into this file from another system's version of this file. This provides a quick way to distribute sets of iptables rules to multiple machines.
You can also save the iptables rules to a separate file for
distribution, backup or other purposes. To save your iptables rules,
type the following command as root:
[root@myServer ~]# iptables-save >where<filename><filename>is a user-defined name for your ruleset.
Important
If distributing the
/etc/sysconfig/iptables file to other machines, type /sbin/service iptables restart for the new rules to take effect.
Note
Note the difference between the
iptables command (/sbin/iptables), which is used to manipulate the tables and chains that constitute the iptables functionality, and the iptables service (/sbin/service iptables), which is used to enable and disable the iptables service itself.
2.6.4. IPTables Control Scripts
There are two basic methods for controlling
iptables in Red Hat Enterprise Linux:
- Firewall Configuration Tool (
system-config-firewall) — A graphical interface for creating, activating, and saving basic firewall rules. Refer to Section 2.5.2, “Basic Firewall Configuration” for more information. /sbin/service iptables— Used to manipulate various functions of<option>iptablesusing its initscript. The following options are available:start— If a firewall is configured (that is,/etc/sysconfig/iptablesexists), all runningiptablesare stopped completely and then started using the/sbin/iptables-restorecommand. This option only works if theipchainskernel module is not loaded. To check if this module is loaded, type the following command as root:[root@MyServer ~]# lsmod | grep ipchainsIf this command returns no output, it means the module is not loaded. If necessary, use the/sbin/rmmodcommand to remove the module.stop— If a firewall is running, the firewall rules in memory are flushed, and all iptables modules and helpers are unloaded.If theIPTABLES_SAVE_ON_STOPdirective in the/etc/sysconfig/iptables-configconfiguration file is changed from its default value toyes, current rules are saved to/etc/sysconfig/iptablesand any existing rules are moved to the file/etc/sysconfig/iptables.save.Refer to Section 2.6.4.1, “IPTables Control Scripts Configuration File” for more information about theiptables-configfile.restart— If a firewall is running, the firewall rules in memory are flushed, and the firewall is started again if it is configured in/etc/sysconfig/iptables. This option only works if theipchainskernel module is not loaded.If theIPTABLES_SAVE_ON_RESTARTdirective in the/etc/sysconfig/iptables-configconfiguration file is changed from its default value toyes, current rules are saved to/etc/sysconfig/iptablesand any existing rules are moved to the file/etc/sysconfig/iptables.save.Refer to Section 2.6.4.1, “IPTables Control Scripts Configuration File” for more information about theiptables-configfile.status— Displays the status of the firewall and lists all active rules.The default configuration for this option displays IP addresses in each rule. To display domain and hostname information, edit the/etc/sysconfig/iptables-configfile and change the value ofIPTABLES_STATUS_NUMERICtono. Refer to Section 2.6.4.1, “IPTables Control Scripts Configuration File” for more information about theiptables-configfile.panic— Flushes all firewall rules. The policy of all configured tables is set toDROP.This option could be useful if a server is known to be compromised. Rather than physically disconnecting from the network or shutting down the system, you can use this option to stop all further network traffic but leave the machine in a state ready for analysis or other forensics.save— Saves firewall rules to/etc/sysconfig/iptablesusingiptables-save. Refer to Section 2.6.3, “Saving IPTables Rules” for more information.
Note
To use the same initscript commands to control netfilter for IPv6, substitute
ip6tables for iptables in the /sbin/service commands listed in this section. For more information about IPv6 and netfilter, refer to Section 2.6.5, “IPTables and IPv6”.
2.6.4.1. IPTables Control Scripts Configuration File
The behavior of the
iptables initscripts is controlled by the /etc/sysconfig/iptables-config configuration file. The following is a list of directives contained in this file:
IPTABLES_MODULES— Specifies a space-separated list of additionaliptablesmodules to load when a firewall is activated. These can include connection tracking and NAT helpers.IPTABLES_MODULES_UNLOAD— Unloads modules on restart and stop. This directive accepts the following values:yes— The default value. This option must be set to achieve a correct state for a firewall restart or stop.no— This option should only be set if there are problems unloading the netfilter modules.
IPTABLES_SAVE_ON_STOP— Saves current firewall rules to/etc/sysconfig/iptableswhen the firewall is stopped. This directive accepts the following values:yes— Saves existing rules to/etc/sysconfig/iptableswhen the firewall is stopped, moving the previous version to the/etc/sysconfig/iptables.savefile.no— The default value. Does not save existing rules when the firewall is stopped.
IPTABLES_SAVE_ON_RESTART— Saves current firewall rules when the firewall is restarted. This directive accepts the following values:yes— Saves existing rules to/etc/sysconfig/iptableswhen the firewall is restarted, moving the previous version to the/etc/sysconfig/iptables.savefile.no— The default value. Does not save existing rules when the firewall is restarted.
IPTABLES_SAVE_COUNTER— Saves and restores all packet and byte counters in all chains and rules. This directive accepts the following values:yes— Saves the counter values.no— The default value. Does not save the counter values.
IPTABLES_STATUS_NUMERIC— Outputs IP addresses in numeric form instead of domain or hostnames. This directive accepts the following values:yes— The default value. Returns only IP addresses within a status output.no— Returns domain or hostnames within a status output.
2.6.5. IPTables and IPv6
If the
iptables-ipv6 package is
installed, netfilter in Red Hat Enterprise Linux can filter the
next-generation IPv6 Internet protocol. The command used to manipulate
the IPv6 netfilter is ip6tables.
Most directives for this command are identical to those used for
iptables, except the nat
table is not yet supported. This means that it is not yet possible to
perform IPv6 network address translation tasks, such as masquerading and
port forwarding.
Rules for
ip6tables are saved in the /etc/sysconfig/ip6tables file. Previous rules saved by the ip6tables initscripts are saved in the /etc/sysconfig/ip6tables.save file.
Configuration options for the
ip6tables init script are stored in /etc/sysconfig/ip6tables-config, and the names for each directive vary slightly from their iptables counterparts.
For example, the
iptables-config directive IPTABLES_MODULES:the equivalent in the ip6tables-config file is IP6TABLES_MODULES.
2.6.6. Additional Resources
Refer to the following sources for additional information on packet filtering with
iptables.
- Section 2.5, “Firewalls” — Contains a chapter about the role of firewalls within an overall security strategy as well as strategies for constructing firewall rules.
2.6.6.1. Installed IP Tables Documentation
man iptables— Contains a description ofiptablesas well as a comprehensive list of targets, options, and match extensions.
2.6.6.2. Useful IP Tables Websites
- http://www.netfilter.org/ — The home of the netfilter/iptables project. Contains assorted information about
iptables, including a FAQ addressing specific problems and various helpful guides by Rusty Russell, the Linux IP firewall maintainer. The HOWTO documents on the site cover subjects such as basic networking concepts, kernel packet filtering, and NAT configurations. - http://www.linuxnewbie.org/nhf/Security/IPtables_Basics.html — An introduction to the way packets move through the Linux kernel, plus an introduction to constructing basic
iptablescommands.
[11] Since system BIOSes differ between manufacturers, some may not support password protection of either type, while others may support one type but not the other.
[12] GRUB also accepts unencrypted passwords, but it is recommended that an MD5 hash be used for added security.
[13] This access is still subject to the restrictions imposed by SELinux, if it is enabled.