Chapter 6. Updating drivers during installation on Intel and AMD systems
In most cases, Red Hat Enterprise Linux already includes drivers for
the devices that make up your system. However, if your system contains
hardware that has been released very recently, drivers for this hardware
might not yet be included. Sometimes, a driver update that provides
support for a new device might be available from Red Hat or your
hardware vendor on a driver disc that contains rpm packages. Typically, the driver disc is available for download as an ISO image file.
Often, you do not need the new hardware during the installation
process. For example, if you use a DVD to install to a local hard drive,
the installation will succeed even if drivers for your network card are
not available. In situations like this, complete the installation and
add support for the piece of hardware afterward — refer to
Section 35.1.1, “Driver update rpm packages” for details of adding this support.
In other situations, you might want to add drivers for a device during
the installation process to support a particular configuration. For
example, you might want to install drivers for a network device or a
storage adapter card to give the installer access to the storage devices
that your system uses. You can use a driver disc to add this support
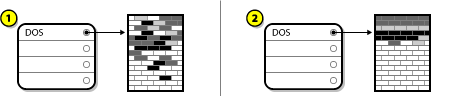
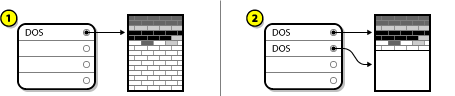
during installation in one of three ways:
place the ISO image file of the driver disc in a location accessible to the installer:
on a local hard drive
a USB flash drive
create a driver disc by extracting the image file onto:
create an initial ramdisk update from the
image file and store it on a PXE server. This is an advanced procedure
that you should consider only if you cannot perform a driver update with
any other method.
If Red Hat, your hardware vendor, or a trusted third party told you
that you will require a driver update during the installation process,
choose a method to supply the update from the methods described in this
chapter and test it before beginning the installation. Conversely, do
not perform a driver update during installation unless you are certain
that your system requires it. Although installing an unnecessary driver
update will not cause harm, the presence of a driver on a system for
which it was not intended can complicate support.
6.1. Limitations of driver updates during installation
Unfortunately, some situations persist in which you cannot use a driver update to provide drivers during installation:
- Devices already in use
You cannot use a driver update to replace drivers that the
installation program has already loaded. Instead, you must complete the
installation with the drivers that the installation program loaded and
update to the new drivers after installation, or, if you need the new
drivers for the installation process, consider performing an initial RAM
disk driver update — refer to
Section 6.2.3, “Preparing an initial RAM disk update”.
- Devices with an equivalent device available
Because all devices of the same type are initialized together, you
cannot update drivers for a device if the installation program has
loaded drivers for a similar device. For example, consider a system that
has two different network adapters, one of which has a driver update
available. The installation program will initialize both adapters at the
same time, and therefore, you will not be able to use this driver
update. Again, complete the installation with the drivers loaded by the
installation program and update to the new drivers after installation,
or use an initial RAM disk driver update.
6.2. Preparing for a driver update during installation
If a driver update is necessary and available for your hardware, Red
Hat or a trusted third party such as the hardware vendor will typically
provide it in the form of an image file in ISO format. Some methods of
performing a driver update require you to make the image file available
to the installation program, others require you to use the image file to
make a driver update disk, and one requires you to prepare an initial
RAM disk update:
- Methods that use the image file itself
local hard drive
USB flash drive
- Methods that use a driver update disk produced from an image file
- Methods that use an initial RAM disk update
6.2.1. Preparing to use a driver update image file
6.2.1.1. Preparing to use an image file on local storage
To make the ISO image file available on local storage, such as a hard
drive or USB flash drive, simply copy the file onto the storage device.
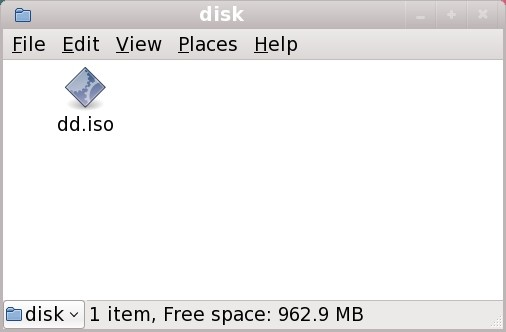
You can rename the file if you find it helpful to do so, but you must
not change the filename extension, which must remain .iso. In the following example, the file is named dd.iso:
Note that if you use this method, the storage device will contain only a
single file. This differs from driver discs on formats such as CD and
DVD, which contain many files. The ISO image file contains all of the
files that would normally be on a driver disc.
6.2.2. Preparing a driver disc
You can create a driver update disc on CD or DVD.
6.2.2.1. Creating a driver update disk on CD or DVD
CD/DVD Creator is
part of the GNOME desktop. If you use a different Linux desktop, or a
different operating system altogether, you will need to use another
piece of software to create the CD or DVD. The steps will be generally
similar.
Make sure that the software that you choose can create CDs or DVDs
from image files. While this is true of most CD and DVD burning
software, exceptions exist. Look for a button or menu entry labeled burn from image
or similar. If your software lacks this feature, or you do not select
it, the resulting disk will hold only the image file itself, instead of
the contents of the image file.
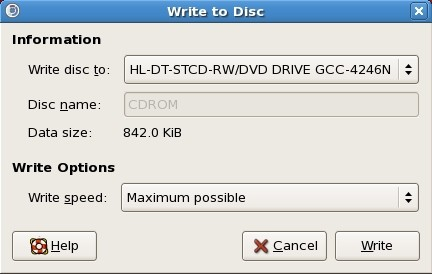
Use the desktop file manager to locate the ISO image file of the
driver disc, supplied to you by Red Hat or your hardware vendor.
Right-click on this file and choose Write to disc. You will see a window similar to the following:
Click the Write button. If a blank disc is not already in the drive, CD/DVD Creator will prompt you to insert one.
After you burn a driver update disk CD or DVD, verify that the disk was
created successfully by inserting it into your system and browsing to
it using the file manager. You should see a single file named rhdd3 and a directory named rpms:
Figure 6.4. Contents of a typical driver update disc on CD or DVD
If you see only a single file ending in .iso, then you have not created the disk correctly and should try again. Ensure that you choose an option similar to burn from image if you use a Linux desktop other than GNOME or if you use a different operating system.
6.2.3. Preparing an initial RAM disk update
This is an advanced procedure that you should consider only if you cannot perform a driver update with any other method.
The Red Hat Enterprise Linux installation program can load updates for itself early in the installation process from a
RAM disk
— an area of your computer's memory that temporarily behaves as if it
were a disk. You can use this same capability to load driver updates. To
perform a driver update during installation, your computer must be able
to boot from a
preboot execution environment (PXE) server, and you must have a PXE server available on your network. Refer to
Chapter 30, Setting Up an Installation Server for instructions on using PXE during installation.
To make the driver update available on your PXE server:
Place the driver update image file on your PXE server. Usually, you
would do this by downloading it to the PXE server from a location on the
Internet specified by Red Hat or your hardware vendor. Names of driver
update image files end in .iso.
Copy the driver update image file into the /tmp/initrd_update directory.
Rename the driver update image file to dd.img.
At the command line, change into the /tmp/initrd_update directory, type the following command, and press Enter:
find . | cpio --quiet -c -o | gzip -9 >/tmp/initrd_update.img
Copy the file /tmp/initrd_update.img into the directory the holds the target that you want to use for installation. This directory is placed under the /tftpboot/pxelinux/ directory. For example, /tftpboot/pxelinux/r6c/ might hold the PXE target for Red Hat Enterprise Linux 6 Client.
Edit the /tftpboot/pxelinux/pxelinux.cfg/default file to include an entry that includes the initial RAM disk update that you just created, in the following format:
label target-dd
kernel target/vmlinuz
append initrd=target/initrd.img,target/dd.img
Where target is the target that you want to use for installation.
Example 6.1. Preparing an initial RAM disk update from a driver update image file
In this example, driver_update.iso is a
driver update image file that you downloaded from the Internet to a
directory on your PXE server. The target that you want to PXE boot from
is located in /tftpboot/pxelinux/r6c/
At the command line, change to the directory that holds the file and enter the following commands:
$ cp driver_update.iso /tmp/initrd_update/dd.img
$ cd /tmp/initrd_update
$ find . | cpio --quiet -c -o | gzip -9 >/tmp/initrd_update.img
$ cp /tmp/initrd_update.img /tftpboot/pxelinux/r6c/dd.img
Edit the /tftpboot/pxelinux/pxelinux.cfg/default file and include the following entry:
label r6c-dd
kernel r6c/vmlinuz
append initrd=r6c/initrd.img,r6c/dd.img
6.4. Specifying the location of a driver update image file or driver update disk
If the installer detects more than one possible device that could hold a
driver update, it prompts you to select the correct device. If you are
not sure which option represents the device on which the driver update
is stored, try the various options in order until you find the correct
one.
If the device that you choose contains no suitable update media, the installer will prompt you to make another choice.
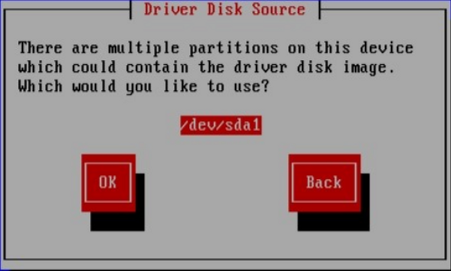
If you made a driver update disk on CD, DVD, or USB flash drive, the
installer now loads the driver update. However, if the device that you
selected is a type of device that could contain more than one partition
(whether the device currently has more than one partition or not), the
installer might prompt you to select the partition that holds the driver
update.
The installer prompts you to specify which file contains the driver update:
Expect to see these screens if you stored the driver update on an
internal hard drive or on a USB storage device. You should not see them
if the driver update is on a CD or DVD.
Regardless of whether you are providing a driver update in the form of
an image file or with a driver update disk, the installer now copies the
appropriate update files into a temporary storage area (located in
system RAM and not on disk). The installer might ask whether you would
like to use additional driver updates. If you select Yes, you can load additional updates in turn. When you have no further driver updates to load, select No.
If you stored the driver update on removeable media, you can now safely
eject or disconnect the disk or device. The installer no longer
requires the driver update, and you can re-use the media for other
purposes.
Chapter 7. Booting the Installer
Red Hat Enterprise Linux 6 does not support UEFI for 32-bit x86 systems.
Note that the boot configurations of UEFI and BIOS differ
significantly from each other. Therefore, the installed system must boot
using the same firmware that was used during installation. You cannot
install the operating system on a system that uses BIOS and then boot
this installation on a system that uses UEFI.
Red Hat Enterprise Linux 6 supports version 2.2 of the UEFI
specification. Hardware that supports version 2.3 of the UEFI
specification or later should boot and operate with Red Hat Enterprise
Linux 6, but the additional functionality defined by these later
specifications will not be available. The UEFI specifications are
available from
http://www.uefi.org/specs/agreement/
To start the installation program from a Red Hat Enterprise Linux DVD or from minimal boot media, follow this procedure:
Power on your computer system.
Insert the media in your computer.
Power off your computer with the boot media still inside.
Power on your computer system.
You might need to press a specific key or combination of keys to boot
from the media. On most computers, a message appears briefly on the
screen very soon after you turn on the computer. Typically, it is worded
something like Press F10 to select boot device,
although the specific wording and the key that you must press varies
widely from computer to computer. Consult the documentation for your
computer or motherboard, or seek support from the hardware manufacturer
or vendor.
If your computer does not allow you to select a boot device as it starts up, you might need to configure your system's
Basic Input/Output System (
BIOS) to boot from the media.
To change your BIOS settings on an x86, AMD64, or Intel 64 system,
watch the instructions provided on your display when your computer first
boots. A line of text appears, telling you which key to press to enter
the BIOS settings.
Once you have entered your BIOS setup program, find the section where
you can alter your boot sequence. The default is often C, A or A, C
(depending on whether you boot from your hard drive [C] or a diskette
drive [A]). Change this sequence so that the DVD is first in your boot
order and that C or A (whichever is your typical boot default) is
second. This instructs the computer to first look at the DVD drive for
bootable media; if it does not find bootable media on the DVD drive, it
then checks your hard drive or diskette drive.
Save your changes before exiting the BIOS. For more information, refer to the documentation that came with your system.
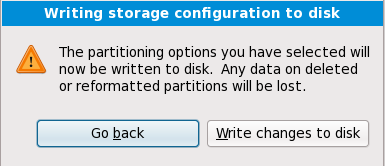
To abort the installation, either press Ctrl +Alt+Del
or power off your computer with the power switch. You may abort the
installation process without consequence at any time prior to selecting Write changes to disk on the Write partitioning to disk
screen. Red Hat Enterprise Linux makes no permanent changes to your
computer until that point. Please be aware that stopping the
installation after partitioning has begun can leave your computer
unusable.
7.1. Starting the Installation Program
Red Hat Enterprise Linux 6 does not support UEFI for 32-bit x86 systems.
Note that the boot configurations of UEFI and BIOS differ
significantly from each other. Therefore, the installed system must boot
using the same firmware that was used during installation. You cannot
install the operating system on a system that uses BIOS and then boot
this installation on a system that uses UEFI.
Red Hat Enterprise Linux 6 supports version 2.2 of the UEFI
specification. Hardware that supports version 2.3 of the UEFI
specification or later should boot and operate with Red Hat Enterprise
Linux 6, but the additional functionality defined by these later
specifications will not be available. The UEFI specifications are
available from
http://www.uefi.org/specs/agreement/
To start, first make sure that you have all necessary resources for the installation. If you have already read through
Chapter 3, Planning for Installation on the x86 Architecture,
and followed the instructions, you should be ready to start the
installation process. When you have verified that you are ready to
begin, boot the installation program using the Red Hat Enterprise Linux
DVD or any boot media that you have created.
7.1.1. Booting the Installation Program on x86, AMD64, and Intel 64 Systems
You can boot the installation program using any one of the following media (depending upon what your system can support):
Red Hat Enterprise Linux DVD — Your machine supports a bootable DVD drive and you have the Red Hat Enterprise Linux installation DVD.
Boot CD-ROM — Your machine supports a bootable CD-ROM drive and you want to perform network or hard drive installation.
USB flash drive — Your machine supports booting from a USB device.
Insert the boot media and reboot the system.
You might need to press a specific key or combination of keys to boot
from the media. On most computers, a message appears briefly on the
screen very soon after you turn on the computer. Typically, it is worded
something like Press F10 to select boot device,
although the specific wording and the key that you must press varies
widely from computer to computer. Consult the documentation for your
computer or motherboard, or seek support from the hardware manufacturer
or vendor.
If your computer does not allow you to select a boot device as it starts up, you might need to configure your system's
Basic Input/Output System (
BIOS) to boot from the media.
To change your BIOS settings on an x86, AMD64, or Intel 64 system,
watch the instructions provided on your display when your computer first
boots. A line of text appears, telling you which key to press to enter
the BIOS settings.
Once you have entered your BIOS setup program, find the section where
you can alter your boot sequence. The default is often C, A or A, C
(depending on whether you boot from your hard drive [C] or a diskette
drive [A]). Change this sequence so that the DVD is first in your boot
order and that C or A (whichever is your typical boot default) is
second. This instructs the computer to first look at the DVD drive for
bootable media; if it does not find bootable media on the DVD drive, it
then checks your hard drive or diskette drive.
Save your changes before exiting the BIOS. For more information, refer to the documentation that came with your system.
After a short delay, a screen containing the boot:
prompt should appear. The screen contains information on a variety of
boot options. Each boot option also has one or more help screens
associated with it. To access a help screen, press the appropriate
function key as listed in the line at the bottom of the screen.
As you boot the installation program, be aware of two issues:
Once the boot: prompt appears, the
installation program automatically begins if you take no action within
the first minute. To disable this feature, press one of the help screen
function keys.
If you press a help screen function key, there is a slight delay while the help screen is read from the boot media.
Normally, you only need to press
Enter
to boot. Be sure to watch the boot messages to review if the Linux
kernel detects your hardware. If your hardware is properly detected,
continue to the next section. If it does not properly detect your
hardware, you may need to restart the installation and use one of the
boot options provided in
Chapter 28, Boot Options.
7.1.2. Additional Boot Options
While it is easiest to boot using a DVD and perform a graphical
installation, sometimes there are installation scenarios where booting
in a different manner may be needed. This section discusses additional
boot options available for Red Hat Enterprise Linux.
To pass options to the boot loader on an x86, AMD64, or Intel 64
system, use the instructions as provided in the boot loader option
samples below.
To perform a text mode installation, at the installation boot prompt, type:
linux text
To specify an installation source, use the
linux repo= option. For example:
linux repo=cdrom:device
linux repo=ftp://username:password@URL
linux repo=http://URL
linux repo=hd:device
linux repo=nfs:options:server:/path
linux repo=nfsiso:options:server:/path
In these examples, cdrom refers to a CD or DVD drive, ftp refers to a location accessible by FTP, http refers to a location accessible by HTTP, hd refers to an ISO image file accessible on a hard drive partition, nfs refers to an expanded tree of installation files accessible by NFS, and nfsiso refers to an ISO image file accessible by NFS.
ISO images have an SHA256 checksum embedded in them. To test the
checksum integrity of an ISO image, at the installation boot prompt,
type:
linux mediacheck
The installation program prompts you to insert a DVD or select an ISO image to test, and select OK
to perform the checksum operation. This checksum operation can be
performed on any Red Hat Enterprise Linux DVD. It is strongly
recommended to perform this operation on any Red Hat Enterprise Linux
DVD that was created from downloaded ISO images. This command works with
the DVD, hard drive ISO, and NFS ISO installation methods.
If you need to perform the installation in
serial mode, type the following command:
linux console=<device>
For text mode installations, use:
linux text console=<device>
In the above command, <device> should be the device you are using (such as ttyS0 or ttyS1). For example, linux text console=ttyS0.
Text mode installations using a serial terminal work best when the
terminal supports UTF-8. Under UNIX and Linux, Kermit supports UTF-8.
For Windows, Kermit '95 works well. Non-UTF-8 capable terminals works as
long as only English is used during the installation process. An
enhanced serial display can be used by passing the utf8 command as a boot-time option to the installation program. For example:
linux console=ttyS0 utf8
Options can also be passed to the kernel. For example, to apply
updates for the anaconda installation program from a USB storage device
enter:
linux updates
For text mode installations, use:
linux text updates
This command results in a prompt for the path to the device that contains updates for anaconda. It is not needed if you are performing a network installation and have already placed the updates image contents in rhupdates/ on the server.
After entering any options, press Enter to boot using those options.
7.3. Installing from a Different Source
You can install Red Hat Enterprise Linux from the ISO images stored on
hard disk, or from a network using NFS, FTP, or HTTP methods.
Experienced users frequently use one of these methods because it is
often faster to read data from a hard disk or network server than from a
DVD.
The following table summarizes the different boot methods and recommended installation methods to use with each:
Table 7.1. Boot methods and installation sources
|
Boot method
|
Installation source
|
|---|
|
Installation DVD
|
DVD, network, or hard disk
|
|
Installation USB flash drive
|
USB flash drive, installation DVD, network, or hard disk
|
|
Minimal boot CD or USB, rescue CD
|
Network or hard disk
|
7.4. Booting from the Network using PXE
Configure the computer to boot from the network interface. This option is in the BIOS, and may be labeled Network Boot or Boot Services.
Once you properly configure PXE booting, the computer can boot the Red
Hat Enterprise Linux installation system without any other media.
To boot a computer from a PXE server:
Ensure that the network cable is attached. The link indicator light
on the network socket should be lit, even if the computer is not
switched on.
Switch on the computer.
A menu screen appears. Press the number key that corresponds to the desired option.
If your PC does not boot from the netboot server, ensure that the
BIOS is configured to boot first from the correct network interface.
Some BIOS systems specify the network interface as a possible boot
device, but do not support the PXE standard. Refer to your hardware
documentation for more information.
Some servers with multiple network interfaces might not assign eth0 to
the first network interface as the firmware interface knows it, which
can cause the installer to try to use a different network interface from
the one that was used by PXE. To change this behavior, use the
following in pxelinux.cfg/* config files:
IPAPPEND 2
APPEND ksdevice=bootif
These configuration options above cause the installer to use the same
network interface the firmware interface and PXE use. You can also use
the following option:
ksdevice=link
This option causes the installer to use the first network device it finds that is linked to a network switch.
Chapter 9. Installing using anaconda
This chapter describes an installation using the graphical user interface of anaconda.
9.1. The Text Mode Installation Program User Interface
Installing in text mode does not prevent you from using a graphical interface on your system once it is installed.
Apart from the graphical installer, anaconda also includes a text-based installer.
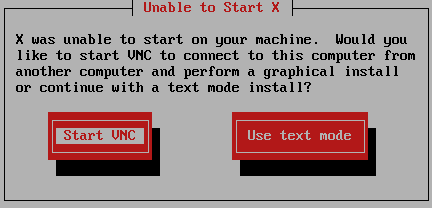
If one of the following situations occurs, the installation program uses text mode:
While text mode installations are not explicitly documented, those
using the text mode installation program can easily follow the GUI
installation instructions. However, because text mode presents you with a
simpler, more streamlined insatallation process, certain options that
are available in graphical mode are not also available in text mode.
These differences are noted in the description of the installation
process in this guide, and include:
configuring advanced storage methods such as LVM, RAID, FCoE, zFCP, and iSCSI.
customizing the partition layout
customizing the bootloader layout
selecting packages during installation
configuring the installed system with Firstboot
9.2. The Graphical Installation Program User Interface
If you have used a graphical user interface (GUI)
before, you are already familiar with this process; use your mouse to
navigate the screens, click buttons, or enter text fields.
You can also navigate through the installation using the keyboard. The Tab key allows you to move around the screen, the Up and Down arrow keys to scroll through lists, + and - keys expand and collapse lists, while Space and Enter selects or removes from selection a highlighted item. You can also use the Alt+X key command combination as a way of clicking on buttons or making other screen selections, where X is replaced with any underlined letter appearing within that screen.
If you are using an x86, AMD64, or Intel 64 system, and you do not
wish to use the GUI installation program, the text mode installation
program is also available. To start the text mode installation program,
use the following command at the boot: prompt:
linux text
It is highly recommended that installs be performed using the GUI
installation program. The GUI installation program offers the full
functionality of the Red Hat Enterprise Linux installation program,
including LVM configuration which is not available during a text mode
installation.
Users who must use the text mode installation program can follow the
GUI installation instructions and obtain all needed information.
9.2.1. Screenshots during installation
Anaconda allows you to take screenshots during the installation process. At any time during installation, press Shift+Print Screen and anaconda will save a screenshot to /root/anaconda-screenshots.
If you are performing a Kickstart installation, use the
autostep --autoscreenshot option to generate a screenshot of each step of the installation automatically. Refer to
Section 32.3, “Creating the Kickstart File” for details of configuring a Kickstart file.
9.2.2. A Note about Virtual Consoles
The Red Hat Enterprise Linux installation program offers more than the
dialog boxes of the installation process. Several kinds of diagnostic
messages are available to you, as well as a way to enter commands from a
shell prompt. The installation program displays these messages on five virtual consoles, among which you can switch using a single keystroke combination.
A virtual console is a shell prompt in a non-graphical environment,
accessed from the physical machine, not remotely. Multiple virtual
consoles can be accessed simultaneously.
These virtual consoles can be helpful if you encounter a problem while
installing Red Hat Enterprise Linux. Messages displayed on the
installation or system consoles can help pinpoint a problem. Refer to
Table 9.1, “Console, Keystrokes, and Contents” for a listing of the virtual consoles, keystrokes used to switch to them, and their contents.
Generally, there is no reason to leave the default console (virtual
console #6) for graphical installations unless you are attempting to
diagnose installation problems.
Table 9.1. Console, Keystrokes, and Contents
|
console
|
keystrokes
|
contents
|
|---|
|
1
|
ctrl+alt+f1
|
graphical display
|
|
2
|
ctrl+alt+f2
|
shell prompt
|
|
3
|
ctrl+alt+f3
|
install log (messages from installation program)
|
|
4
|
ctrl+alt+f4
|
system-related messages
|
|
5
|
ctrl+alt+f5
|
other messages
|
9.3. Welcome to Red Hat Enterprise Linux
The Welcome screen does not prompt you for any input.
Click on the Next button to continue.
9.4. Keyboard Configuration
Using your mouse, select the correct layout type (for example, U.S.
English) for the keyboard you would prefer to use for the installation
and as the system default (refer to the figure below).
Once you have made your selection, click Next to continue.
Red Hat Enterprise Linux includes support for more than one keyboard
layout for many languages. In particular, most European languages
include a latin1 option, which uses dead keys
to access certain characters, such as those with diacritical marks.
When you press a dead key, nothing will appear on your screen until you
press another key to "complete" the character. For example, to type é on a latin1 keyboard layout, you would press (and release) the ' key, and then press the E key. By contrast, you access this character on some other keyboards by pressing and holding down a key (such as Alt-Gr) while you press the E key. Other keyboards might have a dedicated key for this character.
To change your keyboard layout type after you have completed the installation, use the Keyboard Configuration Tool.
Type the system-config-keyboard command in a shell prompt to launch the Keyboard Configuration Tool. If you are not root, it prompts you for the root password to continue.
You can install Red Hat Enterprise Linux on a large variety of storage
devices. This screen allows you to select either basic or specialized
storage devices.
- Basic Storage Devices
Select to install Red Hat Enterprise Linux on the following storage devices:
- Specialized Storage Devices
Select to install Red Hat Enterprise Linux on the following storage devices:
Use the option to configure Internet Small Computer System Interface (iSCSI) and FCoE (Fiber Channel over Ethernet) connections.
If you select ,
anaconda automatically detects the local storage attached to the system and does not require further input from you. Proceed to
Section 9.6, “Setting the Hostname”.
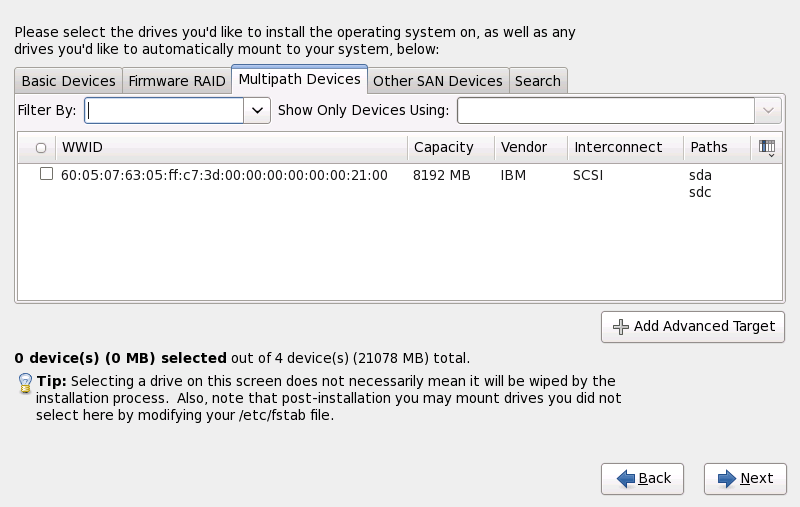
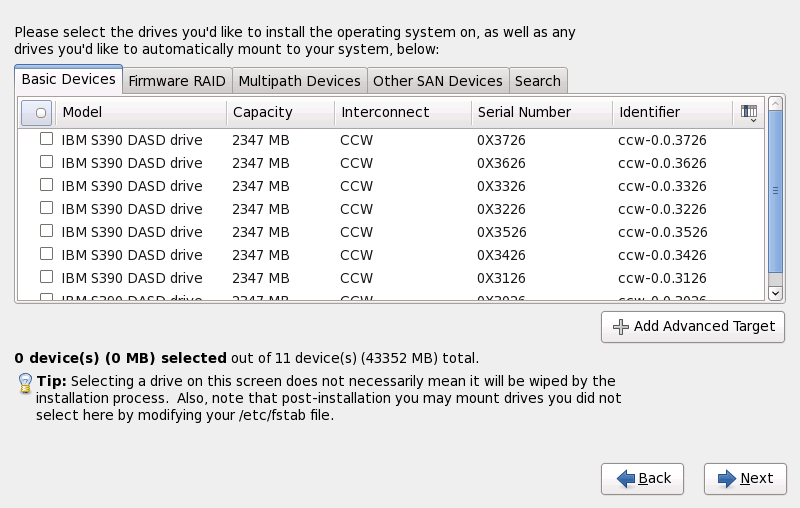
9.5.1. The Storage Devices Selection Screen
The storage devices selection screen displays all storage devices to which anaconda has access.
Devices are grouped under the following tabs:
- Basic Devices
Basic storage devices directly connected to the local system, such as hard disk drives and solid-state drives.
- Firmware RAID
Storage devices attached to a firmware RAID controller.
- Multipath Devices
Storage devices accessible through more than one path, such as
through multiple SCSI controllers or Fiber Channel ports on the same
system.
- Other SAN Devices
Any other devices available on a storage area network (SAN).
The storage devices selection screen also contains a Search tab that allows you to filter storage devices either by their World Wide Identifier (WWID) or by the port, target, or logical unit number (LUN) at which they are accessed.
The tab contains a drop-down menu to select searching by port, target,
WWID, or LUN (with corresponding text boxes for these values). Searching
by WWID or LUN requires additional values in the corresponding text
box.
Each tab presents a list of devices detected by anaconda,
with information about the device to help you to identify it. A small
drop-down menu marked with an icon is located to the right of the column
headings. This menu allows you to select the types of data presented on
each device. For example, the menu on the Multipath Devices tab allows you to specify any of , , , , and
to include among the details presented for each device. Reducing or
expanding the amount of information presented might help you to identify
particular devices.
Each device is presented on a separate row, with a checkbox to its
left. Click the checkbox to make a device available during the
installation process, or click the radio button
at the left of the column headings to select or deselect all the
devices listed in a particular screen. Later in the installation
process, you can choose to install Red Hat Enterprise Linux onto any of
the devices selected here, and can choose to automatically mount any of
the other devices selected here as part of the installed system.
Note that the devices that you select here are not automatically erased
by the installation process. Selecting a device on this screen does
not, in itself, place data stored on the device at risk. Note also that
any devices that you do not select here to form part of the installed
system can be added to the system after installation by modifying the /etc/fstab file.
Any storage devices that you do not select on this screen are hidden from anaconda entirely. To chain load the Red Hat Enterprise Linux boot loader from a different boot loader, select all the devices presented in this screen.
9.5.1.1. Advanced Storage Options
From this screen you can configure an
iSCSI (SCSI over TCP/IP) target or
FCoE (Fibre channel over ethernet)
SAN (storage area network). Refer to
Appendix B, ISCSI disks for an introduction to iSCSI.
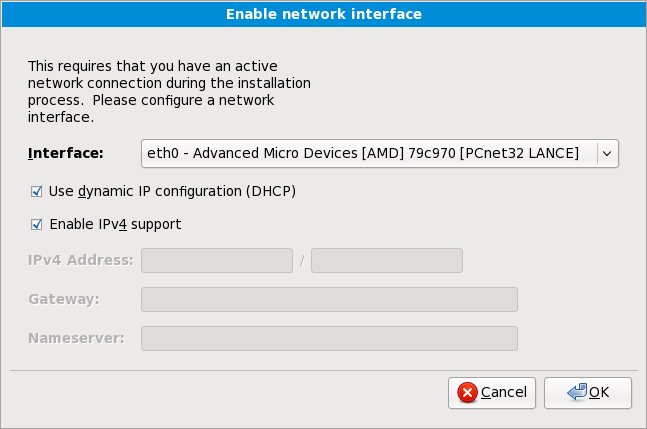
9.5.1.1.1. Enable Network Interfaces
Use this dialog to configure the network interfaces through which the system will connect to networked storage devices.
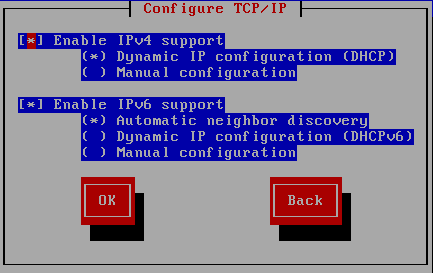
If your network does not have DHCP enabled, or if you need to override
the DHCP settings, select the network interface that you plan to use
from the Interfaces menu. Clear the checkbox for Use dynamic IP configuration (DHCP). You can now enter an IPv4 address and netmask for this system in the form address / netmask, along with the gateway address and nameserver address for your network.
Click OK to accept these settings and continue.
9.5.1.1.2. Configure iSCSI Parameters
To configure an ISCSI target invoke the 'Configure ISCSI Parameters'
dialog by selecting 'Add ISCSI target' and clicking on the 'Add Drive'
button. Fill in the details for the ISCSI target IP and provide a unique
ISCSI initiator name to identify this system. If the ISCSI target uses
CHAP (Challenge Handshake Authentication Protocol) for authentication,
enter the CHAP username and password. If your enviroment uses 2-way CHAP
(also called "Mutual CHAP"), also enter the reverse CHAP username and
password. Click the 'Add target' button to attempt connection to the
ISCSI target using this information.
Note that you will be able to reattempt with a different ISCSI target
IP should you enter it incorrectly, but to change the ISCSI initiator
name you will need to restart the installation.
9.5.1.1.3. Configure FCoE Parameters
To configure an FCoE SAN, select Add FCoE SAN and click Add Drive.
On the menu that appears in the next dialog box, select the network interface that is connected to your FCoE switch and click Add FCoE Disk(s).
Data Center Bridging (DCB) is a set of
enhancements to the Ethernet protocols designed to increase the
efficiency of Ethernet connections in storage networks and clusters.
Enable or disable the installer's awareness of DCB with the checkbox in
this dialog.
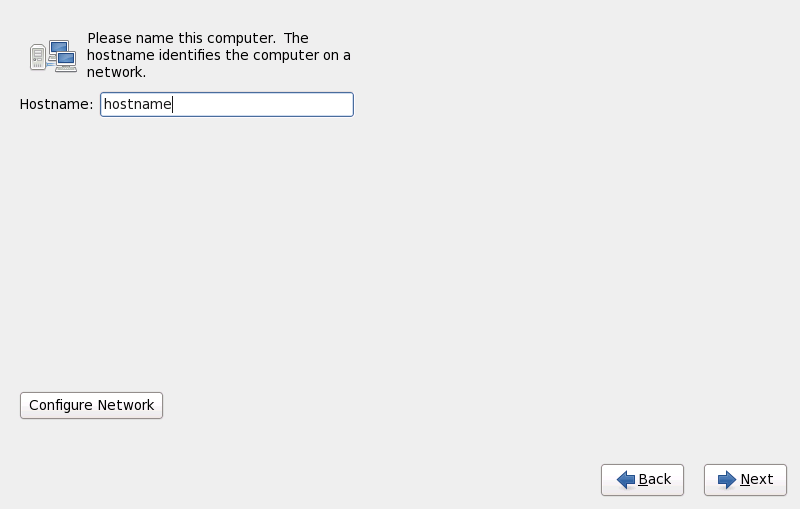
9.6. Setting the Hostname
Setup prompts you to supply a host name for this computer, either as a fully-qualified domain name (FQDN) in the format hostname.domainname or as a short host name in the format hostname. Many networks have a Dynamic Host Configuration Protocol
(DHCP) service that automatically supplies connected systems with a
domain name. To allow the DHCP service to assign the domain name to this
machine, specify the short host name only.
You may give your system any name provided that the full hostname is
unique. The hostname may include letters, numbers and hyphens.
If your Red Hat Enterprise Linux system is connected directly
to the Internet, you must pay attention to additional considerations to
avoid service interruptions or risk action by your upstream service
provider. A full discussion of these issues is beyond the scope of this
document.
The installation program does not configure modems. Configure these devices after installation with the Network utility. The settings for your modem are specific to your particular Internet Service Provider (ISP).
9.6.1. Edit Network Connections
When a Red Hat Enterprise Linux 6 installation boots for the
first time, it activates any network interfaces that you configured
during the installation process. However, the installer does not prompt
you to configure network interfaces on some common installation paths,
for example, when you install Red Hat Enterprise Linux from a DVD to a
local hard drive.
When you install Red Hat Enterprise Linux from a local installation
source to a local storage device, be sure to configure at least one
network interface manually if you require network access when the system
boots for the first time.
To change your network configuration after you have completed the installation, use the Network Administration Tool.
Type the system-config-network command in a shell prompt to launch the Network Administration Tool. If you are not root, it prompts you for the root password to continue.
The Network Administration Tool is now deprecated and will be replaced by NetworkManager during the lifetime of Red Hat Enterprise Linux 6.
To configure a network connection manually, click the button Configure Network. The Network Connections
dialog appears that allows you to configure wired, wireless, mobile
broadband, VPN, and DSL connections for the system using the NetworkManager tool. A full description of all configurations possible with NetworkManager
is beyond the scope of this guide. This section only details the most
typical scenario of how to configure wired connections during
installation. Configuration of other types of network is broadly
similar, although the specific parameters that you must configure are
necessarily different.
To add a new connection or to modify or remove a connection configured
earlier in the installation process, click the tab that corresponds to
the type of connection. To add a new connection of that type, click Add. To modify an existing connection, select it in the list and click Edit.
In either case, a dialog box appears with a set of tabs that is
appropriate to the particular connection type, as described below. To
remove a connection, select it in the list and click Delete.
When you have finished editing network settings, click Apply
to activate your changes. Note that re-configuring your network
settings might require you to re-connect using the new settings.
9.6.1.1. Options common to all types of connection
Certain configuration options are common to all connection types.
Specify a name for the connection in the Connection name name field.
Select Start automatically to start the connection automatically when the system boots.
Select Available to all users to make the connection available to all users.
Use the Wired tab to specify or change the media access control (MAC) address for the network adapter, and either set the maximum transmission unit (MTU, in bytes) that can pass through the interface.
9.6.1.3. The 802.1x Security tab
Use the 802.1x Security tab to configure 802.1X port-based network access control (PNAC). Select Use 802.1X security for this connection to enable access control, then specify details of your network. The configuration options include:
- Authentication
Choose one of the following methods of authentication:
TLS for Transport Layer Security
Tunneled TLS for Tunneled Transport Layer Security, otherwise known as TTLS, or EAP-TTLS
Protected EAP (PEAP) for Protected Extensible Authentication Protocol
- Identity
Provide the identity of this server.
- User certificate
Browse to a personal X.509 certificate file encoded with Distinguished Encoding Rules (DER) or Privacy Enhanced Mail (PEM).
- CA certificate
Browse to a X.509 certificate authority certificate file encoded with Distinguished Encoding Rules (DER) or Privacy Enhanced Mail (PEM).
- Private key
Browse to a private key file encoded with Distinguished Encoding Rules (DER), Privacy Enhanced Mail (PEM), or the Personal Information Exchange Syntax Standard (PKCS#12).
- Private key password
The password for the private key specified in the Private key field. Select Show password to make the password visible as you type it.
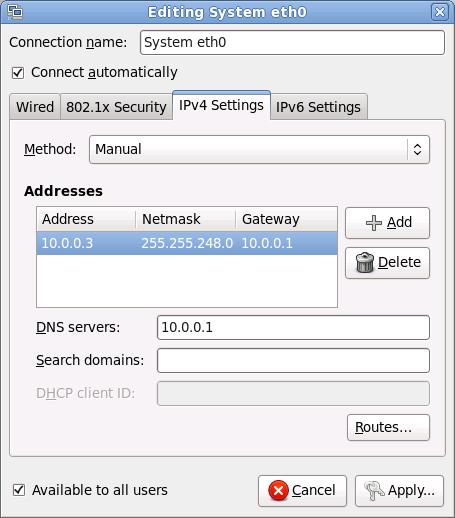
9.6.1.4. The IPv4 Settings tab
Use the IPv4 Settings tab tab to configure the IPv4 parameters for the previously selected network connection.
Use the Method drop-down menu to specify which settings the system should attempt to obtain from a Dynamic Host Configuration Protocol (DHCP) service running on the network. Choose from the following options:
- Automatic (DHCP)
IPv4 parameters are configured by the DHCP service on the network.
- Automatic (DHCP) addresses only
The IPv4 address, netmask, and gateway address are configured by the
DHCP service on the network, but DNS servers and search domains must be
configured manually.
- Manual
IPv4 parameters are configured manually for a static configuration.
- Link-Local Only
A link-local address in the 169.254/16 range is assigned to the interface.
- Shared to other computers
The system is configured to provide network access to other
computers. The interface is assigned an address in the 10.42.x.1/24
range, a DHCP server and DNS server are started, and the interface is
connected to the default network connection on the system with network address translation (NAT).
- Disabled
IPv4 is disabled for this connection.
If you selected a a method that requires you to supply manual
parameters, enter details of the IP address for this interface, the
netmask, and the gateway in the Addresses field. Use the Add and Delete buttons to add or remove addresses. Enter a comma-separated list of DNS servers in the DNS servers field, and a comma-separated list of domains in the Search domains field for any domains that you want to include in name server lookups.
Optionally, enter a name for this network connection in the DHCP client ID
field. This name must be unique on the subnet. When you assign a
meaningful DHCP client ID to a connection, it is easy to identify this
connection when troubleshooting network problems.
Deselect the Require IPv4 addressing for this connection to complete
check box to allow the system to make this connection on an
IPv6-enabled network if IPv4 configuration fails but IPv6 configuration
succeeds.
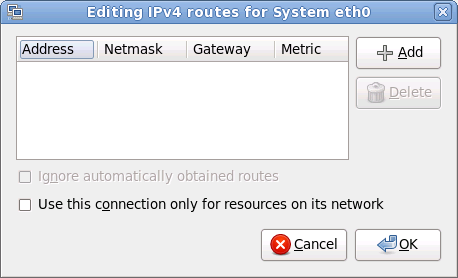
9.6.1.4.1. Editing IPv4 routes
Red Hat Enterprise Linux configures a number of routes automatically
based on the IP addresses of a device. To edit additional routes, click
the Routes button. The Editing IPv4 routes dialog appears.
Click Add to add the IP address, netmask, gateway address, and metric for a new static route.
Select Ignore automatically obtained routes to make the interface use only the routes specified for it here.
Select Use this connection only for resources on its network to restrict connections only to the local network.
9.6.1.5. The IPv6 Settings tab
Use the IPv6 Settings tab tab to configure the IPv6 parameters for the previously selected network connection.
Use the Method drop-down menu to specify which settings the system should attempt to obtain from a Dynamic Host Configuration Protocol (DHCP) service running on the network. Choose from the following options:
- Ignore
IPv6 is ignored for this connection.
- Automatic
IPv6 parameters are configured by the DHCP service on the network.
- Automatic, addresses only
The IPv6 address, prefix, and gateway address are configured by the
DHCP service on the network, but DNS servers and search domains must be
configured manually.
- Manual
IPv6 parameters are configured manually for a static configuration.
- Link-Local Only
A link-local address with the fe80::/10 prefix is assigned to the interface.
If you selected a a method that requires you to supply manual
parameters, enter details of the IP address for this interface, the
netmask, and the gateway in the Addresses field. Use the Add and Delete buttons to add or remove addresses. Enter a comma-separated list of DNS servers in the DNS servers field, and a comma-separated list of domains in the Search domains field for any domains that you want to include in name server lookups.
Optionally, enter a name for this network connection in the DHCP client ID
field. This name must be unique on the subnet. When you assign a
meaningful DHCP client ID to a connection, it is easy to identify this
connection when troubleshooting network problems.
Deselect the Require IPv6 addressing for this connection to complete
check box to allow the system to make this connection on an
IPv4-enabled network if IPv6 configuration fails but IPv4 configuration
succeeds.
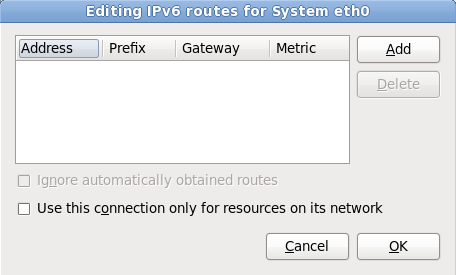
9.6.1.5.1. Editing IPv6 routes
Red Hat Enterprise Linux configures a number of routes automatically
based on the IP addresses of a device. To edit additional routes, click
the Routes button. The Editing IPv6 routes dialog appears.
Click Add to add the IP address, netmask, gateway address, and metric for a new static route.
Select Use this connection only for resources on its network to restrict connections only to the local network.
9.7. Time Zone Configuration
Set your time zone by selecting the city closest to your computer's
physical location. Click on the map to zoom in to a particular
geographical region of the world.
Specify a time zone even if you plan to use NTP (Network Time Protocol) to maintain the accuracy of the system clock.
From here there are two ways for you to select your time zone:
Using your mouse, click on the interactive map to select a specific city (represented by a yellow dot). A red X appears indicating your selection.
You can also scroll through the list at the bottom of the screen to
select your time zone. Using your mouse, click on a location to
highlight your selection.
If Red Hat Enterprise Linux is the only operating system on your computer, select System clock uses UTC.
The system clock is a piece of hardware on your computer system. Red
Hat Enterprise Linux uses the timezone setting to determine the offset
between the local time and UTC on the system clock. This behavior is
standard for systems that use UNIX, Linux, and similar operating
systems.
Click Next to proceed.
Do not enable the System clock uses UTC
option if your machine also runs Microsoft Windows. Microsoft operating
systems change the BIOS clock to match local time rather than UTC. This
may cause unexpected behavior under Red Hat Enterprise Linux.
To change your time zone configuration after you have completed the installation, use the Time and Date Properties Tool.
Type the system-config-date command in a shell prompt to launch the Time and Date Properties Tool. If you are not root, it prompts you for the root password to continue.
To run the Time and Date Properties Tool as a text-based application, use the command timeconfig.
9.8. Set the Root Password
Setting up a root account and password is one of the most important
steps during your installation. The root account is used to install
packages, upgrade RPMs, and perform most system maintenance. Logging in
as root gives you complete control over your system.
The root user (also known as the superuser) has complete access to the
entire system; for this reason, logging in as the root user is best
done only to perform system maintenance or administration.
Use the root account only for system administration. Create a non-root account for your general use and use the su
command to change to root only when you need to perform tasks that
require superuser authorization. These basic rules minimize the changes
of a typo or an incorrect command doing damage to your system.
To become root, type su - at the shell prompt in a terminal window and then press Enter. Then, enter the root password and press Enter.
The installation program prompts you to set a root password[] for your system. You cannot proceed to the next stage of the installation process without entering a root password.
The root password must be at least six characters long; the password
you type is not echoed to the screen. You must enter the password twice;
if the two passwords do not match, the installation program asks you to
enter them again.
You should make the root password something you can remember, but not
something that is easy for someone else to guess. Your name, your phone
number, qwerty, password, root, 123456, and anteater
are all examples of bad passwords. Good passwords mix numerals with
upper and lower case letters and do not contain dictionary words: Aard387vark or 420BMttNT,
for example. Remember that the password is case-sensitive. If you write
down your password, keep it in a secure place. However, it is
recommended that you do not write down this or any password you create.
Do not use one of the example passwords offered in this manual. Using
one of these passwords could be considered a security risk.
To change your root password after you have completed the installation, use the Root Password Tool.
Type the system-config-users command in a shell prompt to launch the User Manager, a powerful user management and configuration tool. If you are not root, it prompts you for the root password to continue.
Enter the root password into the Root Password field. Red Hat Enterprise Linux displays the characters as asterisks for security. Type the same password into the Confirm field to ensure it is set correctly. After you set the root password, select Next to proceed.
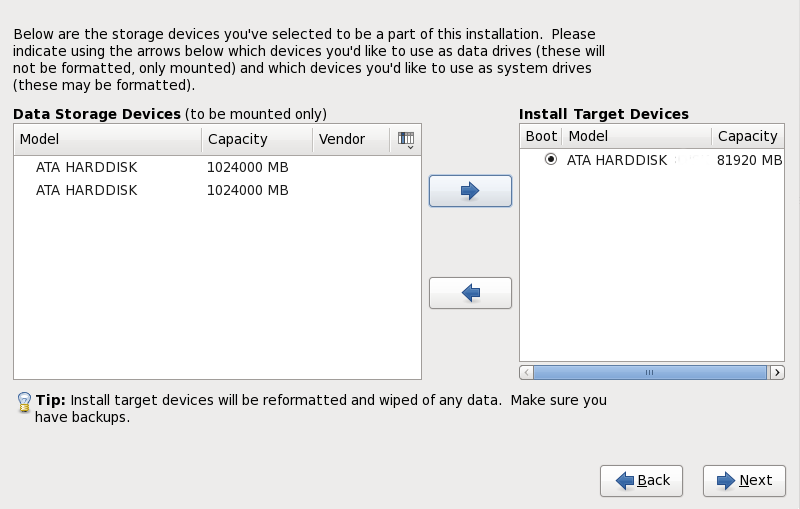
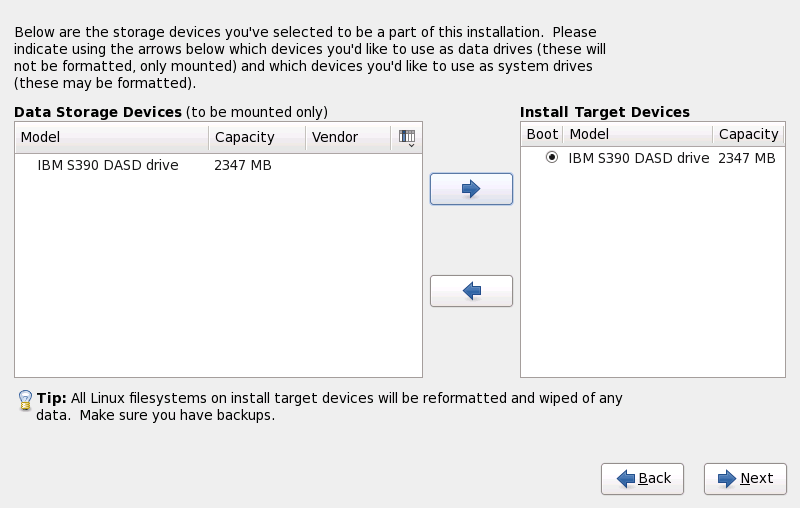
9.9. Assign Storage Devices
If you selected more than one storage device on the storage devices selection screen (refer to
Section 9.5, “Storage Devices”),
anaconda
asks you to select which of these devices should be available for
installation of the operating system, and which should only be attached
to the file system for data storage. If you selected only one storage
device,
anaconda does not present you with this screen.
During installation, the devices that you identify here as being for
data storage only are mounted as part of the file system, but are not
partitioned or formatted.
The screen is split into two panes. The left pane contains a list of
devices to be used for data storage only. The right pane contains a list
of devices that are to be available for installation of the operating
system.
Each list contains information about the devices to help you to
identify them. A small drop-down menu marked with an icon is located to
the right of the column headings. This menu allows you to select the
types of data presented on each device. Reducing or expanding the amount
of information presented might help you to identify particular devices.
Move a device from one list to the other by clicking on the device,
then clicking either the button labeled with a left-pointing arrow to
move it to the list of data storage devices or the button labeled with a
right-pointing arrow to move it to the list of devices available for
installation of the operating system.
The list of devices available as installation targets also includes a
radio button beside each device. Use this radio button to specify the
device that you want to use as the boot device for the system.
If any storage device contains a boot loader that will chain load the
Red Hat Enterprise Linux boot loader, include that storage device among
the Install Target Devices. Storage devices that you identify as Install Target Devices remain visible to anaconda during boot loader configuration.
Storage devices that you identify as
Install Target Devices on this screen are not automatically erased by the installation process unless you selected the
Use All Space option on the partioning screen (refer to
Section 9.12, “Disk Partitioning Setup”).
When you have finished identifying devices to be used for installation, click Next to continue.
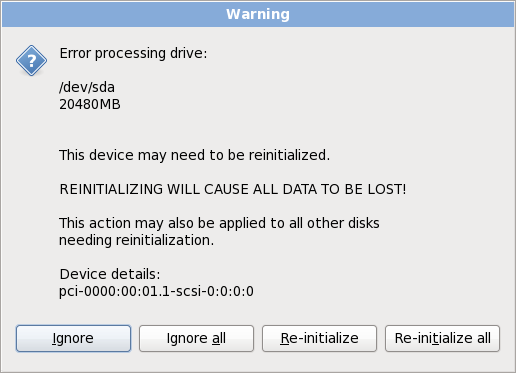
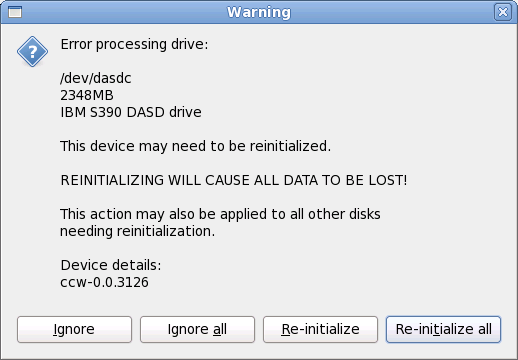
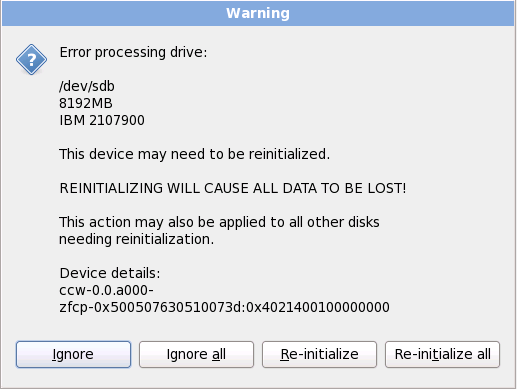
9.10. Initializing the Hard Disk
If no readable partition tables are found on existing hard disks, the
installation program asks to initialize the hard disk. This operation
makes any existing data on the hard disk unreadable. If your system has a
brand new hard disk with no operating system installed, or you have
removed all partitions on the hard disk, click Re-initialize drive.
The installation program presents you with a separate dialog for each
disk on which it cannot read a valid partition table. Click the Ignore all button or Re-initialize all button to apply the same answer to all devices.
Certain RAID systems or other nonstandard configurations may be
unreadable to the installation program and the prompt to initialize the
hard disk may appear. The installation program responds to the physical
disk structures it is able to detect.
To enable automatic initializing of hard disks for which it turns out to be necessary, use the kickstart command
clearpart --initlabel (refer to
Chapter 32, Kickstart Installations)
If you have a nonstandard disk configuration that can be detached
during installation and detected and configured afterward, power off the
system, detach it, and restart the installation.
9.11. Upgrading an Existing System
Although anaconda
provides an option for upgrading from earlier major versions of Red Hat
Enterprise Linux to Red Hat Enterprise Linux 6, Red Hat does not
currently support this. More generally, Red Hat does not support
in-place upgrades between any major versions of Red Hat Enterprise
Linux. (A major version is denoted by a whole number version change. For
example, Red Hat Enteprise Linux 4 and Red Hat Enterprise Linux 5 are
both major versions of Red Hat Enterprise Linux.)
In-place upgrades across major releases do not preserve all system
settings, services or custom configurations. Consequently, Red Hat
strongly recommends fresh installations when upgrading from one major
version to another.
The installation system automatically detects any existing installation
of Red Hat Enterprise Linux. The upgrade process updates the existing
system software with new versions, but does not remove any data from
users' home directories. The existing partition structure on your hard
drives does not change. Your system configuration changes only if a
package upgrade demands it. Most package upgrades do not change system
configuration, but rather install an additional configuration file for
you to examine later.
Note that the installation medium that you are using might not contain
all the software packages that you need to upgrade your computer.
9.11.1. The Upgrade Dialog
If your system contains a Red Hat Enterprise Linux installation, a
dialog appears asking whether you want to upgrade that installation. To
perform an upgrade of an existing system, choose the appropriate
installation from the drop-down list and select Next.
Software you have installed manually on your existing Red Hat
Enterprise Linux system may behave differently after an upgrade. You may
need to manually reinstall or recompile this software after an upgrade
to ensure it performs correctly on the updated system.
9.11.2. Upgrading Using the Installer
In general, Red Hat recommends that you keep user data on a separate
/home partition and perform a fresh installation. For more information on partitions and how to set them up, refer to
Section 9.12, “Disk Partitioning Setup”.
If you choose to upgrade your system using the installation program,
any software not provided by Red Hat Enterprise Linux that conflicts
with Red Hat Enterprise Linux software is overwritten. Before you begin
an upgrade this way, make a list of your system's current packages for
later reference:
rpm -qa --qf '%{NAME} %{VERSION}-%{RELEASE} %{ARCH}\n' > ~/old-pkglist.txt
After installation, consult this list to discover which packages you
may need to rebuild or retrieve from sources other than Red Hat.
Next, make a backup of any system configuration data:
su -c 'tar czf /tmp/etc-`date +%F`.tar.gz /etc'
su -c 'mv /tmp/etc-*.tar.gz /home'
Make a complete backup of any important data before performing an
upgrade. Important data may include the contents of your entire /home
directory as well as content from services such as an Apache, FTP, or
SQL server, or a source code management system. Although upgrades are
not destructive, if you perform one improperly there is a small
possibility of data loss.
Note that the above examples store backup materials in a /home directory. If your /home directory is not a separate partition, you should not follow these examples verbatim! Store your backups on another device such as CD or DVD discs or an external hard disk.
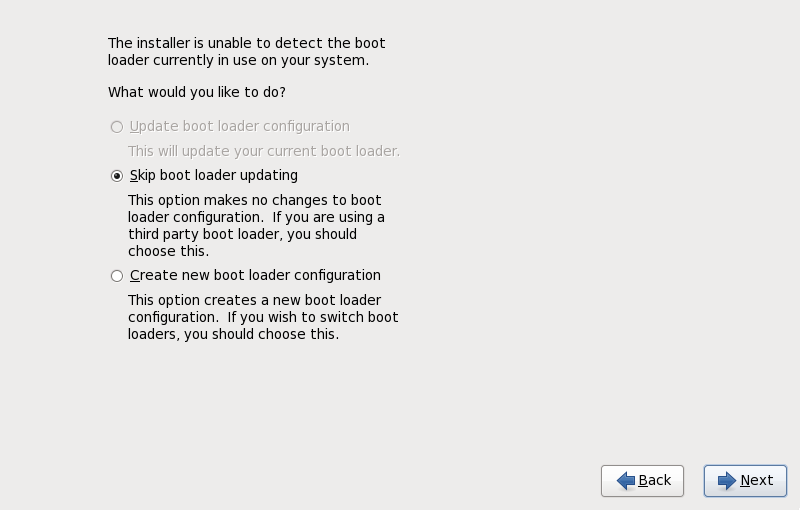
9.11.3. Upgrading Boot Loader Configuration
Your completed Red Hat Enterprise Linux installation must be registered in the
boot loader to boot properly. A boot loader is software on your machine that locates and starts the operating system. Refer to
Appendix E, The GRUB Boot Loader for more information about boot loaders.
If the existing boot loader was installed by a Linux distribution, the
installation system can modify it to load the new Red Hat Enterprise
Linux system. To update the existing Linux boot loader, select Update boot loader configuration. This is the default behavior when you upgrade an existing Red Hat Enterprise Linux installation.
GRUB is the standard boot loader for Red
Hat Enterprise Linux on 32-bit and 64-bit x86 architectures. If your
machine uses another boot loader, such as BootMagic, System Commander,
or the loader installed by Microsoft Windows, then the Red Hat
Enterprise Linux installation system cannot update it. In this case,
select Skip boot loader updating. When the installation process completes, refer to the documentation for your product for assistance.
Install a new boot loader as part of an upgrade process only if you
are certain you want to replace the existing boot loader. If you install
a new boot loader, you may not be able to boot other operating systems
on the same machine until you have configured the new boot loader.
Select Create new boot loader configuration to remove the existing boot loader and install GRUB.
9.12. Disk Partitioning Setup
It is always a good idea to back up any data that you have on your
systems. For example, if you are upgrading or creating a dual-boot
system, you should back up any data you wish to keep on your storage
devices. Mistakes do happen and can result in the loss of all your data.
If you install Red Hat Enterprise Linux in text mode, you can only use
the default partitioning schemes described in this section. You cannot
add or remove partitions or file systems beyond those that the installer
automatically adds or removes. If you require a customized layout at
installation time, you should perform a graphical installation over a
VNC connection or a kickstart installation.
Furthermore, advanced options such as LVM, encrypted filesystems, and
resizable filesystems are available only in graphical mode and
kickstart.
If you have a RAID card, be aware that some BIOSes do not support booting from the RAID card. In cases such as these, the /boot/
partition must be created on a partition outside of the RAID array,
such as on a separate hard drive. An internal hard drive is necessary to
use for partition creation with problematic RAID cards.
A /boot/ partition is also necessary for software RAID setups.
If you have chosen to automatically partition your system, you should select Review and manually edit your /boot/ partition.
Partitioning allows you to divide your hard drive into isolated
sections, where each section behaves as its own hard drive. Partitioning
is particularly useful if you run multiple operating systems. If you
are not sure how you want your system to be partitioned, read
Appendix A, An Introduction to Disk Partitions for more information.
On this screen you can choose to create the default partition layout in
one of four different ways, or choose to partition storage devices
manually to create a custom layout.
The first four options allow you to perform an automated installation
without having to partition your storage devices yourself. If you do not
feel comfortable with partitioning your system, choose one of these
options and let the installation program partition the storage devices
for you. Depending on the option that you choose, you can still control
what data (if any) is removed from the system.
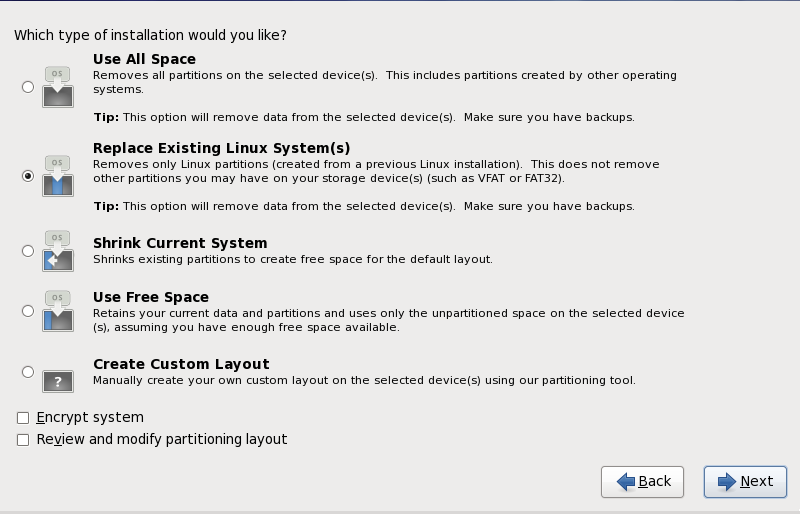
Your options are:
- Use All Space
Select this option to remove all partitions on your hard drives (this
includes partitions created by other operating systems such as Windows
VFAT or NTFS partitions).
If you select this option, all data on the selected hard drives is
removed by the installation program. Do not select this option if you
have information that you want to keep on the hard drives where you are
installing Red Hat Enterprise Linux.
In particular, do not select this option when you configure a system
to chain load the Red Hat Enterprise Linux boot loader from another
boot loader.
- Replace Existing Linux System(s)
Select this option to remove only partitions created by a previous
Linux installation. This does not remove other partitions you may have
on your hard drives (such as VFAT or FAT32 partitions).
- Shrink Current System
Select this option to resize your current data and partitions
manually and install a default Red Hat Enterprise Linux layout in the
space that is freed.
If you shrink partitions on which other operating systems are
installed, you might not be able to use those operating systems.
Although this partitioning option does not destroy data, operating
systems typically require some free space in their partitions. Before
you resize a partition that holds an operating system that you might
want to use again, find out how much space you need to leave free.
- Use Free Space
Select this option to retain your current data and partitions and
install Red Hat Enterprise Linux in the unused space available on the
storage drives. Ensure that there is sufficient space available on the
storage drives before you select this option — refer to
Section 3.4, “Do You Have Enough Disk Space?”.
- Create Custom Layout
Choose your preferred partitioning method by clicking the radio button to the left of its description in the dialog box.
Select
Encrypt system to encrypt all partitions except the
/boot partition. Refer to
Appendix C, Disk Encryption for information on encryption.
To review and make any necessary changes to the partitions created by automatic partitioning, select the Review option. After selecting Review and clicking Next to move forward, the partitions created for you by anaconda appear. You can make modifications to these partitions if they do not meet your needs.
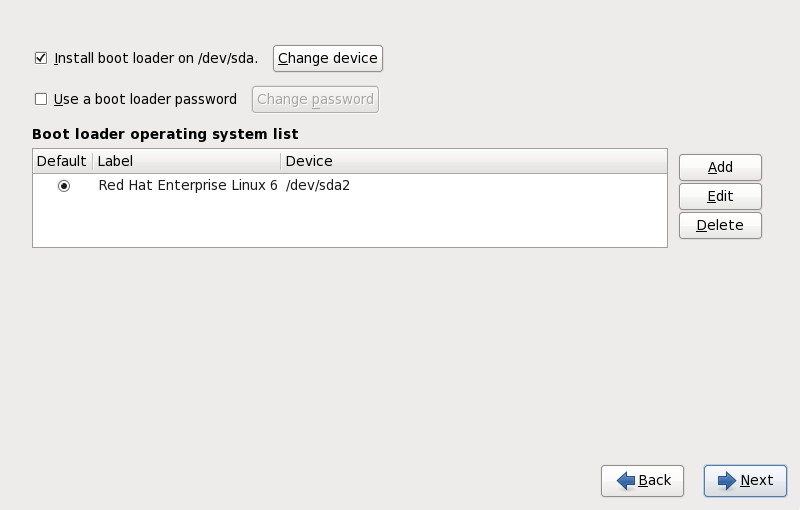
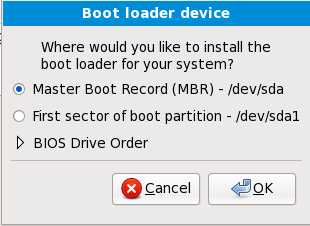
To configure the Red Hat Enterprise Linux boot loader to chain load
from a different boot loader, you must specify the boot drive manually.
If you chose any of the automatic partitioning options, you must now
select the Review and modify partitioning layout option before you click Next or you cannot specify the correct boot drive.
Click Next once you have made your selections to proceed.
If you selected the Encrypt System option, the installer prompts you for a passphrase with which to encrypt the partitions on the system.
Choose a passphrase and type it into each of the two fields in the
dialog box. You must provide this passphrase every time that the system
boots.
If you lose this passphrase, any encrypted partitions and the data on
them will become completely inaccessible. There is no way to recover a
lost passphrase.
9.14. Creating a Custom Layout or Modifying the Default Layout
If you chose one of the automatic partitioning options and selected Review, you can either accept the current partition settings (click Next), or modify the setup manually in the partitioning screen.
If you chose to create a custom layout, you must tell the installation
program where to install Red Hat Enterprise Linux. This is done by
defining mount points for one or more disk partitions in which Red Hat
Enterprise Linux is installed. You may also need to create and/or delete
partitions at this time.
Anaconda can handle the partitioning requirements for a typical installation.
Figure 9.28. Partitioning on x86, AMD64, and Intel 64 Systems
The partitioning screen contains two panes. The top pane contains a
graphical representation of the hard drive, logical volume, or RAID
device selected in the lower pane.
Above the graphical representation of the device, you can review the name of the drive (such as /dev/sda or LogVol00), its size (in MB), and its model as detected by the installation program.
Using your mouse, click once to highlight a particular field in the
graphical display. Double-click to edit an existing partition or to
create a partition out of existing free space.
The lower pane contains a list of all drives, logical volumes, and
RAID devices to be used during installation, as specified earlier in the
installation process — refer to
Section 9.9, “ Assign Storage Devices ”
Devices are grouped by type. Click on the small triangles to the left of each device type to view or hide devices of that type.
Anaconda displays several details for each device listed:
- Device
the name of the device, logical volume, or partition
- Size (MB)
the size of the device, logical volume, or partition (in MB)
- Mount Point/RAID/Volume
the mount point (location within a file
system) on which a partition is to be mounted, or the name of the RAID
or logical volume group of which it is a part
- Type
the type of partition. If the partition is a standard partition,
this field displays the type of file system on the partition (for
example, ext4). Otherwise, it indicates that the partition is a physical volume (LVM), or part of a software RAID
- Format
A check mark in this column indicates that the partition will be formatted during installation.
Beneath the lower pane are four buttons: Create, Edit, Delete, and Reset.
Select a device or partition by clicking on it in either the graphical
representation in the upper pane of in the list in the lower pane, then
click one of the four buttons to carry out the following actions:
- Create
create a new partition, logical volume, or software RAID
- Edit
change an existing new partition, logical volume, or software RAID
- Delete
remove a partition, logical volume, or software RAID
- Reset
undo all changes made in this screen
The Create Storage dialog allows you to create new storage partitions, logical volumes, and software RAIDs. Anaconda
presents options as available or unavailable depending on the storage
already present on the system or configured to transfer to the system.
Options are grouped under Create Partition, Create Software RAID and Create LVM as follows:
Create Software RAID
RAID Partition — create
a partition in unallocated space to form part of a software RAID
device. To form a software RAID device, two or more RAID partitions must
be available on the system.
RAID Device — combine
two or more RAID partitions into a software RAID device. When you choose
this option, you can specify the type of RAID device to create (the RAID level). This option is only available when two or more RAID partitions are available on the system.
RAID Clone — create a
mirror of a RAID partition on one storage device on another storage
device. This option is only available when at least one RAID partition
is available on the system.
Create LVM Logical Volume
LVM Physical Volume — create a physical volume in unallocated space.
LVM Volume Group — create a volume group from one or more physical volumes. This option is only available when at least one physical volume is available on the system.
LVM Logical Volume — create a logical volume on a volume group. This option is only available when at least one volume group is available on the system.
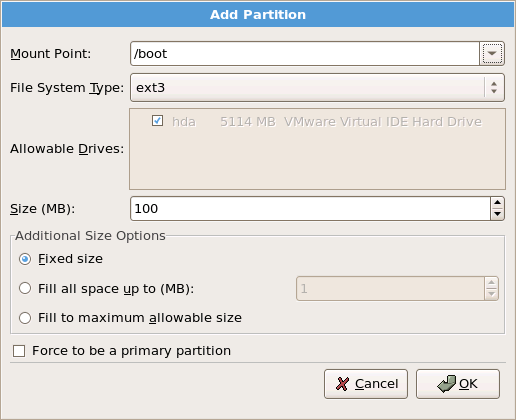
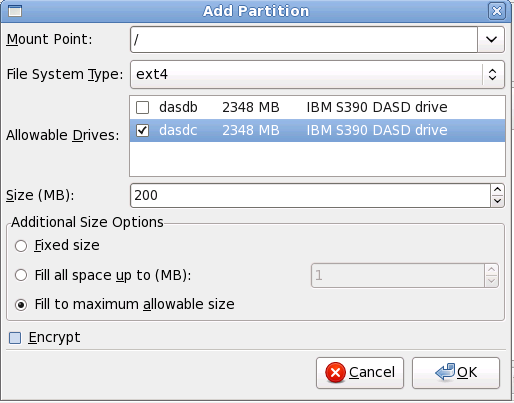
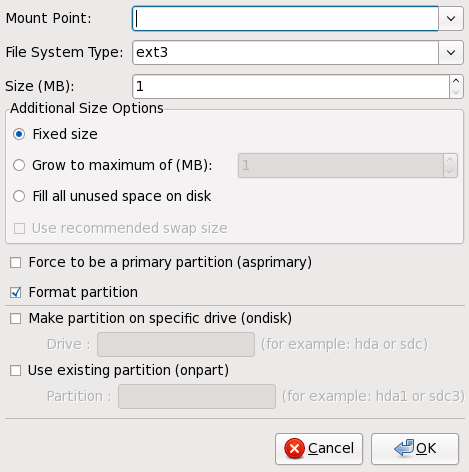
9.14.2. Adding Partitions
Mount Point: Enter the partition's mount point. For example, if this partition should be the root partition, enter /; enter /boot for the /boot
partition, and so on. You can also use the pull-down menu to choose the
correct mount point for your partition. For a swap partition the mount
point should not be set — setting the filesystem type to swap is sufficient.
File System Type:
Using the pull-down menu, select the appropriate file system type for
this partition. For more information on file system types, refer to
Section 9.14.2.1, “File System Types”.
Allowable Drives: This
field contains a list of the hard disks installed on your system. If a
hard disk's box is highlighted, then a desired partition can be created
on that hard disk. If the box is not checked, then the partition will never be created on that hard disk. By using different checkbox settings, you can have anaconda place partitions where you need them, or let anaconda decide where partitions should go.
Size (MB): Enter the
size (in megabytes) of the partition. Note, this field starts with 200
MB; unless changed, only a 200 MB partition will be created.
Additional Size Options:
Choose whether to keep this partition at a fixed size, to allow it to
"grow" (fill up the available hard drive space) to a certain point, or
to allow it to grow to fill any remaining hard drive space available.
If you choose Fill all space up to (MB),
you must give size constraints in the field to the right of this
option. This allows you to keep a certain amount of space free on your
hard drive for future use.
Encrypt: Choose whether
to encrypt the partition so that the data stored on it cannot be
accessed without a passphrase, even if the storage device is connected
to another system. Refer to
Appendix C, Disk Encryption
for information on encryption of storage devices. If you select this
option, the installer prompts you to provide a passphrase before it
writes the partition to the disk.
OK: Select OK once you are satisfied with the settings and wish to create the partition.
Cancel: Select Cancel if you do not want to create the partition.
9.14.2.1. File System Types
Red Hat Enterprise Linux allows you to create different partition types
and file systems. The following is a brief description of the different
partition types and file systems available, and how they can be used.
Partition types
standard partition — A
standard partition can contain a file system or swap space, or it can
provide a container for software RAID or an LVM physical volume.
swap — Swap partitions
are used to support virtual memory. In other words, data is written to a
swap partition when there is not enough RAM to store the data your
system is processing. Refer to the Red Hat Enterprise Linux Deployment Guide for additional information.
software RAID —
Creating two or more software RAID partitions allows you to create a
RAID device. For more information regarding RAID, refer to the chapter RAID (Redundant Array of Independent Disks) in the Red Hat Enterprise Linux Deployment Guide.
physical volume (LVM) —
Creating one or more physical volume (LVM) partitions allows you to
create an LVM logical volume. LVM can improve performance when using
physical disks. For more information regarding LVM, refer to the Red Hat Enterprise Linux Deployment Guide.
File systems
ext4 — The ext4 file
system is based on the ext3 file system and features a number of
improvements. These include support for larger file systems and larger
files, faster and more efficient allocation of disk space, no limit on
the number of subdirectories within a directory, faster file system
checking, and more robust journalling. The ext4 file system is selected
by default and is highly recommended.
ext3 — The ext3 file
system is based on the ext2 file system and has one main advantage —
journaling. Using a journaling file system reduces time spent recovering
a file system after a crash as there is no need to fsck [] the file system.
ext2 — An ext2 file
system supports standard Unix file types (regular files, directories,
symbolic links, etc). It provides the ability to assign long file names,
up to 255 characters.
xfs — XFS is a highly
scalable, high-performance file system that supports filesystems up to
16 exabytes (approximately 16 million terabytes), files up to 8 exabytes
(approximately 8 million terabytes) and directory structures containing
tens of millions of entries. XFS supports metadata journaling, which
facilitates quicker crash recovery. The XFS file system can also be
defragmented and resized while mounted and active.
vfat — The VFAT file system is a Linux file system that is compatible with Microsoft Windows long filenames on the FAT file system.
Btrfs — Btrfs is under
development as a file system capable of addressing and managing more
files, larger files, and larger volumes than the ext2, ext3, and ext4
file systems. Btrfs is designed to make the file system tolerant of
errors, and to facilitate the detection and repair of errors when they
occur. It uses checksums to ensure the validity of data and metadata,
and maintains snapshots of the file system that can be used for backup
or repair.
Because Btrfs is still experimental and under development, the
installation program does not offer it by default. If you want to create
a Btrfs partition on a drive, you must commence the installation
process with the boot option
btrfs. Refer to
Chapter 28, Boot Options for instructions.
Red Hat Enterprise Linux 6 includes Btrfs as a technology preview to
allow you to experiment with this file system. You should not choose
Btrfs for partitions that will contain valuable data or that are
essential for the operation of important systems.
9.14.3. Create Software RAID
Redundant arrays of independent disks
(RAIDs) are constructed from multiple storage devices that are arranged
to provided increased performance and — in some configurations — greater
fault tolerance. Refer to the Red Hat Enterprise Linux Deployment Guide for a description of different kinds of RAIDs.
To make a RAID device, you must first create software RAID partitions.
Once you have created two or more software RAID partitions, select RAID to join the software RAID partitions into a RAID device.
- RAID Partition
Choose this option to configure a partition for software RAID. This
option is the only choice available if your disk contains no software
RAID partitions. This is the same dialog that appears when you add a
standard partition — refer to
Section 9.14.2, “Adding Partitions” for a description of the available options. Note, however, that
File System Type must be set to
software RAID
- RAID Device
Choose this option to construct a RAID device from two or more
existing software RAID partitions. This option is available if two or
more software RAID partitions have been configured.
Select the file system type as for a standard partition.
Anaconda automatically suggests a name for the RAID device, but you can manually select names from md0 to md15.
Click the checkboxes beside individual storage devices to include or remove them from this RAID.
The RAID Level corresponds to a particular type of RAID. Choose from the following options:
RAID 0 —
distributes data across multiple storage devices. Level 0 RAIDs offer
increased performance over standard partitions, and can be used to pool
the storage of multiple devices into one large virtual device. Note that
Level 0 RAIDS offer no redundancy and that the failure of one device in
the array destroys the entire array. RAID 0 requires at least two RAID
partitions.
RAID 1 — mirrors
the data on one storage device onto one or more other storage devices.
Additional devices in the array provide increasing levels of redundancy.
RAID 1 requires at least two RAID partitions.
RAID 4 —
distributes data across multiple storage devices, but uses one device in
the array to store parity information that safeguards the array in case
any device within the array fails. Because all parity information is
stored on the one device, access to this device creates a bottleneck in
the performance of the array. RAID 4 requires at least three RAID
partitions.
RAID 5 —
distributes data and parity information across multiple storage devices.
Level 5 RAIDs therefore offer the performance advantages of
distributing data across multiple devices, but do not share the
performance bottleneck of level 4 RAIDs because the parity information
is also distributed through the array. RAID 5 requires at least three
RAID partitions.
RAID 6 — level 6
RAIDs are similar to level 5 RAIDs, but instead of storing only one set
of parity data, they store two sets. RAID 6 requires at least four RAID
partitions.
RAID 10 — level 10 RAIDs are nested RAIDs or hybrid RAIDs.
Level 10 RAIDs are constructed by distributing data over mirrored sets
of storage devices. For example, a level 10 RAID constructed from four
RAID partitions consists of two pairs of partitions in which one
partition mirrors the other. Data is then distributed across both pairs
of storage devices, as in a level 0 RAID. RAID 10 requires at least four
RAID partitions.
- RAID Clone
Choose this option to set up a RAID mirror of an existing disk. This option is available if two or more disks are attached to the system.
9.14.4. Create LVM Logical Volume
LVM initial set up is not available during text-mode installation. If
you need to create an LVM configuration from scratch, press Alt+F2 to use a different virtual console, and run the lvm command. To return to the text-mode installation, press Alt+F1.
Logical Volume Management (LVM) presents a
simple logical view of underlying physical storage space, such as a hard
drives or LUNs. Partitions on physical storage are represented as physical volumes that can be grouped together into volume groups. Each volume group can be divided into multiple logical volumes,
each of which is analogous to a standard disk partition. Therefore, LVM
logical volumes function as partitions that can span multiple physical
disks.
To read more about LVM, refer to the Red Hat Enterprise Linux Deployment Guide. Note, LVM is only available in the graphical installation program.
- LVM Physical Volume
Choose this option to configure a partition or device as an LVM
physical volume. This option is the only choice available if your
storage does not already contain LVM Volume Groups. This is the same
dialog that appears when you add a standard partition — refer to
Section 9.14.2, “Adding Partitions” for a description of the available options. Note, however, that
File System Type must be set to
physical volume (LVM)
- Make LVM Volume Group
Choose this option to create LVM volume groups from the available LVM
physical volumes, or to add existing logical volumes to a volume group.
To assign one or more physical volumes to a volume group, first name
the volume group. Then select the physical volumes to be used in the
volume group. Finally, configure logical volumes on any volume groups
using the Add, Edit and Delete options.
You may not remove a physical volume from a volume group if doing so
would leave insufficient space for that group's logical volumes. Take
for example a volume group made up of two 5 GB LVM physical volume
partitions, which contains an 8 GB logical volume. The installer would
not allow you to remove either of the component physical volumes, since
that would leave only 5 GB in the group for an 8 GB logical volume. If
you reduce the total size of any logical volumes appropriately, you may
then remove a physical volume from the volume group. In the example,
reducing the size of the logical volume to 4 GB would allow you to
remove one of the 5 GB physical volumes.
- Make Logical Volume
Choose this option to create an LVM logical volume. Select a mount
point, file system type, and size (in MB) just as if it were a standard
disk partition. You can also choose a name for the logical volume and
specify the volume group to which it will belong.
9.14.5. Recommended Partitioning Scheme
9.14.5.1. x86, AMD64, and Intel 64 systems
Unless you have a reason for doing
otherwise, we recommend that you create the following partitions for
x86, AMD64, and Intel 64 systems:
A swap partition
A /boot partition
A / partition
A swap partition (at least 256 MB) — swap partitions are used to
support virtual memory. In other words, data is written to a swap
partition when there is not enough RAM to store the data your system is
processing.
In years past, the recommended amount of swap space increased linearly
with the amount of RAM in the system. But because the amount of memory
in modern systems has increased into the hundreds of gigabytes, it is
now recognized that the amount of swap space that a system needs is a
function of the memory workload running on that system. However, given
that swap space is usually designated at install time, and that it can
be difficult to determine beforehand the memory workload of a system, we
recommend determining system swap using the following table.
Table 9.2. Recommended System Swap Space
|
Amount of RAM in the System
|
Recommended Amount of Swap Space
|
|---|
|
4GB of RAM or less
|
a minimum of 2GB of swap space
|
|
4GB to 16GB of RAM
|
a minimum of 4GB of swap space
|
|
16GB to 64GB of RAM
|
a minimum of 8GB of swap space
|
|
64GB to 256GB of RAM
|
a minimum of 16GB of swap space
|
|
256GB to 512GB of RAM
|
a minimum of 32GB of swap space
|
Note that you can obtain better performance by distributing swap space
over multiple storage devices, particularly on systems with fast
drives, controllers, and interfaces.
The partition mounted on /boot/ contains
the operating system kernel (which allows your system to boot Red Hat
Enterprise Linux), along with files used during the bootstrap process.
For most users, a 250 MB boot partition is sufficient.
The GRUB bootloader
in Red Hat Enterprise Linux 6 supports only the ext2, ext3, and
ext4 (recommended) file systems. You cannot use any other file system
for /boot, such as Btrfs, XFS, or VFAT.
If your hard drive is more than 1024 cylinders (and your system was
manufactured more than two years ago), you may need to create a /boot/ partition if you want the / (root) partition to use all of the remaining space on your hard drive.
If you have a RAID card, be aware that some BIOSes do not support booting from the RAID card. In cases such as these, the /boot/ partition must be created on a partition outside of the RAID array, such as on a separate hard drive.
This is where "/" (the root directory) is located. In this setup, all files (except those stored in /boot) are on the root partition.
A 3.0 GB partition allows you to install a minimal installation, while
a 5.0 GB root partition lets you perform a full installation, choosing
all package groups.
The / (or root) partition is the top of the directory structure. The /root directory/root (sometimes pronounced "slash-root") directory is the home directory of the user account for system administration.
Many systems have more partitions than the minimum listed above.
Choose partitions based on your particular system needs. For example,
consider creating a separate
/home partition on systems that store user data. Refer to
Section 9.14.5.1.1, “Advice on Partitions” for more information.
The following table summarizes minimum partition sizes for the partitions containing the listed directories. You do not have to make a separate partition for each of these directories. For instance, if the partition containing /foo must be at least 500 MB, and you do not make a separate /foo partition, then the / (root) partition must be at least 500 MB.
Table 9.3. Minimum partition sizes
|
Directory
|
Minimum size
|
|---|
/
|
250 MB
|
/usr
|
250 MB, but avoid placing this on a separate partition
|
/tmp
|
50 MB
|
/var
|
384 MB
|
/home
|
100 MB
|
/boot
|
250 MB
|
Only assign storage capacity to those partitions you require
immediately. You may allocate free space at any time, to meet needs as
they occur. To learn about a more flexible method for storage
management, refer to
Appendix D, Understanding LVM.
If you are not sure how best to configure the partitions for your computer, accept the default partition layout.
9.14.5.1.1. Advice on Partitions
Optimal partition setup depends on the usage for the Linux system in
question. The following tips may help you decide how to allocate your
disk space.
If you expect that you or other users will store data on the system, create a separate partition for the /home directory within a volume group. With a separate /home partition, you may upgrade or reinstall Red Hat Enterprise Linux without erasing user data files.
Consider encrypting any partitions that might contain sensitive
data. Encryption prevents unauthorized people from accessing the data on
the partitions, even if they have access to the physical storage
device. In most cases, you should at least encrypt the /home partition.
Each kernel installed on your system requires approximately 10 MB on the /boot partition. Unless you plan to install a great many kernels, the default partition size of 250 MB for /boot should suffice.
The GRUB bootloader
in Red Hat Enterprise Linux 6 supports only the ext2, ext3, and
ext4 (recommended) file systems. You cannot use any other file system
for /boot, such as Btrfs, XFS, or VFAT.
The /var directory holds content for a number of applications, including the Apache web server. It also is used to store downloaded update packages on a temporary basis. Ensure that the partition containing the /var directory has enough space to download pending updates and hold your other content.
The PackageKit update software downloads updated packages to /var/cache/yum/ by default. If you partition the system manually, and create a separate /var/ partition, be sure to create the partition large enough (3.0 GB or more) to download package updates.
The /usr directory holds the majority
of software content on a Red Hat Enterprise Linux system. For an
installation of the default set of software, allocate at least 4 GB of
space. If you are a software developer or plan to use your Red Hat
Enterprise Linux system to learn software development skills, you may
want to at least double this allocation.
If /usr is on a separate partition from /,
the boot process becomes much more complex, and in some situations
(like installations on iSCSI drives), might not work at all.
Consider leaving a portion of the space in an LVM volume group
unallocated. This unallocated space gives you flexibility if your space
requirements change but you do not wish to remove data from other
partitions to reallocate storage.
If you separate subdirectories into partitions, you can retain
content in those subdirectories if you decide to install a new version
of Red Hat Enterprise Linux over your current system. For instance, if
you intend to run a MySQL database in /var/lib/mysql, make a separate partition for that directory in case you need to reinstall later.
The following table is a possible partition setup for a system with a
single, new 80 GB hard disk and 1 GB of RAM. Note that approximately 10
GB of the volume group is unallocated to allow for future growth.
This setup is not optimal for all use cases.
Example 9.1. Example partition setup
Table 9.4. Example partition setup
|
Partition
|
Size and type
|
|---|
/boot
|
250 MB ext3 partition
|
swap
|
2 GB swap
|
|
LVM physical volume
|
Remaining space, as one LVM volume group
|
The physical volume is assigned to the default volume group and divided into the following logical volumes:
Table 9.5. Example partition setup: LVM physical volume
|
Partition
|
Size and type
|
|---|
/
|
13 GB ext4
|
/var
|
4 GB ext4
|
/home
|
50 GB ext4
|
9.15. Write changes to disk
The installer prompts you to confirm the partitioning options that you selected. Click Write changes to disk to allow the installer to partition your hard drive and install Red Hat Enterprise Linux.
If you are certain that you want to proceed, click Write changes to disk.
Up to this point in the installation process, the installer has made no lasting changes to your computer. When you click Write changes to disk,
the installer will allocate space on your hard drive and start to
transfer Red Hat Enterprise Linux into this space. Depending on the
partitioning option that you chose, this process might include erasing
data that already exists on your computer.
To revise any of the choices that you made up to this point, click Go back.
To cancel installation completely, switch off your computer. To switch
off most computers at this stage, press the power button and hold it
down for a few seconds.
After you click Write changes to disk,
allow the installation process to complete. If the process is
interrupted (for example, by you switching off or resetting the
computer, or by a power outage) you will probably not be able to use
your computer until you restart and complete the Red Hat Enterprise
Linux installation process, or install a different operating system.
9.16. x86, AMD64, and Intel 64 Boot Loader Configuration
To boot the system without boot media, you usually need to install a
boot loader. A boot loader is the first software program that runs when a
computer starts. It is responsible for loading and transferring control
to the operating system kernel software. The kernel, in turn,
initializes the rest of the operating system.
If you install Red Hat Enterprise Linux in text mode, the installer
configures the bootloader automatically and you cannot customize
bootloader settings during the installation process.
GRUB (GRand Unified Bootloader), which is installed by default, is a
very powerful boot loader. GRUB can load a variety of free operating
systems, as well as proprietary operating systems with chain-loading
(the mechanism for loading unsupported operating systems, such as
Windows, by loading another boot loader). Note that the version of GRUB
in Red Hat Enterprise Linux 6 is an old and stable version now
known as "GRUB Legacy" since upstream development moved to GRUB 2.[]
Red Hat remains committed to maintaining the version of GRUB that we
ship with Red Hat Enterprise Linux 6, just as we do with all
packages that we ship.
The GRUB menu defaults to being hidden, except on dual-boot systems.
To show the GRUB menu during system boot, press and hold the Shift key before the kernel is loaded. (Any other key works as well but the Shift key is the safest to use.)
If there are no other operating systems on your computer, or you are
completely removing any other operating systems the installation program
will install
GRUB as your boot loader without any intervention. In that case you may continue on to
Section 9.17, “Package Group Selection”.
You may have a boot loader installed on your system already. An
operating system may install its own preferred boot loader, or you may
have installed a third-party boot loader.If your boot loader does not
recognize Linux partitions, you may not be able to boot Red Hat
Enterprise Linux. Use GRUB as your boot loader to boot Linux and most other operating systems. Follow the directions in this chapter to install GRUB.
If you install GRUB, it may overwrite your existing boot loader.
By default, the installation program installs GRUB in the master boot record or
MBR, of the device for the root file system. To decline installation of a new boot loader, unselect
Install boot loader on /dev/sda.
If you choose not to install GRUB for any reason, you will not be
able to boot the system directly, and you must use another boot method
(such as a commercial boot loader application). Use this option only if
you are sure you have another way of booting the system!
If you have other operating systems already installed, Red Hat
Enterprise Linux attempts to automatically detect and configure GRUB to boot them. You may manually configure any additional operating systems if GRUB does not detect them.
To add, remove, or change the detected operating system settings, use the options provided.
- Add
Select Add to include an additional operating system in GRUB.
Select the disk partition which contains the bootable operating system from the drop-down list and give the entry a label. GRUB displays this label in its boot menu.
- Edit
To change an entry in the GRUB boot menu, select the entry and then select Edit.
- Delete
To remove an entry from the GRUB boot menu, select the entry and then select Delete.
Select Default beside
the preferred boot partition to choose your default bootable OS. You
cannot move forward in the installation unless you choose a default boot
image.
The Label column lists
what you must enter at the boot prompt, in non-graphical boot loaders,
in order to boot the desired operating system.
Once you have loaded the GRUB boot screen, use the arrow keys to choose a boot label or type e for edit. You are presented with a list of items in the configuration file for the boot label you have selected.
Boot loader passwords provide a security mechanism in an environment where physical access to your server is available.
If you are installing a boot loader, you should create a password to
protect your system. Without a boot loader password, users with access
to your system can pass options to the kernel which can compromise your
system security. With a boot loader password in place, the password must
first be entered before selecting any non-standard boot options.
However, it is still possible for someone with physical access to the
machine to boot from a diskette, CD-ROM, DVD, or USB media if the BIOS
supports it. Security plans which include boot loader passwords should
also address alternate boot methods.
You may not require a GRUB
password if your system only has trusted operators, or is physically
secured with controlled console access. However, if an untrusted person
can get physical access to your computer's keyboard and monitor, that
person can reboot the system and access GRUB. A password is helpful in this case.
If you choose to use a boot loader password to enhance your system security, be sure to select the checkbox labeled Use a boot loader password.
Once selected, enter a password and confirm it.
GRUB stores the password in encrypted form, so it cannot be read or recovered. If you forget the boot password, boot the system normally and then change the password entry in the /boot/grub/grub.conf
file. If you cannot boot, you may be able to use the "rescue" mode on
the first Red Hat Enterprise Linux installation disc to reset the GRUB
password.
If you do need to change the GRUB password, use the grub-md5-crypt utility. For information on using this utility, use the command man grub-md5-crypt in a terminal window to read the manual pages.
When selecting a GRUB password, be aware that GRUB recognizes only
the QWERTY keyboard layout, regardless of the keyboard actually attached
to the system. If you use a keyboard with a significantly different
layout, it might be more effective to memorize a pattern of keystrokes
rather than the word that the pattern produces.
To configure more advanced boot loader options, such as changing the drive order or passing options to the kernel, be sure Configure advanced boot loader options is selected before clicking Next.
9.16.1. Advanced Boot Loader Configuration
Now that you have chosen which boot loader to install, you can also
determine where you want the boot loader to be installed. You may
install the boot loader in one of two places:
The master boot record (MBR) — This is the recommended place to
install a boot loader, unless the MBR already starts another operating
system loader, such as System Commander. The MBR is a special area on
your hard drive that is automatically loaded by your computer's BIOS,
and is the earliest point at which the boot loader can take control of
the boot process. If you install it in the MBR, when your machine boots,
GRUB presents a boot prompt. You can then boot Red Hat Enterprise Linux
or any other operating system that you have configured the boot loader
to boot.
The first sector of your boot partition — This is recommended if
you are already using another boot loader on your system. In this case,
your other boot loader takes control first. You can then configure that
boot loader to start GRUB, which then boots Red Hat Enterprise Linux.
If you install GRUB as a secondary boot loader, you must
reconfigure your primary boot loader whenever you install and boot from a
new kernel. The kernel of an operating system such as Microsoft Windows
does not boot in the same fashion. Most users therefore use GRUB as the
primary boot loader on dual-boot systems.
If you have a RAID card, be aware that some BIOSes do not support
booting from the RAID card. In cases such as these, the boot loader should not be installed on the MBR of the RAID array. Rather, the boot loader should be installed on the MBR of the same drive as the /boot/ partition was created.
If your system only uses Red Hat Enterprise Linux, you should choose the MBR.
Click the Change Drive Order
button if you would like to rearrange the drive order or if your BIOS
does not return the correct drive order. Changing the drive order may be
useful if you have multiple SCSI adapters, or both SCSI and IDE
adapters, and you want to boot from the SCSI device.
While partitioning your hard drive, keep in mind that the BIOS in some
older systems cannot access more than the first 1024 cylinders on a
hard drive. If this is the case, leave enough room for the /boot
Linux partition on the first 1024 cylinders of your hard drive to boot
Linux. The other Linux partitions can be after cylinder 1024.
In parted, 1024 cylinders equals 528MB. For more information, refer to:
http://www.pcguide.com/ref/hdd/bios/sizeMB504-c.html
Rescue mode provides the ability to boot a small Red Hat Enterprise
Linux environment entirely from boot media or some other boot method
instead of the system's hard drive. There may be times when you are
unable to get Red Hat Enterprise Linux running completely enough to
access files on your system's hard drive. Using rescue mode, you can
access the files stored on your system's hard drive, even if you cannot
actually run Red Hat Enterprise Linux from that hard drive. If you need
to use rescue mode, try the following method:
Boot an x86, AMD64, or Intel 64 system from any installation medium, such as CD, DVD, USB, or PXE, and type
linux rescue at the installation boot prompt. Refer to
Chapter 36, Basic System Recovery for a more complete description of rescue mode.
For additional information, refer to the Red Hat Enterprise Linux Deployment Guide.
9.16.3. Alternative Boot Loaders
GRUB is the default
bootloader for Red Hat Enterprise Linux, but is not the only choice. A
variety of open-source and proprietary alternatives to GRUB are available to load Red Hat Enterprise Linux, including LILO, SYSLINUX, and Acronis Disk Director Suite.
Red Hat does not support third-party boot loaders.
9.17. Package Group Selection
Now that you have made most of the choices for your installation, you
are ready to confirm the default package selection or customize packages
for your system.
The Package Installation Defaults
screen appears and details the default package set for your Red Hat
Enterprise Linux installation. This screen varies depending on the
version of Red Hat Enterprise Linux you are installing.
If you install Red Hat Enterprise Linux in text mode, you cannot make
package selections. The installer automatically selects packages only
from the base and core groups. These packages are sufficient to ensure
that the system is operational at the end of the installation process,
ready to install updates and new packages. To change the package
selection, complete the installation, then use the Add/Remove Software application to make desired changes.
By default, the Red Hat Enterprise Linux installation process loads a
selection of software that is suitable for a system deployed as a basic
server. Note that this installation does not include a graphical
environment. To include a selection of software suitable for other
roles, click the radio button that corresponds to one of the following
options:
- Basic Server
This option provides a basic installation of Red Hat Enterprise Linux for use on a server.
- Database Server
This option provides the MySQL and PostgreSQL databases.
- Web server
This option provides the Apache web server.
- Desktop
This option provides the OpenOffice.org productivity suite, graphical tools such as the GIMP, and multimedia applications.
- Software Development Workstation
This option provides the necessary tools to compile software on your Red Hat Enterprise Linux system.
- Minimal
This option provides only the packages essential to run Red Hat
Enterprise Linux. A minimal installation provides the basis for a
single-purpose server or desktop appliance and maximizes performance and
security on such an installation.
To customize your package set further, select the Customize now option on the screen. Clicking Next takes you to the Package Group Selection screen.
9.17.1. Installing from Additional Repositories
You can define additional repositories to
increase the software available to your system during installation. A
repository is a network location that stores software packages along
with metadata that describes them. Many of
the software packages used in Red Hat Enterprise Linux require other
software to be installed. The installer uses the metadata to ensure that
these requirements are met for every piece of software you select for
installation.
The basic options are:
The ClusteredStorage repository includes packages for storage clustering using the Red Hat global file system (GFS).
The HighAvailability repository includes packages for high-availability clustering (also known as failover clustering) using the Red Hat High-availability Service Management component.
The LoadBalance repository includes packages for load-balancing clustering using Linux Virtual Server (LVS).
The Red Hat Enterprise Linux 6
repository is automatically selected for you. It contains the complete
collection of software that was released as Red Hat Enterprise
Linux 6, with the various pieces of software in their versions that
were current at the time of release.
To include software from extra repositories, select Add additional software repositories and provide the location of the repository.
To edit an existing software repository location, select the repository in the list and then select Modify repository.
If you change the repository information during a non-network
installation, such as from a Red Hat Enterprise Linux DVD, the installer
prompts you for network configuration information.
If you select Add additional software repositories, the Edit repository dialog appears. Provide a Repository name and the Repository URL for its location.
Once you have located a mirror, to determine the URL to use, find the directory on the mirror that contains a directory named repodata.
Once you provide information for an additional repository, the
installer reads the package metadata over the network. Software that is
specially marked is then included in the package group selection system.
If you choose Back
from the package selection screen, any extra repository data you may
have entered is lost. This allows you to effectively cancel extra
repositories. Currently there is no way to cancel only a single
repository once entered.
9.17.2. Customizing the Software Selection
Your Red Hat Enterprise Linux system automatically supports the
language that you selected at the start of the installation process. To
include support for additional languages, select the package group for
those languages from the Languages category.
Select Customize now to
specify the software packages for your final system in more detail. This
option causes the installation process to display an additional
customization screen when you select Next.
Red Hat Enterprise Linux divides the included software into
package groups. For ease of use, the package selection screen displays these groups as categories.
You can select package groups, which group components together according to function (for example, X Window System and Editors), individual packages, or a combination of the two.
To view the package groups for a category, select the category from the
list on the left. The list on the right displays the package groups for
the currently selected category.
To specify a package group for installation, select the check box next
to the group. The box at the bottom of the screen displays the details
of the package group that is currently highlighted. None of the packages from a group will be installed unless the check box for that group is selected.
If you select a package group, Red Hat Enterprise Linux automatically
installs the base and mandatory packages for that group. To change which
optional packages within a selected group will be installed, select the
Optional Packages button under the description of the group. Then use the check box next to an individual package name to change its selection.
In the package selection list on the right, you can use the context
menu as a shortcut to select or de-select base and mandatory packages or
all optional packages.
After you choose the desired packages, select Next
to proceed. The installer checks your selection, and automatically adds
any extra packages required to use the software you selected. When you
have finished selecting packages, click Close to save your optional package selections and return to the main package selection screen.
The packages that you select are not permanent. After you boot your system, use the Add/Remove Software tool to either install new software or remove installed packages. To run this tool, from the main menu, select → → .
The Red Hat Enterprise Linux software management system downloads the
latest packages from network servers, rather than using those on the
installation discs.
9.17.2.1. Core Network Services
All Red Hat Enterprise Linux installations include the following network services:
centralized logging through syslog
email through SMTP (Simple Mail Transfer Protocol)
network file sharing through NFS (Network File System)
remote access through SSH (Secure SHell)
resource advertising through mDNS (multicast DNS)
The default installation also provides:
network file transfer through HTTP (HyperText Transfer Protocol)
printing through CUPS (Common UNIX Printing System)
remote desktop access through VNC (Virtual Network Computing)
Some automated processes on your Red Hat Enterprise Linux system use
the email service to send reports and messages to the system
administrator. By default, the email, logging, and printing services do
not accept connections from other systems. Red Hat Enterprise Linux
installs the NFS sharing, HTTP, and VNC components without enabling
those services.
You may configure your Red Hat Enterprise Linux system after
installation to offer email, file sharing, logging, printing and remote
desktop access services. The SSH service is enabled by default. You may
use NFS to access files on other systems without enabling the NFS
sharing service.
9.18. Installing Packages
At this point there is nothing left for you to do until all the
packages have been installed. How quickly this happens depends on the
number of packages you have selected and your computer's speed.
Depending on the available resources, you might see the following
progress bar while the installer resolves dependencies of the packages
you selected for installation:
Red Hat Enterprise Linux reports the installation progress on the screen as it writes the selected packages to your system.
For your reference, a complete log of your installation can be found in
/root/install.log once you reboot your system.
After installation completes, select Reboot to restart your computer. Red Hat Enterprise Linux ejects any loaded discs before the computer reboots.
9.19. Installation Complete
Congratulations! Your Red Hat Enterprise Linux installation is now complete!
The installation program prompts you to prepare your system for reboot.
Remember to remove any installation media if it is not ejected
automatically upon reboot.
After your computer's normal power-up sequence has completed, Red Hat
Enterprise Linux loads and starts. By default, the start process is
hidden behind a graphical screen that displays a progress bar.
Eventually, a login: prompt or a GUI login screen (if you installed the X Window System and chose to start X automatically) appears.
The first time you start your Red Hat Enterprise Linux system in run level 5 (the graphical run level), the FirstBoot
tool appears, which guides you through the Red Hat Enterprise Linux
configuration. Using this tool, you can set your system time and date,
install software, register your machine with Red Hat Network, and more. FirstBoot
lets you configure your environment at the beginning, so that you can
get started using your Red Hat Enterprise Linux system quickly.
 The page lists ISO image files.